Chart Guide (2.0.35)
- Bubbles
- Color = surface: green (turf), brown (dirt), blue (synthetic)
- Top number = finishing position; bottom number in parentheses = starting post position
- Height above line = beaten lengths — closer means a smaller margin
- Border = track conditions: green (FST/GD/FM), yellow (WF/SL/YLD), red (SY/MY/FRZ/SFT/HVY)
- Connecting Line
- Solid = good conditions; dashed = bad conditions
- Line Symbol
- ▲ Triangle = sprint (7f or less); ● Circle = route (more than 7f)
- Days Between Races
- Small number above each bubble (e.g. 19d) = days since the previous race — helps spot freshness, layoffs, and tight scheduling.
- Shaded Band (Bollinger)
- Highlights volatility — a wider band means more variation in recent performance
- Performance Trend
- Straight line showing the overall performance direction — angled up = improving, angled down = declining
- Dashed Reference Line
- AI Opponent = AI analysis class-level par for the race
⚠ Concerns:(1) Repeatedly beaten at this class level (3 of last 5 starts). (2) Consider there will be likely pace pressure in this race - multiple E types entered. (3) Poor record at this distance (0 wins from 10 recent starts). (4) Poor record at this track (0 wins from 9 starts). (5) Trip note from last race: Bmp after brk;3-4p trn. (6) 0 wins from 10 starts on dirt in last 10 — repeated failure on today's surface.
Mod1(W): 44 (6/6) Mod2(W): 38 (6/6) Mod3(W): 45 (6/6) Mod1-LS: 55 (4/6) Mod2-LS: 39 (6/6) Mod3-LS: 42 (6/6) Mod4(Form): 39 (6/6) Win Prob: 21.4% Value Score: 2.99 ★ ML: 10.00 (9/1) Overlay %: 5.84 Fair Odds: 6.70 (6/1) O/U: Overlay
Score Definitions
- Mod1(W)
- Winner Model 1 score (0–100) — AI composite rating among field contenders (higher = stronger). The number in parentheses (e.g. 1/9) shows this horse’s rank out of the field size.
- Mod2(W)
- Winner Model 2 score (0–100) — AI rating among field contenders (higher = stronger). The number in parentheses shows rank within the field.
- Mod3(W)
- Winner Model 3 score (0–100) — AI rating among field contenders (higher = stronger). The number in parentheses shows rank within the field.
- Mod1-LS
- Longshot Model 1 score (0–100) — AI model trained to surface high-value longshots. Higher = stronger longshot profile. Rank in parentheses shows position within the field.
- Mod2-LS
- Longshot Model 2 score (0–100) — AI longshot model. Higher = stronger longshot profile.
- Mod3-LS
- Longshot Model 3 score (0–100) — AI longshot model. Higher = stronger longshot profile.
- Mod4(Form)
- Form Model score (0–100) — AI sequence model trained on recent form patterns to capture momentum and trajectory. Higher = stronger recent form profile. Rank in parentheses shows position within the field.
- Win Prob
- LightGBM estimated win probability expressed as a percentage. This is a raw model output, not normalized to sum to 100% across the field — use it for comparison rather than as an absolute probability.
- Value Score
- Win Prob divided by the market-implied probability (derived from morning line). Values above 1.0 mean the model sees more win chance than the odds imply — a ★ star appears when Value Score ≥ 1.3, indicating a 30%+ model edge over the market.
- ML
- Morning line odds set by the track handicapper before wagering opens
- Overlay %
- How much the fair odds exceed the morning line, expressed as a percentage — positive values indicate value
- Fair Odds
- Model-derived fair-value odds based on estimated win probability
- O/U
- Overlay or Underlay — whether the horse offers value (O) or is overbet (U) relative to fair odds
Lane Bias Guide
- Bar Direction
- Bars above the line = more favorable lane • Bars below = less favorable, relative to the average at this track.
- Color
- Green = above-average advantage • Yellow = near-average • Red = below-average • Blue = this horse’s lane.
- Bias Score
- Derived from weighted average finishing positions across historical races at this track. Shown in the tooltip on hover. To use the bias score, calculate your handicap for the horse (e.g. finish position), then add (detrimental bias) or subtract (favorable bias) the bias score.
- Races
- Number of historical races used to compute each lane’s bias score.
Race Pace Bias Guide
- Bar Height & Direction
- Positive (green) = pace favors this horse • Negative (red) = pace works against this horse • Near-zero (amber) = neutral.
- Race Shape
- Projected race shape based on running styles of all horses (e.g. EE = two early horses, EP = one early presser).
- Pace Category
- FAST = contested early pace • LONE EARLY = one speed horse controlling pace • HONEST = moderate early pressure • SLOW = closers’ race.
- Flag (★)
- A star above the bar means this horse’s pace bias figure is ≥ 1.5 — a meaningful pace advantage or disadvantage.
Total Pace Guide
- Bar Segments
- Green = Early Pace (E1) • Amber = Mid Pace (E2) • Red = Late Pace (LP)
- Bar Height
- Total height = sum of E1 + E2 + LP average pace figures. Taller bars indicate a faster-paced horse overall.
- Grades & Rankings
- Hover to see each horse’s letter grade and ranking vs. other horses in this race (e.g. 2/9 = 2nd best of 9).
- Border
- Thicker border = this horse’s post position.
Performance vs. Peers Guide
- Bars (per post)
- Blue = avg career performance • Amber = avg last 3 races • Green = last race (improved vs. avg) • Red = last race (declined vs. avg)
- Trend Line
- Angled line above the bars: rising = improving form • falling = declining form.
- Horizontal Line
- Field average — the mean career performance of all horses in this race.
- Color Circles
- Standard post-position colors below each lane — same as the Total Pace chart.
- Border
- Thicker border = this horse’s post position.
Figure Comparison
- Rating
- The three Pick Pony algorithm ratings (Algo 1, Algo 2, Algo 3) that make up the overall PP AI Rating — higher is a stronger contender rating.
- Speed
- Career average speed, recent 3-race average, and last-race speed figure — spot horses in improving or declining form.
- Pace
- Average Early (E1), Mid (E2), and Stretch (LP) pace figures — reveals pace-setters vs. closers vs. all-the-way types.
- This horse
- The horse whose stats card is open is highlighted with a darker column background.
Winning Profiles
- Axes
- X: Win % from last 10 starts — Y: In-the-money % (top-3 finishes) from last 10 starts.
- Quadrants
- Consistent Winners (top-right): high win & ITM — reliable performers.
Place Threats (top-left): boards often but doesn’t win often — good exacta/trifecta angles.
Streaky (bottom-right): wins occasionally, misses the board often — all-or-nothing.
Developing (bottom-left): still finding form — longshot territory. - Reference Lines
- Dashed lines mark field averages. Dots to the right win more; dots higher board more.
- This horse
- Highlighted with a gold border and larger dot.
AI Model Comparison
- Winner Models (green)
- Mod1(W), Mod2(W), and Mod3(W) trained to predict race winners. Higher score = stronger contender.
- Longshot Models (red)
- Mod1-LS, Mod2-LS, and Mod3-LS trained to find high-value longshots. Higher score = stronger longshot candidate.
- Form Model (blue)
- Mod4 sequence model trained on recent form patterns. Higher score = stronger recent form profile.
- This horse
- Highlighted with a darker column background.
Race Pace Simulation Guide
- Slider
- Drag left→right to advance from gate to finish. Drag all the way back to reset the race.
- Predicted Finish Order
- Factors in contested pace burn, each horse’s effort curve (peaked-early vs. peaked-late), and wide trip cost from outside posts. Updated live when Track Bias changes.
- Pace Scenario
- Lone Speed: single E horse likely rates and holds. Contested: two E horses burn each other — closers benefit. Hot Pace: speed meltdown, deep closers thrive. Soft: no early speed, moderate fractions throughout.
- Track Bias
- Slider below canvas. −2 = strong closer/wet bias; +2 = strong speed/rail bias. Recomputes the predicted finish order.
- Boxed Indicator
- Dashed orange ring = horse is surrounded (rival ahead, rival behind, wall outside). In a real race this horse must find a clear path to run.
- Running Styles
- E/EE = early speed (rushes to rail). P = presser (stalks the pace). S = stalker. SS = slow starter / closer.
| Stat | vs. Current Card | vs. All Horses |
|---|---|---|
| Averages
Career-average metrics across all AI race analysis. Performance and pace averages reflect estimated historical performance; trainer and jockey grades score in-the-money percentages. Grading scale: A = elite • B = above average • C = average • D = below average • F = poor • — = no data |
||
| Pick Pony AI Rating | C | C |
| Pace Trip Longshot | — | — |
| Connections Longshot | — | — |
| Situational Longshot | — | — |
| Speed | C | D |
| Early Pace | C | D |
| Mid Pace | C | D |
| Late Pace | D | D |
| Finish Pos | B | F |
| Dirt Speed | C | C |
| Turf Speed | D | D |
| Distance Speed | C | C |
| Trainer Effectiveness | C | D |
| Jockey Effectiveness | D | D |
| 3rd Party Ratings | C | D |
| Recent
Performance analysis from the horse's recent races, weighted to reflect current form. Sprint and Route FPS (Foot Per Second) measure pace efficiency over the horse's recent sprints and routes respectively. Grading scale: A = elite • B = above average • C = average • D = below average • F = poor • — = no data |
||
| Speed | D | D |
| Early Pace | C | C |
| Mid Pace | C | C |
| Late Pace | C | C |
| Sprint FPS | C | C |
| Route FPS | C | C |
| Trainer Effectiveness | C | D |
| Jockey Effectiveness | D | D |
| 3rd Party Ratings | C | D |
| Predictions
AI-generated projections for the upcoming race, derived from prior AI analysis for speed and pace trends, surface and distance suitability, and current conditions. Grading scale: A = elite • B = above average • C = average • D = below average • F = poor • — = no data |
||
| Speed | C | D |
| Early Pace | C | C |
| Mid Pace | B | C |
| Late Pace | C | C |
Chart Guide (2.0.35)
- Bubbles
- Color = surface: green (turf), brown (dirt), blue (synthetic)
- Top number = finishing position; bottom number in parentheses = starting post position
- Height above line = beaten lengths — closer means a smaller margin
- Border = track conditions: green (FST/GD/FM), yellow (WF/SL/YLD), red (SY/MY/FRZ/SFT/HVY)
- Connecting Line
- Solid = good conditions; dashed = bad conditions
- Line Symbol
- ▲ Triangle = sprint (7f or less); ● Circle = route (more than 7f)
- Days Between Races
- Small number above each bubble (e.g. 19d) = days since the previous race — helps spot freshness, layoffs, and tight scheduling.
- Shaded Band (Bollinger)
- Highlights volatility — a wider band means more variation in recent performance
- Performance Trend
- Straight line showing the overall performance direction — angled up = improving, angled down = declining
- Dashed Reference Line
- AI Opponent = AI analysis class-level par for the race
✓ Positives:(1) Dropping in class today ($20,000 → $12,500). (2) Speed average (75) well above field median (65). (3) Hot trainer - high ITM rate (54%). (4) Strong trainer/jockey combo - 35 wins from 128 starts (27%). (5) Hot jockey — high ITM rate (48%). (6) Early pace significantly above field median (E1: 88 vs field 77). (7) Career-best figure (87) buried in races 4–10 back — 22 pts above race median and 15 pts above recent form — market has forgotten the peak effort. (8) Pick Pony Daily Edge Radar pick — value score 10/10 — angles: Class Superiority, Hot Trainer-Jockey Pairing, Hot Trainer, Hot Jockey, Hidden Figure, Early Speed Edge, Class Drop.
⚠ Concerns:(1) Consider there will be likely pace pressure in this race - multiple E types entered. (2) Poor record at this distance (0 wins from 5 recent starts). (3) Poor record at this track (0 wins from 5 starts). (4) Trip note from last race: Dropped back rail turn. (5) 0 wins from 6 starts on dirt in last 10 — repeated failure on today's surface.
Mod1(W): 100 (1/6) Mod2(W): 100 (1/6) Mod3(W): 100 (1/6) Mod1-LS: 100 (1/6) Mod2-LS: 100 (1/6) Mod3-LS: 100 (1/6) Mod4(Form): 98 (2/6) Win Prob: 79% Value Score: 3.01 ★ ML: 2.00 (1/1) Overlay %: -7.92 Fair Odds: 4.46 (7/2) O/U: Underlay
Score Definitions
- Mod1(W)
- Winner Model 1 score (0–100) — AI composite rating among field contenders (higher = stronger). The number in parentheses (e.g. 1/9) shows this horse’s rank out of the field size.
- Mod2(W)
- Winner Model 2 score (0–100) — AI rating among field contenders (higher = stronger). The number in parentheses shows rank within the field.
- Mod3(W)
- Winner Model 3 score (0–100) — AI rating among field contenders (higher = stronger). The number in parentheses shows rank within the field.
- Mod1-LS
- Longshot Model 1 score (0–100) — AI model trained to surface high-value longshots. Higher = stronger longshot profile. Rank in parentheses shows position within the field.
- Mod2-LS
- Longshot Model 2 score (0–100) — AI longshot model. Higher = stronger longshot profile.
- Mod3-LS
- Longshot Model 3 score (0–100) — AI longshot model. Higher = stronger longshot profile.
- Mod4(Form)
- Form Model score (0–100) — AI sequence model trained on recent form patterns to capture momentum and trajectory. Higher = stronger recent form profile. Rank in parentheses shows position within the field.
- Win Prob
- LightGBM estimated win probability expressed as a percentage. This is a raw model output, not normalized to sum to 100% across the field — use it for comparison rather than as an absolute probability.
- Value Score
- Win Prob divided by the market-implied probability (derived from morning line). Values above 1.0 mean the model sees more win chance than the odds imply — a ★ star appears when Value Score ≥ 1.3, indicating a 30%+ model edge over the market.
- ML
- Morning line odds set by the track handicapper before wagering opens
- Overlay %
- How much the fair odds exceed the morning line, expressed as a percentage — positive values indicate value
- Fair Odds
- Model-derived fair-value odds based on estimated win probability
- O/U
- Overlay or Underlay — whether the horse offers value (O) or is overbet (U) relative to fair odds
Lane Bias Guide
- Bar Direction
- Bars above the line = more favorable lane • Bars below = less favorable, relative to the average at this track.
- Color
- Green = above-average advantage • Yellow = near-average • Red = below-average • Blue = this horse’s lane.
- Bias Score
- Derived from weighted average finishing positions across historical races at this track. Shown in the tooltip on hover. To use the bias score, calculate your handicap for the horse (e.g. finish position), then add (detrimental bias) or subtract (favorable bias) the bias score.
- Races
- Number of historical races used to compute each lane’s bias score.
Race Pace Bias Guide
- Bar Height & Direction
- Positive (green) = pace favors this horse • Negative (red) = pace works against this horse • Near-zero (amber) = neutral.
- Race Shape
- Projected race shape based on running styles of all horses (e.g. EE = two early horses, EP = one early presser).
- Pace Category
- FAST = contested early pace • LONE EARLY = one speed horse controlling pace • HONEST = moderate early pressure • SLOW = closers’ race.
- Flag (★)
- A star above the bar means this horse’s pace bias figure is ≥ 1.5 — a meaningful pace advantage or disadvantage.
Total Pace Guide
- Bar Segments
- Green = Early Pace (E1) • Amber = Mid Pace (E2) • Red = Late Pace (LP)
- Bar Height
- Total height = sum of E1 + E2 + LP average pace figures. Taller bars indicate a faster-paced horse overall.
- Grades & Rankings
- Hover to see each horse’s letter grade and ranking vs. other horses in this race (e.g. 2/9 = 2nd best of 9).
- Border
- Thicker border = this horse’s post position.
Performance vs. Peers Guide
- Bars (per post)
- Blue = avg career performance • Amber = avg last 3 races • Green = last race (improved vs. avg) • Red = last race (declined vs. avg)
- Trend Line
- Angled line above the bars: rising = improving form • falling = declining form.
- Horizontal Line
- Field average — the mean career performance of all horses in this race.
- Color Circles
- Standard post-position colors below each lane — same as the Total Pace chart.
- Border
- Thicker border = this horse’s post position.
Figure Comparison
- Rating
- The three Pick Pony algorithm ratings (Algo 1, Algo 2, Algo 3) that make up the overall PP AI Rating — higher is a stronger contender rating.
- Speed
- Career average speed, recent 3-race average, and last-race speed figure — spot horses in improving or declining form.
- Pace
- Average Early (E1), Mid (E2), and Stretch (LP) pace figures — reveals pace-setters vs. closers vs. all-the-way types.
- This horse
- The horse whose stats card is open is highlighted with a darker column background.
Winning Profiles
- Axes
- X: Win % from last 10 starts — Y: In-the-money % (top-3 finishes) from last 10 starts.
- Quadrants
- Consistent Winners (top-right): high win & ITM — reliable performers.
Place Threats (top-left): boards often but doesn’t win often — good exacta/trifecta angles.
Streaky (bottom-right): wins occasionally, misses the board often — all-or-nothing.
Developing (bottom-left): still finding form — longshot territory. - Reference Lines
- Dashed lines mark field averages. Dots to the right win more; dots higher board more.
- This horse
- Highlighted with a gold border and larger dot.
AI Model Comparison
- Winner Models (green)
- Mod1(W), Mod2(W), and Mod3(W) trained to predict race winners. Higher score = stronger contender.
- Longshot Models (red)
- Mod1-LS, Mod2-LS, and Mod3-LS trained to find high-value longshots. Higher score = stronger longshot candidate.
- Form Model (blue)
- Mod4 sequence model trained on recent form patterns. Higher score = stronger recent form profile.
- This horse
- Highlighted with a darker column background.
Race Pace Simulation Guide
- Slider
- Drag left→right to advance from gate to finish. Drag all the way back to reset the race.
- Predicted Finish Order
- Factors in contested pace burn, each horse’s effort curve (peaked-early vs. peaked-late), and wide trip cost from outside posts. Updated live when Track Bias changes.
- Pace Scenario
- Lone Speed: single E horse likely rates and holds. Contested: two E horses burn each other — closers benefit. Hot Pace: speed meltdown, deep closers thrive. Soft: no early speed, moderate fractions throughout.
- Track Bias
- Slider below canvas. −2 = strong closer/wet bias; +2 = strong speed/rail bias. Recomputes the predicted finish order.
- Boxed Indicator
- Dashed orange ring = horse is surrounded (rival ahead, rival behind, wall outside). In a real race this horse must find a clear path to run.
- Running Styles
- E/EE = early speed (rushes to rail). P = presser (stalks the pace). S = stalker. SS = slow starter / closer.
| Stat | vs. Current Card | vs. All Horses |
|---|---|---|
| Averages
Career-average metrics across all AI race analysis. Performance and pace averages reflect estimated historical performance; trainer and jockey grades score in-the-money percentages. Grading scale: A = elite • B = above average • C = average • D = below average • F = poor • — = no data |
||
| Pick Pony AI Rating | A | A |
| Pace Trip Longshot | — | — |
| Connections Longshot | — | — |
| Situational Longshot | — | — |
| Speed | A | B |
| Early Pace | A | A |
| Mid Pace | A | A |
| Late Pace | A | B |
| Finish Pos | A | C |
| Dirt Speed | A | B |
| Turf Speed | A | A |
| Distance Speed | B | C |
| Trainer Effectiveness | A | A |
| Jockey Effectiveness | B | A |
| 3rd Party Ratings | A | C |
| Recent
Performance analysis from the horse's recent races, weighted to reflect current form. Sprint and Route FPS (Foot Per Second) measure pace efficiency over the horse's recent sprints and routes respectively. Grading scale: A = elite • B = above average • C = average • D = below average • F = poor • — = no data |
||
| Speed | C | C |
| Early Pace | A | B |
| Mid Pace | A | B |
| Late Pace | D | D |
| Sprint FPS | A | B |
| Route FPS | B | C |
| Trainer Effectiveness | A | A |
| Jockey Effectiveness | B | A |
| 3rd Party Ratings | A | C |
| Predictions
AI-generated projections for the upcoming race, derived from prior AI analysis for speed and pace trends, surface and distance suitability, and current conditions. Grading scale: A = elite • B = above average • C = average • D = below average • F = poor • — = no data |
||
| Speed | A | B |
| Early Pace | A | A |
| Mid Pace | A | A |
| Late Pace | C | C |
Chart Guide (2.0.35)
- Bubbles
- Color = surface: green (turf), brown (dirt), blue (synthetic)
- Top number = finishing position; bottom number in parentheses = starting post position
- Height above line = beaten lengths — closer means a smaller margin
- Border = track conditions: green (FST/GD/FM), yellow (WF/SL/YLD), red (SY/MY/FRZ/SFT/HVY)
- Connecting Line
- Solid = good conditions; dashed = bad conditions
- Line Symbol
- ▲ Triangle = sprint (7f or less); ● Circle = route (more than 7f)
- Days Between Races
- Small number above each bubble (e.g. 19d) = days since the previous race — helps spot freshness, layoffs, and tight scheduling.
- Shaded Band (Bollinger)
- Highlights volatility — a wider band means more variation in recent performance
- Performance Trend
- Straight line showing the overall performance direction — angled up = improving, angled down = declining
- Dashed Reference Line
- AI Opponent = AI analysis class-level par for the race
✓ Positives:(1) Returning from 71-day layoff with a recent workout. (2) Dropping in class today ($30,000 → $12,500). (3) Speed average (71) well above field median (65). (4) Hot trainer - high ITM rate (54%). (5) Career-best speed figure (78) recorded in last 1-2 starts — peaking form. (6) Hot jockey — high ITM rate (50%). (7) Strong speed 2 back (78), modest dip last out (73) — form reversal angle, ready to bounce back to top form. (8) Early pace significantly above field median (E1: 84 vs field 77). (9) Dropping in class ($12,500 vs last $30,000) after a 71-day freshening — trainer setup-for-win angle. (10) Averages 74.0 speed pts in today's distance/surface configuration vs 66.5 in other configs (3 qualifying starts) — returning to ideal setup. (11) Pick Pony Daily Edge Radar pick — value score 10/10 — angles: Class Superiority, Career-Best Recent Figure, Class Drop After Rest, Hot Trainer, Hot Jockey, Return to Proven Setup, Early Speed Edge, Form Reversal, Class Drop.
⚠ Concerns:(1) Has not raced in 71 days. (2) Finish positions worsening over last 4 starts. (3) Consider there will be likely pace pressure in this race - multiple E types entered. (4) Moving from a sprint to a route today. (5) Poor record at this track (0 wins from 5 starts). (6) Trip note from last race: 5w upper; improved. (7) 0 wins from 5 starts on dirt in last 10 — repeated failure on today's surface.
Mod1(W): 99 (2/6) Mod2(W): 98 (2/6) Mod3(W): 95 (2/6) Mod1-LS: 100 (2/6) Mod2-LS: 97 (2/6) Mod3-LS: 95 (2/6) Mod4(Form): 100 (1/6) Win Prob: 78.5% Value Score: 2.79 ★ ML: 1.80 (4/5) Overlay %: -10.38 Fair Odds: 4.65 (7/2) O/U: Underlay
Score Definitions
- Mod1(W)
- Winner Model 1 score (0–100) — AI composite rating among field contenders (higher = stronger). The number in parentheses (e.g. 1/9) shows this horse’s rank out of the field size.
- Mod2(W)
- Winner Model 2 score (0–100) — AI rating among field contenders (higher = stronger). The number in parentheses shows rank within the field.
- Mod3(W)
- Winner Model 3 score (0–100) — AI rating among field contenders (higher = stronger). The number in parentheses shows rank within the field.
- Mod1-LS
- Longshot Model 1 score (0–100) — AI model trained to surface high-value longshots. Higher = stronger longshot profile. Rank in parentheses shows position within the field.
- Mod2-LS
- Longshot Model 2 score (0–100) — AI longshot model. Higher = stronger longshot profile.
- Mod3-LS
- Longshot Model 3 score (0–100) — AI longshot model. Higher = stronger longshot profile.
- Mod4(Form)
- Form Model score (0–100) — AI sequence model trained on recent form patterns to capture momentum and trajectory. Higher = stronger recent form profile. Rank in parentheses shows position within the field.
- Win Prob
- LightGBM estimated win probability expressed as a percentage. This is a raw model output, not normalized to sum to 100% across the field — use it for comparison rather than as an absolute probability.
- Value Score
- Win Prob divided by the market-implied probability (derived from morning line). Values above 1.0 mean the model sees more win chance than the odds imply — a ★ star appears when Value Score ≥ 1.3, indicating a 30%+ model edge over the market.
- ML
- Morning line odds set by the track handicapper before wagering opens
- Overlay %
- How much the fair odds exceed the morning line, expressed as a percentage — positive values indicate value
- Fair Odds
- Model-derived fair-value odds based on estimated win probability
- O/U
- Overlay or Underlay — whether the horse offers value (O) or is overbet (U) relative to fair odds
Lane Bias Guide
- Bar Direction
- Bars above the line = more favorable lane • Bars below = less favorable, relative to the average at this track.
- Color
- Green = above-average advantage • Yellow = near-average • Red = below-average • Blue = this horse’s lane.
- Bias Score
- Derived from weighted average finishing positions across historical races at this track. Shown in the tooltip on hover. To use the bias score, calculate your handicap for the horse (e.g. finish position), then add (detrimental bias) or subtract (favorable bias) the bias score.
- Races
- Number of historical races used to compute each lane’s bias score.
Race Pace Bias Guide
- Bar Height & Direction
- Positive (green) = pace favors this horse • Negative (red) = pace works against this horse • Near-zero (amber) = neutral.
- Race Shape
- Projected race shape based on running styles of all horses (e.g. EE = two early horses, EP = one early presser).
- Pace Category
- FAST = contested early pace • LONE EARLY = one speed horse controlling pace • HONEST = moderate early pressure • SLOW = closers’ race.
- Flag (★)
- A star above the bar means this horse’s pace bias figure is ≥ 1.5 — a meaningful pace advantage or disadvantage.
Total Pace Guide
- Bar Segments
- Green = Early Pace (E1) • Amber = Mid Pace (E2) • Red = Late Pace (LP)
- Bar Height
- Total height = sum of E1 + E2 + LP average pace figures. Taller bars indicate a faster-paced horse overall.
- Grades & Rankings
- Hover to see each horse’s letter grade and ranking vs. other horses in this race (e.g. 2/9 = 2nd best of 9).
- Border
- Thicker border = this horse’s post position.
Performance vs. Peers Guide
- Bars (per post)
- Blue = avg career performance • Amber = avg last 3 races • Green = last race (improved vs. avg) • Red = last race (declined vs. avg)
- Trend Line
- Angled line above the bars: rising = improving form • falling = declining form.
- Horizontal Line
- Field average — the mean career performance of all horses in this race.
- Color Circles
- Standard post-position colors below each lane — same as the Total Pace chart.
- Border
- Thicker border = this horse’s post position.
Figure Comparison
- Rating
- The three Pick Pony algorithm ratings (Algo 1, Algo 2, Algo 3) that make up the overall PP AI Rating — higher is a stronger contender rating.
- Speed
- Career average speed, recent 3-race average, and last-race speed figure — spot horses in improving or declining form.
- Pace
- Average Early (E1), Mid (E2), and Stretch (LP) pace figures — reveals pace-setters vs. closers vs. all-the-way types.
- This horse
- The horse whose stats card is open is highlighted with a darker column background.
Winning Profiles
- Axes
- X: Win % from last 10 starts — Y: In-the-money % (top-3 finishes) from last 10 starts.
- Quadrants
- Consistent Winners (top-right): high win & ITM — reliable performers.
Place Threats (top-left): boards often but doesn’t win often — good exacta/trifecta angles.
Streaky (bottom-right): wins occasionally, misses the board often — all-or-nothing.
Developing (bottom-left): still finding form — longshot territory. - Reference Lines
- Dashed lines mark field averages. Dots to the right win more; dots higher board more.
- This horse
- Highlighted with a gold border and larger dot.
AI Model Comparison
- Winner Models (green)
- Mod1(W), Mod2(W), and Mod3(W) trained to predict race winners. Higher score = stronger contender.
- Longshot Models (red)
- Mod1-LS, Mod2-LS, and Mod3-LS trained to find high-value longshots. Higher score = stronger longshot candidate.
- Form Model (blue)
- Mod4 sequence model trained on recent form patterns. Higher score = stronger recent form profile.
- This horse
- Highlighted with a darker column background.
Race Pace Simulation Guide
- Slider
- Drag left→right to advance from gate to finish. Drag all the way back to reset the race.
- Predicted Finish Order
- Factors in contested pace burn, each horse’s effort curve (peaked-early vs. peaked-late), and wide trip cost from outside posts. Updated live when Track Bias changes.
- Pace Scenario
- Lone Speed: single E horse likely rates and holds. Contested: two E horses burn each other — closers benefit. Hot Pace: speed meltdown, deep closers thrive. Soft: no early speed, moderate fractions throughout.
- Track Bias
- Slider below canvas. −2 = strong closer/wet bias; +2 = strong speed/rail bias. Recomputes the predicted finish order.
- Boxed Indicator
- Dashed orange ring = horse is surrounded (rival ahead, rival behind, wall outside). In a real race this horse must find a clear path to run.
- Running Styles
- E/EE = early speed (rushes to rail). P = presser (stalks the pace). S = stalker. SS = slow starter / closer.
| Stat | vs. Current Card | vs. All Horses |
|---|---|---|
| Averages
Career-average metrics across all AI race analysis. Performance and pace averages reflect estimated historical performance; trainer and jockey grades score in-the-money percentages. Grading scale: A = elite • B = above average • C = average • D = below average • F = poor • — = no data |
||
| Pick Pony AI Rating | A | B |
| Pace Trip Longshot | — | — |
| Connections Longshot | — | — |
| Situational Longshot | — | — |
| Speed | A | C |
| Early Pace | A | B |
| Mid Pace | A | B |
| Late Pace | B | C |
| Finish Pos | A | D |
| Dirt Speed | B | B |
| Turf Speed | D | D |
| Distance Speed | A | B |
| Trainer Effectiveness | A | A |
| Jockey Effectiveness | A | A |
| 3rd Party Ratings | A | B |
| Recent
Performance analysis from the horse's recent races, weighted to reflect current form. Sprint and Route FPS (Foot Per Second) measure pace efficiency over the horse's recent sprints and routes respectively. Grading scale: A = elite • B = above average • C = average • D = below average • F = poor • — = no data |
||
| Speed | A | B |
| Early Pace | B | C |
| Mid Pace | A | B |
| Late Pace | B | B |
| Sprint FPS | B | B |
| Route FPS | A | B |
| Trainer Effectiveness | A | A |
| Jockey Effectiveness | A | A |
| 3rd Party Ratings | A | B |
| Predictions
AI-generated projections for the upcoming race, derived from prior AI analysis for speed and pace trends, surface and distance suitability, and current conditions. Grading scale: A = elite • B = above average • C = average • D = below average • F = poor • — = no data |
||
| Speed | A | C |
| Early Pace | A | B |
| Mid Pace | A | B |
| Late Pace | C | C |
Chart Guide (2.0.35)
- Bubbles
- Color = surface: green (turf), brown (dirt), blue (synthetic)
- Top number = finishing position; bottom number in parentheses = starting post position
- Height above line = beaten lengths — closer means a smaller margin
- Border = track conditions: green (FST/GD/FM), yellow (WF/SL/YLD), red (SY/MY/FRZ/SFT/HVY)
- Connecting Line
- Solid = good conditions; dashed = bad conditions
- Line Symbol
- ▲ Triangle = sprint (7f or less); ● Circle = route (more than 7f)
- Days Between Races
- Small number above each bubble (e.g. 19d) = days since the previous race — helps spot freshness, layoffs, and tight scheduling.
- Shaded Band (Bollinger)
- Highlights volatility — a wider band means more variation in recent performance
- Performance Trend
- Straight line showing the overall performance direction — angled up = improving, angled down = declining
- Dashed Reference Line
- AI Opponent = AI analysis class-level par for the race
✓ Positives:(1) Hot trainer - high ITM rate (43%). (2) Career-best speed figure (69) recorded in last 1-2 starts — peaking form. (3) Hot jockey — high ITM rate (42%). (4) Late pace significantly above field median (LP: 77 vs field 72). (5) Closer/presser in a race with pace pressure — ideal race setup for late runners. (6) Fourth race back from a 66-day layoff — often the peak fitness race. (7) Had documented trouble last race (codes: ['D', 'S', 'T']) yet still finished 3rd — a clean trip today sets up a form reversal. (8) Pick Pony Daily Edge Radar pick — value score 7/10 — angles: Career-Best Recent Figure, Closer in Pace Duel, Hot Trainer, Troubled Trip Comeback, Late Kick Advantage, Classic Fourth Race Pattern.
⚠ Concerns:(1) Consider there will be likely pace pressure in this race - multiple E types entered. (2) Poor record at this track (0 wins from 6 starts). (3) Trip note from last race: 5path trn;came in;chsd. (4) 0 wins from 6 starts on dirt in last 10 — repeated failure on today's surface.
Mod1(W): 84 (3/6) Mod2(W): 67 (3/6) Mod3(W): 72 (3/6) Mod1-LS: 7 (5/6) Mod2-LS: 67 (3/6) Mod3-LS: 44 (5/6) Mod4(Form): 79 (3/6) Win Prob: 56.8% Value Score: 3.61 ★ ML: 4.00 (3/1) Overlay %: 0.30 Fair Odds: 5.24 (4/1) O/U: Fair
Score Definitions
- Mod1(W)
- Winner Model 1 score (0–100) — AI composite rating among field contenders (higher = stronger). The number in parentheses (e.g. 1/9) shows this horse’s rank out of the field size.
- Mod2(W)
- Winner Model 2 score (0–100) — AI rating among field contenders (higher = stronger). The number in parentheses shows rank within the field.
- Mod3(W)
- Winner Model 3 score (0–100) — AI rating among field contenders (higher = stronger). The number in parentheses shows rank within the field.
- Mod1-LS
- Longshot Model 1 score (0–100) — AI model trained to surface high-value longshots. Higher = stronger longshot profile. Rank in parentheses shows position within the field.
- Mod2-LS
- Longshot Model 2 score (0–100) — AI longshot model. Higher = stronger longshot profile.
- Mod3-LS
- Longshot Model 3 score (0–100) — AI longshot model. Higher = stronger longshot profile.
- Mod4(Form)
- Form Model score (0–100) — AI sequence model trained on recent form patterns to capture momentum and trajectory. Higher = stronger recent form profile. Rank in parentheses shows position within the field.
- Win Prob
- LightGBM estimated win probability expressed as a percentage. This is a raw model output, not normalized to sum to 100% across the field — use it for comparison rather than as an absolute probability.
- Value Score
- Win Prob divided by the market-implied probability (derived from morning line). Values above 1.0 mean the model sees more win chance than the odds imply — a ★ star appears when Value Score ≥ 1.3, indicating a 30%+ model edge over the market.
- ML
- Morning line odds set by the track handicapper before wagering opens
- Overlay %
- How much the fair odds exceed the morning line, expressed as a percentage — positive values indicate value
- Fair Odds
- Model-derived fair-value odds based on estimated win probability
- O/U
- Overlay or Underlay — whether the horse offers value (O) or is overbet (U) relative to fair odds
Lane Bias Guide
- Bar Direction
- Bars above the line = more favorable lane • Bars below = less favorable, relative to the average at this track.
- Color
- Green = above-average advantage • Yellow = near-average • Red = below-average • Blue = this horse’s lane.
- Bias Score
- Derived from weighted average finishing positions across historical races at this track. Shown in the tooltip on hover. To use the bias score, calculate your handicap for the horse (e.g. finish position), then add (detrimental bias) or subtract (favorable bias) the bias score.
- Races
- Number of historical races used to compute each lane’s bias score.
Race Pace Bias Guide
- Bar Height & Direction
- Positive (green) = pace favors this horse • Negative (red) = pace works against this horse • Near-zero (amber) = neutral.
- Race Shape
- Projected race shape based on running styles of all horses (e.g. EE = two early horses, EP = one early presser).
- Pace Category
- FAST = contested early pace • LONE EARLY = one speed horse controlling pace • HONEST = moderate early pressure • SLOW = closers’ race.
- Flag (★)
- A star above the bar means this horse’s pace bias figure is ≥ 1.5 — a meaningful pace advantage or disadvantage.
Total Pace Guide
- Bar Segments
- Green = Early Pace (E1) • Amber = Mid Pace (E2) • Red = Late Pace (LP)
- Bar Height
- Total height = sum of E1 + E2 + LP average pace figures. Taller bars indicate a faster-paced horse overall.
- Grades & Rankings
- Hover to see each horse’s letter grade and ranking vs. other horses in this race (e.g. 2/9 = 2nd best of 9).
- Border
- Thicker border = this horse’s post position.
Performance vs. Peers Guide
- Bars (per post)
- Blue = avg career performance • Amber = avg last 3 races • Green = last race (improved vs. avg) • Red = last race (declined vs. avg)
- Trend Line
- Angled line above the bars: rising = improving form • falling = declining form.
- Horizontal Line
- Field average — the mean career performance of all horses in this race.
- Color Circles
- Standard post-position colors below each lane — same as the Total Pace chart.
- Border
- Thicker border = this horse’s post position.
Figure Comparison
- Rating
- The three Pick Pony algorithm ratings (Algo 1, Algo 2, Algo 3) that make up the overall PP AI Rating — higher is a stronger contender rating.
- Speed
- Career average speed, recent 3-race average, and last-race speed figure — spot horses in improving or declining form.
- Pace
- Average Early (E1), Mid (E2), and Stretch (LP) pace figures — reveals pace-setters vs. closers vs. all-the-way types.
- This horse
- The horse whose stats card is open is highlighted with a darker column background.
Winning Profiles
- Axes
- X: Win % from last 10 starts — Y: In-the-money % (top-3 finishes) from last 10 starts.
- Quadrants
- Consistent Winners (top-right): high win & ITM — reliable performers.
Place Threats (top-left): boards often but doesn’t win often — good exacta/trifecta angles.
Streaky (bottom-right): wins occasionally, misses the board often — all-or-nothing.
Developing (bottom-left): still finding form — longshot territory. - Reference Lines
- Dashed lines mark field averages. Dots to the right win more; dots higher board more.
- This horse
- Highlighted with a gold border and larger dot.
AI Model Comparison
- Winner Models (green)
- Mod1(W), Mod2(W), and Mod3(W) trained to predict race winners. Higher score = stronger contender.
- Longshot Models (red)
- Mod1-LS, Mod2-LS, and Mod3-LS trained to find high-value longshots. Higher score = stronger longshot candidate.
- Form Model (blue)
- Mod4 sequence model trained on recent form patterns. Higher score = stronger recent form profile.
- This horse
- Highlighted with a darker column background.
Race Pace Simulation Guide
- Slider
- Drag left→right to advance from gate to finish. Drag all the way back to reset the race.
- Predicted Finish Order
- Factors in contested pace burn, each horse’s effort curve (peaked-early vs. peaked-late), and wide trip cost from outside posts. Updated live when Track Bias changes.
- Pace Scenario
- Lone Speed: single E horse likely rates and holds. Contested: two E horses burn each other — closers benefit. Hot Pace: speed meltdown, deep closers thrive. Soft: no early speed, moderate fractions throughout.
- Track Bias
- Slider below canvas. −2 = strong closer/wet bias; +2 = strong speed/rail bias. Recomputes the predicted finish order.
- Boxed Indicator
- Dashed orange ring = horse is surrounded (rival ahead, rival behind, wall outside). In a real race this horse must find a clear path to run.
- Running Styles
- E/EE = early speed (rushes to rail). P = presser (stalks the pace). S = stalker. SS = slow starter / closer.
| Stat | vs. Current Card | vs. All Horses |
|---|---|---|
| Averages
Career-average metrics across all AI race analysis. Performance and pace averages reflect estimated historical performance; trainer and jockey grades score in-the-money percentages. Grading scale: A = elite • B = above average • C = average • D = below average • F = poor • — = no data |
||
| Pick Pony AI Rating | B | B |
| Pace Trip Longshot | — | — |
| Connections Longshot | — | — |
| Situational Longshot | — | — |
| Speed | C | D |
| Early Pace | C | D |
| Mid Pace | C | C |
| Late Pace | A | B |
| Finish Pos | C | F |
| Dirt Speed | D | C |
| Turf Speed | D | D |
| Distance Speed | D | C |
| Trainer Effectiveness | B | C |
| Jockey Effectiveness | C | B |
| 3rd Party Ratings | C | D |
| Recent
Performance analysis from the horse's recent races, weighted to reflect current form. Sprint and Route FPS (Foot Per Second) measure pace efficiency over the horse's recent sprints and routes respectively. Grading scale: A = elite • B = above average • C = average • D = below average • F = poor • — = no data |
||
| Speed | B | C |
| Early Pace | C | C |
| Mid Pace | C | C |
| Late Pace | B | B |
| Sprint FPS | C | D |
| Route FPS | C | D |
| Trainer Effectiveness | B | C |
| Jockey Effectiveness | C | B |
| 3rd Party Ratings | C | D |
| Predictions
AI-generated projections for the upcoming race, derived from prior AI analysis for speed and pace trends, surface and distance suitability, and current conditions. Grading scale: A = elite • B = above average • C = average • D = below average • F = poor • — = no data |
||
| Speed | C | D |
| Early Pace | C | D |
| Mid Pace | C | C |
| Late Pace | C | C |
Chart Guide (2.0.35)
- Bubbles
- Color = surface: green (turf), brown (dirt), blue (synthetic)
- Top number = finishing position; bottom number in parentheses = starting post position
- Height above line = beaten lengths — closer means a smaller margin
- Border = track conditions: green (FST/GD/FM), yellow (WF/SL/YLD), red (SY/MY/FRZ/SFT/HVY)
- Connecting Line
- Solid = good conditions; dashed = bad conditions
- Line Symbol
- ▲ Triangle = sprint (7f or less); ● Circle = route (more than 7f)
- Days Between Races
- Small number above each bubble (e.g. 19d) = days since the previous race — helps spot freshness, layoffs, and tight scheduling.
- Shaded Band (Bollinger)
- Highlights volatility — a wider band means more variation in recent performance
- Performance Trend
- Straight line showing the overall performance direction — angled up = improving, angled down = declining
- Dashed Reference Line
- AI Opponent = AI analysis class-level par for the race
✓ Positives:(1) Speed average (71) well above field median (65). (2) Hot trainer - high ITM rate (31%). (3) Hot jockey — high ITM rate (21.49%). (4) Early pace significantly above field median (E1: 82 vs field 77). (5) Dropping in class ($12,500 vs last $16,000) after a 48-day freshening — trainer setup-for-win angle. (6) Had documented trouble last race (codes: ['B', 'D', 'O', 'T', 'U']) yet still finished 4th — a clean trip today sets up a form reversal. (7) Pick Pony Daily Edge Radar pick — value score 9/10 — angles: Class Superiority, Class Drop After Rest, Troubled Trip Comeback, Early Speed Edge.
⚠ Concerns:(1) Has not raced in 48 days. (2) Consider there will be likely pace pressure in this race - multiple E types entered. (3) Poor record at this distance (0 wins from 10 recent starts). (4) Poor record at this track (0 wins from 5 starts). (5) Trip note from last race: 4p turn;bid1/4;outkckd.
Mod1(W): 67 (4/6) Mod2(W): 65 (4/6) Mod3(W): 68 (4/6) Mod1-LS: 2 (6/6) Mod2-LS: 65 (4/6) Mod3-LS: 47 (3/6) Mod4(Form): 69 (4/6) Win Prob: 42.9% Value Score: 3.27 ★ ML: 5.00 (4/1) Overlay %: 1.91 Fair Odds: 5.66 (9/2) O/U: Fair
Score Definitions
- Mod1(W)
- Winner Model 1 score (0–100) — AI composite rating among field contenders (higher = stronger). The number in parentheses (e.g. 1/9) shows this horse’s rank out of the field size.
- Mod2(W)
- Winner Model 2 score (0–100) — AI rating among field contenders (higher = stronger). The number in parentheses shows rank within the field.
- Mod3(W)
- Winner Model 3 score (0–100) — AI rating among field contenders (higher = stronger). The number in parentheses shows rank within the field.
- Mod1-LS
- Longshot Model 1 score (0–100) — AI model trained to surface high-value longshots. Higher = stronger longshot profile. Rank in parentheses shows position within the field.
- Mod2-LS
- Longshot Model 2 score (0–100) — AI longshot model. Higher = stronger longshot profile.
- Mod3-LS
- Longshot Model 3 score (0–100) — AI longshot model. Higher = stronger longshot profile.
- Mod4(Form)
- Form Model score (0–100) — AI sequence model trained on recent form patterns to capture momentum and trajectory. Higher = stronger recent form profile. Rank in parentheses shows position within the field.
- Win Prob
- LightGBM estimated win probability expressed as a percentage. This is a raw model output, not normalized to sum to 100% across the field — use it for comparison rather than as an absolute probability.
- Value Score
- Win Prob divided by the market-implied probability (derived from morning line). Values above 1.0 mean the model sees more win chance than the odds imply — a ★ star appears when Value Score ≥ 1.3, indicating a 30%+ model edge over the market.
- ML
- Morning line odds set by the track handicapper before wagering opens
- Overlay %
- How much the fair odds exceed the morning line, expressed as a percentage — positive values indicate value
- Fair Odds
- Model-derived fair-value odds based on estimated win probability
- O/U
- Overlay or Underlay — whether the horse offers value (O) or is overbet (U) relative to fair odds
Lane Bias Guide
- Bar Direction
- Bars above the line = more favorable lane • Bars below = less favorable, relative to the average at this track.
- Color
- Green = above-average advantage • Yellow = near-average • Red = below-average • Blue = this horse’s lane.
- Bias Score
- Derived from weighted average finishing positions across historical races at this track. Shown in the tooltip on hover. To use the bias score, calculate your handicap for the horse (e.g. finish position), then add (detrimental bias) or subtract (favorable bias) the bias score.
- Races
- Number of historical races used to compute each lane’s bias score.
Race Pace Bias Guide
- Bar Height & Direction
- Positive (green) = pace favors this horse • Negative (red) = pace works against this horse • Near-zero (amber) = neutral.
- Race Shape
- Projected race shape based on running styles of all horses (e.g. EE = two early horses, EP = one early presser).
- Pace Category
- FAST = contested early pace • LONE EARLY = one speed horse controlling pace • HONEST = moderate early pressure • SLOW = closers’ race.
- Flag (★)
- A star above the bar means this horse’s pace bias figure is ≥ 1.5 — a meaningful pace advantage or disadvantage.
Total Pace Guide
- Bar Segments
- Green = Early Pace (E1) • Amber = Mid Pace (E2) • Red = Late Pace (LP)
- Bar Height
- Total height = sum of E1 + E2 + LP average pace figures. Taller bars indicate a faster-paced horse overall.
- Grades & Rankings
- Hover to see each horse’s letter grade and ranking vs. other horses in this race (e.g. 2/9 = 2nd best of 9).
- Border
- Thicker border = this horse’s post position.
Performance vs. Peers Guide
- Bars (per post)
- Blue = avg career performance • Amber = avg last 3 races • Green = last race (improved vs. avg) • Red = last race (declined vs. avg)
- Trend Line
- Angled line above the bars: rising = improving form • falling = declining form.
- Horizontal Line
- Field average — the mean career performance of all horses in this race.
- Color Circles
- Standard post-position colors below each lane — same as the Total Pace chart.
- Border
- Thicker border = this horse’s post position.
Figure Comparison
- Rating
- The three Pick Pony algorithm ratings (Algo 1, Algo 2, Algo 3) that make up the overall PP AI Rating — higher is a stronger contender rating.
- Speed
- Career average speed, recent 3-race average, and last-race speed figure — spot horses in improving or declining form.
- Pace
- Average Early (E1), Mid (E2), and Stretch (LP) pace figures — reveals pace-setters vs. closers vs. all-the-way types.
- This horse
- The horse whose stats card is open is highlighted with a darker column background.
Winning Profiles
- Axes
- X: Win % from last 10 starts — Y: In-the-money % (top-3 finishes) from last 10 starts.
- Quadrants
- Consistent Winners (top-right): high win & ITM — reliable performers.
Place Threats (top-left): boards often but doesn’t win often — good exacta/trifecta angles.
Streaky (bottom-right): wins occasionally, misses the board often — all-or-nothing.
Developing (bottom-left): still finding form — longshot territory. - Reference Lines
- Dashed lines mark field averages. Dots to the right win more; dots higher board more.
- This horse
- Highlighted with a gold border and larger dot.
AI Model Comparison
- Winner Models (green)
- Mod1(W), Mod2(W), and Mod3(W) trained to predict race winners. Higher score = stronger contender.
- Longshot Models (red)
- Mod1-LS, Mod2-LS, and Mod3-LS trained to find high-value longshots. Higher score = stronger longshot candidate.
- Form Model (blue)
- Mod4 sequence model trained on recent form patterns. Higher score = stronger recent form profile.
- This horse
- Highlighted with a darker column background.
Race Pace Simulation Guide
- Slider
- Drag left→right to advance from gate to finish. Drag all the way back to reset the race.
- Predicted Finish Order
- Factors in contested pace burn, each horse’s effort curve (peaked-early vs. peaked-late), and wide trip cost from outside posts. Updated live when Track Bias changes.
- Pace Scenario
- Lone Speed: single E horse likely rates and holds. Contested: two E horses burn each other — closers benefit. Hot Pace: speed meltdown, deep closers thrive. Soft: no early speed, moderate fractions throughout.
- Track Bias
- Slider below canvas. −2 = strong closer/wet bias; +2 = strong speed/rail bias. Recomputes the predicted finish order.
- Boxed Indicator
- Dashed orange ring = horse is surrounded (rival ahead, rival behind, wall outside). In a real race this horse must find a clear path to run.
- Running Styles
- E/EE = early speed (rushes to rail). P = presser (stalks the pace). S = stalker. SS = slow starter / closer.
| Stat | vs. Current Card | vs. All Horses |
|---|---|---|
| Averages
Career-average metrics across all AI race analysis. Performance and pace averages reflect estimated historical performance; trainer and jockey grades score in-the-money percentages. Grading scale: A = elite • B = above average • C = average • D = below average • F = poor • — = no data |
||
| Pick Pony AI Rating | C | C |
| Pace Trip Longshot | — | — |
| Connections Longshot | — | — |
| Situational Longshot | — | — |
| Speed | B | C |
| Early Pace | B | C |
| Mid Pace | B | C |
| Late Pace | C | C |
| Finish Pos | D | F |
| Dirt Speed | B | B |
| Turf Speed | A | A |
| Distance Speed | A | B |
| Trainer Effectiveness | D | D |
| Jockey Effectiveness | F | F |
| 3rd Party Ratings | B | C |
| Recent
Performance analysis from the horse's recent races, weighted to reflect current form. Sprint and Route FPS (Foot Per Second) measure pace efficiency over the horse's recent sprints and routes respectively. Grading scale: A = elite • B = above average • C = average • D = below average • F = poor • — = no data |
||
| Speed | A | C |
| Early Pace | A | B |
| Mid Pace | B | B |
| Late Pace | C | C |
| Sprint FPS | A | B |
| Route FPS | A | B |
| Trainer Effectiveness | D | D |
| Jockey Effectiveness | F | F |
| 3rd Party Ratings | B | C |
| Predictions
AI-generated projections for the upcoming race, derived from prior AI analysis for speed and pace trends, surface and distance suitability, and current conditions. Grading scale: A = elite • B = above average • C = average • D = below average • F = poor • — = no data |
||
| Speed | B | C |
| Early Pace | B | C |
| Mid Pace | C | C |
| Late Pace | C | C |
Chart Guide (2.0.35)
- Bubbles
- Color = surface: green (turf), brown (dirt), blue (synthetic)
- Top number = finishing position; bottom number in parentheses = starting post position
- Height above line = beaten lengths — closer means a smaller margin
- Border = track conditions: green (FST/GD/FM), yellow (WF/SL/YLD), red (SY/MY/FRZ/SFT/HVY)
- Connecting Line
- Solid = good conditions; dashed = bad conditions
- Line Symbol
- ▲ Triangle = sprint (7f or less); ● Circle = route (more than 7f)
- Days Between Races
- Small number above each bubble (e.g. 19d) = days since the previous race — helps spot freshness, layoffs, and tight scheduling.
- Shaded Band (Bollinger)
- Highlights volatility — a wider band means more variation in recent performance
- Performance Trend
- Straight line showing the overall performance direction — angled up = improving, angled down = declining
- Dashed Reference Line
- AI Opponent = AI analysis class-level par for the race
✓ Positives:(1) Dropping in class today ($25,000 → $12,500). (2) Hot trainer - high ITM rate (27%). (3) Career-best speed figure (72) recorded in last 1-2 starts — peaking form. (4) Hot jockey — high ITM rate (58%). (5) Closer/presser in a race with pace pressure — ideal race setup for late runners. (6) Strong speed 2 back (72), modest dip last out (62) — form reversal angle, ready to bounce back to top form. (7) Pick Pony Daily Edge Radar pick — value score 7/10 — angles: Career-Best Recent Figure, Closer in Pace Duel, Hot Jockey, Class Drop, Form Reversal.
⚠ Concerns:(1) Consider there will be likely pace pressure in this race - multiple E types entered. (2) Speed average (54) well below field median (65). (3) Poor record at this distance (0 wins from 10 recent starts). (4) Poor record at this track (0 wins from 14 starts). (5) Trip note from last race: Toss head brk;5-3p trn. (6) Consistently breaks behind post position (3 of last 5 starts). (7) Consistently runs wide at the first call (4 of last 5 starts). (8) 0 wins from 10 starts on dirt in last 10 — repeated failure on today's surface.
Mod1(W): 57 (5/6) Mod2(W): 41 (5/6) Mod3(W): 56 (5/6) Mod1-LS: 60 (3/6) Mod2-LS: 51 (5/6) Mod3-LS: 47 (4/6) Mod4(Form): 39 (5/6) Win Prob: 30.3% Value Score: 4.23 ★ ML: 10.00 (9/1) Overlay %: 5.71 Fair Odds: 6.77 (6/1) O/U: Overlay
Score Definitions
- Mod1(W)
- Winner Model 1 score (0–100) — AI composite rating among field contenders (higher = stronger). The number in parentheses (e.g. 1/9) shows this horse’s rank out of the field size.
- Mod2(W)
- Winner Model 2 score (0–100) — AI rating among field contenders (higher = stronger). The number in parentheses shows rank within the field.
- Mod3(W)
- Winner Model 3 score (0–100) — AI rating among field contenders (higher = stronger). The number in parentheses shows rank within the field.
- Mod1-LS
- Longshot Model 1 score (0–100) — AI model trained to surface high-value longshots. Higher = stronger longshot profile. Rank in parentheses shows position within the field.
- Mod2-LS
- Longshot Model 2 score (0–100) — AI longshot model. Higher = stronger longshot profile.
- Mod3-LS
- Longshot Model 3 score (0–100) — AI longshot model. Higher = stronger longshot profile.
- Mod4(Form)
- Form Model score (0–100) — AI sequence model trained on recent form patterns to capture momentum and trajectory. Higher = stronger recent form profile. Rank in parentheses shows position within the field.
- Win Prob
- LightGBM estimated win probability expressed as a percentage. This is a raw model output, not normalized to sum to 100% across the field — use it for comparison rather than as an absolute probability.
- Value Score
- Win Prob divided by the market-implied probability (derived from morning line). Values above 1.0 mean the model sees more win chance than the odds imply — a ★ star appears when Value Score ≥ 1.3, indicating a 30%+ model edge over the market.
- ML
- Morning line odds set by the track handicapper before wagering opens
- Overlay %
- How much the fair odds exceed the morning line, expressed as a percentage — positive values indicate value
- Fair Odds
- Model-derived fair-value odds based on estimated win probability
- O/U
- Overlay or Underlay — whether the horse offers value (O) or is overbet (U) relative to fair odds
Lane Bias Guide
- Bar Direction
- Bars above the line = more favorable lane • Bars below = less favorable, relative to the average at this track.
- Color
- Green = above-average advantage • Yellow = near-average • Red = below-average • Blue = this horse’s lane.
- Bias Score
- Derived from weighted average finishing positions across historical races at this track. Shown in the tooltip on hover. To use the bias score, calculate your handicap for the horse (e.g. finish position), then add (detrimental bias) or subtract (favorable bias) the bias score.
- Races
- Number of historical races used to compute each lane’s bias score.
Race Pace Bias Guide
- Bar Height & Direction
- Positive (green) = pace favors this horse • Negative (red) = pace works against this horse • Near-zero (amber) = neutral.
- Race Shape
- Projected race shape based on running styles of all horses (e.g. EE = two early horses, EP = one early presser).
- Pace Category
- FAST = contested early pace • LONE EARLY = one speed horse controlling pace • HONEST = moderate early pressure • SLOW = closers’ race.
- Flag (★)
- A star above the bar means this horse’s pace bias figure is ≥ 1.5 — a meaningful pace advantage or disadvantage.
Total Pace Guide
- Bar Segments
- Green = Early Pace (E1) • Amber = Mid Pace (E2) • Red = Late Pace (LP)
- Bar Height
- Total height = sum of E1 + E2 + LP average pace figures. Taller bars indicate a faster-paced horse overall.
- Grades & Rankings
- Hover to see each horse’s letter grade and ranking vs. other horses in this race (e.g. 2/9 = 2nd best of 9).
- Border
- Thicker border = this horse’s post position.
Performance vs. Peers Guide
- Bars (per post)
- Blue = avg career performance • Amber = avg last 3 races • Green = last race (improved vs. avg) • Red = last race (declined vs. avg)
- Trend Line
- Angled line above the bars: rising = improving form • falling = declining form.
- Horizontal Line
- Field average — the mean career performance of all horses in this race.
- Color Circles
- Standard post-position colors below each lane — same as the Total Pace chart.
- Border
- Thicker border = this horse’s post position.
Figure Comparison
- Rating
- The three Pick Pony algorithm ratings (Algo 1, Algo 2, Algo 3) that make up the overall PP AI Rating — higher is a stronger contender rating.
- Speed
- Career average speed, recent 3-race average, and last-race speed figure — spot horses in improving or declining form.
- Pace
- Average Early (E1), Mid (E2), and Stretch (LP) pace figures — reveals pace-setters vs. closers vs. all-the-way types.
- This horse
- The horse whose stats card is open is highlighted with a darker column background.
Winning Profiles
- Axes
- X: Win % from last 10 starts — Y: In-the-money % (top-3 finishes) from last 10 starts.
- Quadrants
- Consistent Winners (top-right): high win & ITM — reliable performers.
Place Threats (top-left): boards often but doesn’t win often — good exacta/trifecta angles.
Streaky (bottom-right): wins occasionally, misses the board often — all-or-nothing.
Developing (bottom-left): still finding form — longshot territory. - Reference Lines
- Dashed lines mark field averages. Dots to the right win more; dots higher board more.
- This horse
- Highlighted with a gold border and larger dot.
AI Model Comparison
- Winner Models (green)
- Mod1(W), Mod2(W), and Mod3(W) trained to predict race winners. Higher score = stronger contender.
- Longshot Models (red)
- Mod1-LS, Mod2-LS, and Mod3-LS trained to find high-value longshots. Higher score = stronger longshot candidate.
- Form Model (blue)
- Mod4 sequence model trained on recent form patterns. Higher score = stronger recent form profile.
- This horse
- Highlighted with a darker column background.
Race Pace Simulation Guide
- Slider
- Drag left→right to advance from gate to finish. Drag all the way back to reset the race.
- Predicted Finish Order
- Factors in contested pace burn, each horse’s effort curve (peaked-early vs. peaked-late), and wide trip cost from outside posts. Updated live when Track Bias changes.
- Pace Scenario
- Lone Speed: single E horse likely rates and holds. Contested: two E horses burn each other — closers benefit. Hot Pace: speed meltdown, deep closers thrive. Soft: no early speed, moderate fractions throughout.
- Track Bias
- Slider below canvas. −2 = strong closer/wet bias; +2 = strong speed/rail bias. Recomputes the predicted finish order.
- Boxed Indicator
- Dashed orange ring = horse is surrounded (rival ahead, rival behind, wall outside). In a real race this horse must find a clear path to run.
- Running Styles
- E/EE = early speed (rushes to rail). P = presser (stalks the pace). S = stalker. SS = slow starter / closer.
| Stat | vs. Current Card | vs. All Horses |
|---|---|---|
| Averages
Career-average metrics across all AI race analysis. Performance and pace averages reflect estimated historical performance; trainer and jockey grades score in-the-money percentages. Grading scale: A = elite • B = above average • C = average • D = below average • F = poor • — = no data |
||
| Pick Pony AI Rating | D | D |
| Pace Trip Longshot | — | — |
| Connections Longshot | — | — |
| Situational Longshot | — | — |
| Speed | D | F |
| Early Pace | D | D |
| Mid Pace | D | D |
| Late Pace | C | C |
| Finish Pos | C | F |
| Dirt Speed | C | C |
| Turf Speed | B | C |
| Distance Speed | B | C |
| Trainer Effectiveness | F | D |
| Jockey Effectiveness | A | A |
| 3rd Party Ratings | D | D |
| Recent
Performance analysis from the horse's recent races, weighted to reflect current form. Sprint and Route FPS (Foot Per Second) measure pace efficiency over the horse's recent sprints and routes respectively. Grading scale: A = elite • B = above average • C = average • D = below average • F = poor • — = no data |
||
| Speed | C | C |
| Early Pace | F | F |
| Mid Pace | F | D |
| Late Pace | A | A |
| Sprint FPS | F | D |
| Route FPS | D | D |
| Trainer Effectiveness | F | D |
| Jockey Effectiveness | A | A |
| 3rd Party Ratings | D | D |
| Predictions
AI-generated projections for the upcoming race, derived from prior AI analysis for speed and pace trends, surface and distance suitability, and current conditions. Grading scale: A = elite • B = above average • C = average • D = below average • F = poor • — = no data |
||
| Speed | D | F |
| Early Pace | D | D |
| Mid Pace | D | D |
| Late Pace | C | C |
Chart Guide (2.0.35)
- Bubbles
- Color = surface: green (turf), brown (dirt), blue (synthetic)
- Top number = finishing position; bottom number in parentheses = starting post position
- Height above line = beaten lengths — closer means a smaller margin
- Border = track conditions: green (FST/GD/FM), yellow (WF/SL/YLD), red (SY/MY/FRZ/SFT/HVY)
- Connecting Line
- Solid = good conditions; dashed = bad conditions
- Line Symbol
- ▲ Triangle = sprint (7f or less); ● Circle = route (more than 7f)
- Days Between Races
- Small number above each bubble (e.g. 19d) = days since the previous race — helps spot freshness, layoffs, and tight scheduling.
- Shaded Band (Bollinger)
- Highlights volatility — a wider band means more variation in recent performance
- Performance Trend
- Straight line showing the overall performance direction — angled up = improving, angled down = declining
- Dashed Reference Line
- AI Opponent = AI analysis class-level par for the race
✓ Positives:(1) Dropping in class today ($25,000 → $12,500). (2) Hot trainer - high ITM rate (34%). (3) Career-best speed figure (42) recorded in last 1-2 starts — peaking form. (4) Hot jockey — high ITM rate (38%). (5) Strong speed 2 back (42), modest dip last out (34) — form reversal angle, ready to bounce back to top form. (6) Carries 6 lbs less than field median (120 lbs vs median 126 lbs). (7) Pick Pony Daily Edge Radar pick — value score 7/10 — angles: Career-Best Recent Figure, Class Drop, Form Reversal, Weight Advantage.
⚠ Concerns:(1) Consider there will be likely pace pressure in this race - multiple E types entered. (2) Speed average (32) well below field median (65). (3) Limited experience at today's distance (2 starts). (4) Moving from a sprint to a route today. (5) Trip note from last race: Brush gate; no impact. (6) Dropping in class in consecutive starts ($50,000 → $30,000 → $25,000).
Mod1(W): 0 Mod2(W): 0 Mod3(W): 0 Mod1-LS: 0 Mod2-LS: 0 Mod3-LS: 0 Mod4(Form): 0 Win Prob: 5.7% Value Score: 2.24 ★ ML: 30.00 (30/1) Overlay %: 4.54 Fair Odds: 13.13 (12/1) O/U: Overlay
Score Definitions
- Mod1(W)
- Winner Model 1 score (0–100) — AI composite rating among field contenders (higher = stronger). The number in parentheses (e.g. 1/9) shows this horse’s rank out of the field size.
- Mod2(W)
- Winner Model 2 score (0–100) — AI rating among field contenders (higher = stronger). The number in parentheses shows rank within the field.
- Mod3(W)
- Winner Model 3 score (0–100) — AI rating among field contenders (higher = stronger). The number in parentheses shows rank within the field.
- Mod1-LS
- Longshot Model 1 score (0–100) — AI model trained to surface high-value longshots. Higher = stronger longshot profile. Rank in parentheses shows position within the field.
- Mod2-LS
- Longshot Model 2 score (0–100) — AI longshot model. Higher = stronger longshot profile.
- Mod3-LS
- Longshot Model 3 score (0–100) — AI longshot model. Higher = stronger longshot profile.
- Mod4(Form)
- Form Model score (0–100) — AI sequence model trained on recent form patterns to capture momentum and trajectory. Higher = stronger recent form profile. Rank in parentheses shows position within the field.
- Win Prob
- LightGBM estimated win probability expressed as a percentage. This is a raw model output, not normalized to sum to 100% across the field — use it for comparison rather than as an absolute probability.
- Value Score
- Win Prob divided by the market-implied probability (derived from morning line). Values above 1.0 mean the model sees more win chance than the odds imply — a ★ star appears when Value Score ≥ 1.3, indicating a 30%+ model edge over the market.
- ML
- Morning line odds set by the track handicapper before wagering opens
- Overlay %
- How much the fair odds exceed the morning line, expressed as a percentage — positive values indicate value
- Fair Odds
- Model-derived fair-value odds based on estimated win probability
- O/U
- Overlay or Underlay — whether the horse offers value (O) or is overbet (U) relative to fair odds
Lane Bias Guide
- Bar Direction
- Bars above the line = more favorable lane • Bars below = less favorable, relative to the average at this track.
- Color
- Green = above-average advantage • Yellow = near-average • Red = below-average • Blue = this horse’s lane.
- Bias Score
- Derived from weighted average finishing positions across historical races at this track. Shown in the tooltip on hover. To use the bias score, calculate your handicap for the horse (e.g. finish position), then add (detrimental bias) or subtract (favorable bias) the bias score.
- Races
- Number of historical races used to compute each lane’s bias score.
Race Pace Bias Guide
- Bar Height & Direction
- Positive (green) = pace favors this horse • Negative (red) = pace works against this horse • Near-zero (amber) = neutral.
- Race Shape
- Projected race shape based on running styles of all horses (e.g. EE = two early horses, EP = one early presser).
- Pace Category
- FAST = contested early pace • LONE EARLY = one speed horse controlling pace • HONEST = moderate early pressure • SLOW = closers’ race.
- Flag (★)
- A star above the bar means this horse’s pace bias figure is ≥ 1.5 — a meaningful pace advantage or disadvantage.
Total Pace Guide
- Bar Segments
- Green = Early Pace (E1) • Amber = Mid Pace (E2) • Red = Late Pace (LP)
- Bar Height
- Total height = sum of E1 + E2 + LP average pace figures. Taller bars indicate a faster-paced horse overall.
- Grades & Rankings
- Hover to see each horse’s letter grade and ranking vs. other horses in this race (e.g. 2/9 = 2nd best of 9).
- Border
- Thicker border = this horse’s post position.
Performance vs. Peers Guide
- Bars (per post)
- Blue = avg career performance • Amber = avg last 3 races • Green = last race (improved vs. avg) • Red = last race (declined vs. avg)
- Trend Line
- Angled line above the bars: rising = improving form • falling = declining form.
- Horizontal Line
- Field average — the mean career performance of all horses in this race.
- Color Circles
- Standard post-position colors below each lane — same as the Total Pace chart.
- Border
- Thicker border = this horse’s post position.
Figure Comparison
- Rating
- The three Pick Pony algorithm ratings (Algo 1, Algo 2, Algo 3) that make up the overall PP AI Rating — higher is a stronger contender rating.
- Speed
- Career average speed, recent 3-race average, and last-race speed figure — spot horses in improving or declining form.
- Pace
- Average Early (E1), Mid (E2), and Stretch (LP) pace figures — reveals pace-setters vs. closers vs. all-the-way types.
- This horse
- The horse whose stats card is open is highlighted with a darker column background.
Winning Profiles
- Axes
- X: Win % from last 10 starts — Y: In-the-money % (top-3 finishes) from last 10 starts.
- Quadrants
- Consistent Winners (top-right): high win & ITM — reliable performers.
Place Threats (top-left): boards often but doesn’t win often — good exacta/trifecta angles.
Streaky (bottom-right): wins occasionally, misses the board often — all-or-nothing.
Developing (bottom-left): still finding form — longshot territory. - Reference Lines
- Dashed lines mark field averages. Dots to the right win more; dots higher board more.
- This horse
- Highlighted with a gold border and larger dot.
AI Model Comparison
- Winner Models (green)
- Mod1(W), Mod2(W), and Mod3(W) trained to predict race winners. Higher score = stronger contender.
- Longshot Models (red)
- Mod1-LS, Mod2-LS, and Mod3-LS trained to find high-value longshots. Higher score = stronger longshot candidate.
- Form Model (blue)
- Mod4 sequence model trained on recent form patterns. Higher score = stronger recent form profile.
- This horse
- Highlighted with a darker column background.
Race Pace Simulation Guide
- Slider
- Drag left→right to advance from gate to finish. Drag all the way back to reset the race.
- Predicted Finish Order
- Factors in contested pace burn, each horse’s effort curve (peaked-early vs. peaked-late), and wide trip cost from outside posts. Updated live when Track Bias changes.
- Pace Scenario
- Lone Speed: single E horse likely rates and holds. Contested: two E horses burn each other — closers benefit. Hot Pace: speed meltdown, deep closers thrive. Soft: no early speed, moderate fractions throughout.
- Track Bias
- Slider below canvas. −2 = strong closer/wet bias; +2 = strong speed/rail bias. Recomputes the predicted finish order.
- Boxed Indicator
- Dashed orange ring = horse is surrounded (rival ahead, rival behind, wall outside). In a real race this horse must find a clear path to run.
- Running Styles
- E/EE = early speed (rushes to rail). P = presser (stalks the pace). S = stalker. SS = slow starter / closer.
| Stat | vs. Current Card | vs. All Horses |
|---|---|---|
| Averages
Career-average metrics across all AI race analysis. Performance and pace averages reflect estimated historical performance; trainer and jockey grades score in-the-money percentages. Grading scale: A = elite • B = above average • C = average • D = below average • F = poor • — = no data |
||
| Pick Pony AI Rating | F | F |
| Pace Trip Longshot | — | — |
| Connections Longshot | — | — |
| Situational Longshot | — | — |
| Speed | F | F |
| Early Pace | F | D |
| Mid Pace | F | D |
| Late Pace | F | F |
| Finish Pos | F | F |
| Dirt Speed | F | D |
| Turf Speed | D | D |
| Distance Speed | F | D |
| Trainer Effectiveness | C | D |
| Jockey Effectiveness | C | C |
| 3rd Party Ratings | F | D |
| Recent
Performance analysis from the horse's recent races, weighted to reflect current form. Sprint and Route FPS (Foot Per Second) measure pace efficiency over the horse's recent sprints and routes respectively. Grading scale: A = elite • B = above average • C = average • D = below average • F = poor • — = no data |
||
| Speed | F | F |
| Early Pace | D | D |
| Mid Pace | D | D |
| Late Pace | F | F |
| Sprint FPS | D | D |
| Route FPS | F | D |
| Trainer Effectiveness | C | D |
| Jockey Effectiveness | C | C |
| 3rd Party Ratings | F | D |
| Predictions
AI-generated projections for the upcoming race, derived from prior AI analysis for speed and pace trends, surface and distance suitability, and current conditions. Grading scale: A = elite • B = above average • C = average • D = below average • F = poor • — = no data |
||
| Speed | F | F |
| Early Pace | F | D |
| Mid Pace | F | D |
| Late Pace | C | C |
Chart Guide (2.0.35)
- Bubbles
- Color = surface: green (turf), brown (dirt), blue (synthetic)
- Top number = finishing position; bottom number in parentheses = starting post position
- Height above line = beaten lengths — closer means a smaller margin
- Border = track conditions: green (FST/GD/FM), yellow (WF/SL/YLD), red (SY/MY/FRZ/SFT/HVY)
- Connecting Line
- Solid = good conditions; dashed = bad conditions
- Line Symbol
- ▲ Triangle = sprint (7f or less); ● Circle = route (more than 7f)
- Days Between Races
- Small number above each bubble (e.g. 19d) = days since the previous race — helps spot freshness, layoffs, and tight scheduling.
- Shaded Band (Bollinger)
- Highlights volatility — a wider band means more variation in recent performance
- Performance Trend
- Straight line showing the overall performance direction — angled up = improving, angled down = declining
- Dashed Reference Line
- AI Opponent = AI analysis class-level par for the race
✓ Positives:(1) Hot trainer - high ITM rate (50%). (2) Big last-race effort (63) — 8 pts above recent average. (3) Hot jockey — high ITM rate (40%). (4) Early pace significantly above field median (E1: 23 vs field 19). (5) Late pace significantly above field median (LP: 72 vs field 68). (6) Closer/presser in a race with pace pressure — ideal race setup for late runners. (7) One gate workout in recent training — sharpness signal from the gate. (8) Trainer 'ENGLEHART CHRIS' has 2 horses in today's card all showing last-race improvement — barn appears sharp right now. (9) Pick Pony Daily Edge Radar pick — value score 8/10 — angles: Big Last Effort, Hot Trainer, Closer in Pace Duel, Stable on Fire, Late Kick Advantage, Sharp Gate Work.
⚠ Concerns:(1) Rising in class today ($50,000 → $75,000). (2) Consider there will be likely pace pressure in this race - multiple E types entered. (3) Speed average (58) well below field median (68). (4) First time at today's distance. (5) Moving from a sprint to a route today. (6) Today's distance is longer than any previous start. (7) Trip note from last race: Climb4-1/2;alter;3-4p. (8) Last race was career-best speed (63) — bounce risk after peak effort. (9) Rising in class ($50,000 → $75,000) after finishing 5 last out — double negative. (10) Stepping up to $75,000 — highest class level in last 10 starts (previous high: $50,000).
Mod1(W): 0 Mod2(W): 0 Mod3(W): 0 Mod1-LS: 52 (4/5) Mod2-LS: 0 Mod3-LS: 13 (5/5) Mod4(Form): 0 Win Prob: 21.6% Value Score: 3.62 ★ ML: 12.00 (10/1) Overlay %: 4.56 Fair Odds: 8.49 (7/1) O/U: Overlay
Score Definitions
- Mod1(W)
- Winner Model 1 score (0–100) — AI composite rating among field contenders (higher = stronger). The number in parentheses (e.g. 1/9) shows this horse’s rank out of the field size.
- Mod2(W)
- Winner Model 2 score (0–100) — AI rating among field contenders (higher = stronger). The number in parentheses shows rank within the field.
- Mod3(W)
- Winner Model 3 score (0–100) — AI rating among field contenders (higher = stronger). The number in parentheses shows rank within the field.
- Mod1-LS
- Longshot Model 1 score (0–100) — AI model trained to surface high-value longshots. Higher = stronger longshot profile. Rank in parentheses shows position within the field.
- Mod2-LS
- Longshot Model 2 score (0–100) — AI longshot model. Higher = stronger longshot profile.
- Mod3-LS
- Longshot Model 3 score (0–100) — AI longshot model. Higher = stronger longshot profile.
- Mod4(Form)
- Form Model score (0–100) — AI sequence model trained on recent form patterns to capture momentum and trajectory. Higher = stronger recent form profile. Rank in parentheses shows position within the field.
- Win Prob
- LightGBM estimated win probability expressed as a percentage. This is a raw model output, not normalized to sum to 100% across the field — use it for comparison rather than as an absolute probability.
- Value Score
- Win Prob divided by the market-implied probability (derived from morning line). Values above 1.0 mean the model sees more win chance than the odds imply — a ★ star appears when Value Score ≥ 1.3, indicating a 30%+ model edge over the market.
- ML
- Morning line odds set by the track handicapper before wagering opens
- Overlay %
- How much the fair odds exceed the morning line, expressed as a percentage — positive values indicate value
- Fair Odds
- Model-derived fair-value odds based on estimated win probability
- O/U
- Overlay or Underlay — whether the horse offers value (O) or is overbet (U) relative to fair odds
Lane Bias Guide
- Bar Direction
- Bars above the line = more favorable lane • Bars below = less favorable, relative to the average at this track.
- Color
- Green = above-average advantage • Yellow = near-average • Red = below-average • Blue = this horse’s lane.
- Bias Score
- Derived from weighted average finishing positions across historical races at this track. Shown in the tooltip on hover. To use the bias score, calculate your handicap for the horse (e.g. finish position), then add (detrimental bias) or subtract (favorable bias) the bias score.
- Races
- Number of historical races used to compute each lane’s bias score.
Race Pace Bias Guide
- Bar Height & Direction
- Positive (green) = pace favors this horse • Negative (red) = pace works against this horse • Near-zero (amber) = neutral.
- Race Shape
- Projected race shape based on running styles of all horses (e.g. EE = two early horses, EP = one early presser).
- Pace Category
- FAST = contested early pace • LONE EARLY = one speed horse controlling pace • HONEST = moderate early pressure • SLOW = closers’ race.
- Flag (★)
- A star above the bar means this horse’s pace bias figure is ≥ 1.5 — a meaningful pace advantage or disadvantage.
Total Pace Guide
- Bar Segments
- Green = Early Pace (E1) • Amber = Mid Pace (E2) • Red = Late Pace (LP)
- Bar Height
- Total height = sum of E1 + E2 + LP average pace figures. Taller bars indicate a faster-paced horse overall.
- Grades & Rankings
- Hover to see each horse’s letter grade and ranking vs. other horses in this race (e.g. 2/9 = 2nd best of 9).
- Border
- Thicker border = this horse’s post position.
Performance vs. Peers Guide
- Bars (per post)
- Blue = avg career performance • Amber = avg last 3 races • Green = last race (improved vs. avg) • Red = last race (declined vs. avg)
- Trend Line
- Angled line above the bars: rising = improving form • falling = declining form.
- Horizontal Line
- Field average — the mean career performance of all horses in this race.
- Color Circles
- Standard post-position colors below each lane — same as the Total Pace chart.
- Border
- Thicker border = this horse’s post position.
Figure Comparison
- Rating
- The three Pick Pony algorithm ratings (Algo 1, Algo 2, Algo 3) that make up the overall PP AI Rating — higher is a stronger contender rating.
- Speed
- Career average speed, recent 3-race average, and last-race speed figure — spot horses in improving or declining form.
- Pace
- Average Early (E1), Mid (E2), and Stretch (LP) pace figures — reveals pace-setters vs. closers vs. all-the-way types.
- This horse
- The horse whose stats card is open is highlighted with a darker column background.
Winning Profiles
- Axes
- X: Win % from last 10 starts — Y: In-the-money % (top-3 finishes) from last 10 starts.
- Quadrants
- Consistent Winners (top-right): high win & ITM — reliable performers.
Place Threats (top-left): boards often but doesn’t win often — good exacta/trifecta angles.
Streaky (bottom-right): wins occasionally, misses the board often — all-or-nothing.
Developing (bottom-left): still finding form — longshot territory. - Reference Lines
- Dashed lines mark field averages. Dots to the right win more; dots higher board more.
- This horse
- Highlighted with a gold border and larger dot.
AI Model Comparison
- Winner Models (green)
- Mod1(W), Mod2(W), and Mod3(W) trained to predict race winners. Higher score = stronger contender.
- Longshot Models (red)
- Mod1-LS, Mod2-LS, and Mod3-LS trained to find high-value longshots. Higher score = stronger longshot candidate.
- Form Model (blue)
- Mod4 sequence model trained on recent form patterns. Higher score = stronger recent form profile.
- This horse
- Highlighted with a darker column background.
Race Pace Simulation Guide
- Slider
- Drag left→right to advance from gate to finish. Drag all the way back to reset the race.
- Predicted Finish Order
- Factors in contested pace burn, each horse’s effort curve (peaked-early vs. peaked-late), and wide trip cost from outside posts. Updated live when Track Bias changes.
- Pace Scenario
- Lone Speed: single E horse likely rates and holds. Contested: two E horses burn each other — closers benefit. Hot Pace: speed meltdown, deep closers thrive. Soft: no early speed, moderate fractions throughout.
- Track Bias
- Slider below canvas. −2 = strong closer/wet bias; +2 = strong speed/rail bias. Recomputes the predicted finish order.
- Boxed Indicator
- Dashed orange ring = horse is surrounded (rival ahead, rival behind, wall outside). In a real race this horse must find a clear path to run.
- Running Styles
- E/EE = early speed (rushes to rail). P = presser (stalks the pace). S = stalker. SS = slow starter / closer.
| Stat | vs. Current Card | vs. All Horses |
|---|---|---|
| Averages
Career-average metrics across all AI race analysis. Performance and pace averages reflect estimated historical performance; trainer and jockey grades score in-the-money percentages. Grading scale: A = elite • B = above average • C = average • D = below average • F = poor • — = no data |
||
| Pick Pony AI Rating | F | F |
| Pace Trip Longshot | — | — |
| Connections Longshot | — | — |
| Situational Longshot | — | — |
| Speed | C | D |
| Early Pace | D | D |
| Mid Pace | D | D |
| Late Pace | A | C |
| Finish Pos | D | D |
| Dirt Speed | C | C |
| Turf Speed | C | D |
| Distance Speed | C | F |
| Trainer Effectiveness | A | A |
| Jockey Effectiveness | C | C |
| 3rd Party Ratings | D | C |
| Recent
Performance analysis from the horse's recent races, weighted to reflect current form. Sprint and Route FPS (Foot Per Second) measure pace efficiency over the horse's recent sprints and routes respectively. Grading scale: A = elite • B = above average • C = average • D = below average • F = poor • — = no data |
||
| Speed | C | D |
| Early Pace | D | D |
| Mid Pace | D | D |
| Late Pace | A | C |
| Sprint FPS | C | D |
| Route FPS | C | D |
| Trainer Effectiveness | A | A |
| Jockey Effectiveness | C | C |
| 3rd Party Ratings | D | C |
| Predictions
AI-generated projections for the upcoming race, derived from prior AI analysis for speed and pace trends, surface and distance suitability, and current conditions. Grading scale: A = elite • B = above average • C = average • D = below average • F = poor • — = no data |
||
| Speed | C | D |
| Early Pace | B | C |
| Mid Pace | B | D |
| Late Pace | C | C |
Chart Guide (2.0.35)
- Bubbles
- Color = surface: green (turf), brown (dirt), blue (synthetic)
- Top number = finishing position; bottom number in parentheses = starting post position
- Height above line = beaten lengths — closer means a smaller margin
- Border = track conditions: green (FST/GD/FM), yellow (WF/SL/YLD), red (SY/MY/FRZ/SFT/HVY)
- Connecting Line
- Solid = good conditions; dashed = bad conditions
- Line Symbol
- ▲ Triangle = sprint (7f or less); ● Circle = route (more than 7f)
- Days Between Races
- Small number above each bubble (e.g. 19d) = days since the previous race — helps spot freshness, layoffs, and tight scheduling.
- Shaded Band (Bollinger)
- Highlights volatility — a wider band means more variation in recent performance
- Performance Trend
- Straight line showing the overall performance direction — angled up = improving, angled down = declining
- Dashed Reference Line
- AI Opponent = AI analysis class-level par for the race
✓ Positives:(1) Returning from 48-day layoff with a recent workout. (2) Hot trainer - high ITM rate (44%). (3) Career-best speed figure (50) recorded in last 1-2 starts — peaking form. (4) Hot jockey — high ITM rate (38%). (5) 3 workouts in last 30 days — horse appears sharp and fit. (6) Consistent workout spacing (9, 8 days) — disciplined training regimen. (7) Pick Pony Daily Edge Radar pick — value score 4/10 — angles: Career-Best Recent Figure, Sharp Workout Pattern.
⚠ Concerns:(1) Has not raced in 48 days. (2) Consider there will be likely pace pressure in this race - multiple E types entered. (3) Speed average (50) well below field median (68). (4) First time at today's distance. (5) Moving from a sprint to a route today. (6) Today's distance is longer than any previous start. (7) Unproven on dirt surface (1 start). (8) Trip note from last race: Shied in st; tired. (9) Was the betting favorite in the last race but finished off the board.
Mod1(W): 52 (3/5) Mod2(W): 16 (5/5) Mod3(W): 14 (5/5) Mod1-LS: 0 Mod2-LS: 18 (5/5) Mod3-LS: 0 Mod4(Form): 48 (4/5) Win Prob: 37.2% Value Score: 2.87 ★ ML: 5.00 (4/1) Overlay %: 1.37 Fair Odds: 5.98 (5/1) O/U: Fair
Score Definitions
- Mod1(W)
- Winner Model 1 score (0–100) — AI composite rating among field contenders (higher = stronger). The number in parentheses (e.g. 1/9) shows this horse’s rank out of the field size.
- Mod2(W)
- Winner Model 2 score (0–100) — AI rating among field contenders (higher = stronger). The number in parentheses shows rank within the field.
- Mod3(W)
- Winner Model 3 score (0–100) — AI rating among field contenders (higher = stronger). The number in parentheses shows rank within the field.
- Mod1-LS
- Longshot Model 1 score (0–100) — AI model trained to surface high-value longshots. Higher = stronger longshot profile. Rank in parentheses shows position within the field.
- Mod2-LS
- Longshot Model 2 score (0–100) — AI longshot model. Higher = stronger longshot profile.
- Mod3-LS
- Longshot Model 3 score (0–100) — AI longshot model. Higher = stronger longshot profile.
- Mod4(Form)
- Form Model score (0–100) — AI sequence model trained on recent form patterns to capture momentum and trajectory. Higher = stronger recent form profile. Rank in parentheses shows position within the field.
- Win Prob
- LightGBM estimated win probability expressed as a percentage. This is a raw model output, not normalized to sum to 100% across the field — use it for comparison rather than as an absolute probability.
- Value Score
- Win Prob divided by the market-implied probability (derived from morning line). Values above 1.0 mean the model sees more win chance than the odds imply — a ★ star appears when Value Score ≥ 1.3, indicating a 30%+ model edge over the market.
- ML
- Morning line odds set by the track handicapper before wagering opens
- Overlay %
- How much the fair odds exceed the morning line, expressed as a percentage — positive values indicate value
- Fair Odds
- Model-derived fair-value odds based on estimated win probability
- O/U
- Overlay or Underlay — whether the horse offers value (O) or is overbet (U) relative to fair odds
Lane Bias Guide
- Bar Direction
- Bars above the line = more favorable lane • Bars below = less favorable, relative to the average at this track.
- Color
- Green = above-average advantage • Yellow = near-average • Red = below-average • Blue = this horse’s lane.
- Bias Score
- Derived from weighted average finishing positions across historical races at this track. Shown in the tooltip on hover. To use the bias score, calculate your handicap for the horse (e.g. finish position), then add (detrimental bias) or subtract (favorable bias) the bias score.
- Races
- Number of historical races used to compute each lane’s bias score.
Race Pace Bias Guide
- Bar Height & Direction
- Positive (green) = pace favors this horse • Negative (red) = pace works against this horse • Near-zero (amber) = neutral.
- Race Shape
- Projected race shape based on running styles of all horses (e.g. EE = two early horses, EP = one early presser).
- Pace Category
- FAST = contested early pace • LONE EARLY = one speed horse controlling pace • HONEST = moderate early pressure • SLOW = closers’ race.
- Flag (★)
- A star above the bar means this horse’s pace bias figure is ≥ 1.5 — a meaningful pace advantage or disadvantage.
Total Pace Guide
- Bar Segments
- Green = Early Pace (E1) • Amber = Mid Pace (E2) • Red = Late Pace (LP)
- Bar Height
- Total height = sum of E1 + E2 + LP average pace figures. Taller bars indicate a faster-paced horse overall.
- Grades & Rankings
- Hover to see each horse’s letter grade and ranking vs. other horses in this race (e.g. 2/9 = 2nd best of 9).
- Border
- Thicker border = this horse’s post position.
Performance vs. Peers Guide
- Bars (per post)
- Blue = avg career performance • Amber = avg last 3 races • Green = last race (improved vs. avg) • Red = last race (declined vs. avg)
- Trend Line
- Angled line above the bars: rising = improving form • falling = declining form.
- Horizontal Line
- Field average — the mean career performance of all horses in this race.
- Color Circles
- Standard post-position colors below each lane — same as the Total Pace chart.
- Border
- Thicker border = this horse’s post position.
Figure Comparison
- Rating
- The three Pick Pony algorithm ratings (Algo 1, Algo 2, Algo 3) that make up the overall PP AI Rating — higher is a stronger contender rating.
- Speed
- Career average speed, recent 3-race average, and last-race speed figure — spot horses in improving or declining form.
- Pace
- Average Early (E1), Mid (E2), and Stretch (LP) pace figures — reveals pace-setters vs. closers vs. all-the-way types.
- This horse
- The horse whose stats card is open is highlighted with a darker column background.
Winning Profiles
- Axes
- X: Win % from last 10 starts — Y: In-the-money % (top-3 finishes) from last 10 starts.
- Quadrants
- Consistent Winners (top-right): high win & ITM — reliable performers.
Place Threats (top-left): boards often but doesn’t win often — good exacta/trifecta angles.
Streaky (bottom-right): wins occasionally, misses the board often — all-or-nothing.
Developing (bottom-left): still finding form — longshot territory. - Reference Lines
- Dashed lines mark field averages. Dots to the right win more; dots higher board more.
- This horse
- Highlighted with a gold border and larger dot.
AI Model Comparison
- Winner Models (green)
- Mod1(W), Mod2(W), and Mod3(W) trained to predict race winners. Higher score = stronger contender.
- Longshot Models (red)
- Mod1-LS, Mod2-LS, and Mod3-LS trained to find high-value longshots. Higher score = stronger longshot candidate.
- Form Model (blue)
- Mod4 sequence model trained on recent form patterns. Higher score = stronger recent form profile.
- This horse
- Highlighted with a darker column background.
Race Pace Simulation Guide
- Slider
- Drag left→right to advance from gate to finish. Drag all the way back to reset the race.
- Predicted Finish Order
- Factors in contested pace burn, each horse’s effort curve (peaked-early vs. peaked-late), and wide trip cost from outside posts. Updated live when Track Bias changes.
- Pace Scenario
- Lone Speed: single E horse likely rates and holds. Contested: two E horses burn each other — closers benefit. Hot Pace: speed meltdown, deep closers thrive. Soft: no early speed, moderate fractions throughout.
- Track Bias
- Slider below canvas. −2 = strong closer/wet bias; +2 = strong speed/rail bias. Recomputes the predicted finish order.
- Boxed Indicator
- Dashed orange ring = horse is surrounded (rival ahead, rival behind, wall outside). In a real race this horse must find a clear path to run.
- Running Styles
- E/EE = early speed (rushes to rail). P = presser (stalks the pace). S = stalker. SS = slow starter / closer.
| Stat | vs. Current Card | vs. All Horses |
|---|---|---|
| Averages
Career-average metrics across all AI race analysis. Performance and pace averages reflect estimated historical performance; trainer and jockey grades score in-the-money percentages. Grading scale: A = elite • B = above average • C = average • D = below average • F = poor • — = no data |
||
| Pick Pony AI Rating | D | D |
| Pace Trip Longshot | — | — |
| Connections Longshot | — | — |
| Situational Longshot | — | — |
| Speed | D | F |
| Early Pace | B | B |
| Mid Pace | C | B |
| Late Pace | D | D |
| Finish Pos | F | F |
| Dirt Speed | D | D |
| Turf Speed | C | D |
| Distance Speed | C | F |
| Trainer Effectiveness | B | B |
| Jockey Effectiveness | D | C |
| 3rd Party Ratings | C | C |
| Recent
Performance analysis from the horse's recent races, weighted to reflect current form. Sprint and Route FPS (Foot Per Second) measure pace efficiency over the horse's recent sprints and routes respectively. Grading scale: A = elite • B = above average • C = average • D = below average • F = poor • — = no data |
||
| Speed | D | F |
| Early Pace | B | B |
| Mid Pace | C | B |
| Late Pace | D | D |
| Sprint FPS | A | C |
| Route FPS | B | C |
| Trainer Effectiveness | B | B |
| Jockey Effectiveness | D | C |
| 3rd Party Ratings | C | C |
| Predictions
AI-generated projections for the upcoming race, derived from prior AI analysis for speed and pace trends, surface and distance suitability, and current conditions. Grading scale: A = elite • B = above average • C = average • D = below average • F = poor • — = no data |
||
| Speed | D | F |
| Early Pace | D | F |
| Mid Pace | D | F |
| Late Pace | C | C |
Chart Guide (2.0.35)
- Bubbles
- Color = surface: green (turf), brown (dirt), blue (synthetic)
- Top number = finishing position; bottom number in parentheses = starting post position
- Height above line = beaten lengths — closer means a smaller margin
- Border = track conditions: green (FST/GD/FM), yellow (WF/SL/YLD), red (SY/MY/FRZ/SFT/HVY)
- Connecting Line
- Solid = good conditions; dashed = bad conditions
- Line Symbol
- ▲ Triangle = sprint (7f or less); ● Circle = route (more than 7f)
- Days Between Races
- Small number above each bubble (e.g. 19d) = days since the previous race — helps spot freshness, layoffs, and tight scheduling.
- Shaded Band (Bollinger)
- Highlights volatility — a wider band means more variation in recent performance
- Performance Trend
- Straight line showing the overall performance direction — angled up = improving, angled down = declining
- Dashed Reference Line
- AI Opponent = AI analysis class-level par for the race
✓ Positives:(1) Hot trainer - high ITM rate (35%). (2) Equipment change today (code: 1). (3) Hot jockey — high ITM rate (21.49%). (4) Early pace significantly above field median (E1: 36 vs field 19). (5) Closer/presser in a race with pace pressure — ideal race setup for late runners. (6) Strong speed 2 back (72), modest dip last out (65) — form reversal angle, ready to bounce back to top form. (7) One gate workout in recent training — sharpness signal from the gate. (8) Pick Pony Daily Edge Radar pick — value score 5/10 — angles: Closer in Pace Duel, Form Reversal, Sharp Gate Work, Equipment Change.
⚠ Concerns:(1) Consider there will be likely pace pressure in this race - multiple E types entered. (2) Limited experience at today's distance (1 start). (3) Moving from a sprint to a route today. (4) Trip note from last race: Saved ground;empty.
Mod1(W): 31 (5/5) Mod2(W): 34 (2/5) Mod3(W): 26 (3/5) Mod1-LS: 76 (2/5) Mod2-LS: 31 (3/5) Mod3-LS: 55 (2/5) Mod4(Form): 19 (5/5) Win Prob: 34.9% Value Score: 4.04 ★ ML: 8.00 (7/1) Overlay %: 6.73 Fair Odds: 5.51 (9/2) O/U: Overlay
Score Definitions
- Mod1(W)
- Winner Model 1 score (0–100) — AI composite rating among field contenders (higher = stronger). The number in parentheses (e.g. 1/9) shows this horse’s rank out of the field size.
- Mod2(W)
- Winner Model 2 score (0–100) — AI rating among field contenders (higher = stronger). The number in parentheses shows rank within the field.
- Mod3(W)
- Winner Model 3 score (0–100) — AI rating among field contenders (higher = stronger). The number in parentheses shows rank within the field.
- Mod1-LS
- Longshot Model 1 score (0–100) — AI model trained to surface high-value longshots. Higher = stronger longshot profile. Rank in parentheses shows position within the field.
- Mod2-LS
- Longshot Model 2 score (0–100) — AI longshot model. Higher = stronger longshot profile.
- Mod3-LS
- Longshot Model 3 score (0–100) — AI longshot model. Higher = stronger longshot profile.
- Mod4(Form)
- Form Model score (0–100) — AI sequence model trained on recent form patterns to capture momentum and trajectory. Higher = stronger recent form profile. Rank in parentheses shows position within the field.
- Win Prob
- LightGBM estimated win probability expressed as a percentage. This is a raw model output, not normalized to sum to 100% across the field — use it for comparison rather than as an absolute probability.
- Value Score
- Win Prob divided by the market-implied probability (derived from morning line). Values above 1.0 mean the model sees more win chance than the odds imply — a ★ star appears when Value Score ≥ 1.3, indicating a 30%+ model edge over the market.
- ML
- Morning line odds set by the track handicapper before wagering opens
- Overlay %
- How much the fair odds exceed the morning line, expressed as a percentage — positive values indicate value
- Fair Odds
- Model-derived fair-value odds based on estimated win probability
- O/U
- Overlay or Underlay — whether the horse offers value (O) or is overbet (U) relative to fair odds
Lane Bias Guide
- Bar Direction
- Bars above the line = more favorable lane • Bars below = less favorable, relative to the average at this track.
- Color
- Green = above-average advantage • Yellow = near-average • Red = below-average • Blue = this horse’s lane.
- Bias Score
- Derived from weighted average finishing positions across historical races at this track. Shown in the tooltip on hover. To use the bias score, calculate your handicap for the horse (e.g. finish position), then add (detrimental bias) or subtract (favorable bias) the bias score.
- Races
- Number of historical races used to compute each lane’s bias score.
Race Pace Bias Guide
- Bar Height & Direction
- Positive (green) = pace favors this horse • Negative (red) = pace works against this horse • Near-zero (amber) = neutral.
- Race Shape
- Projected race shape based on running styles of all horses (e.g. EE = two early horses, EP = one early presser).
- Pace Category
- FAST = contested early pace • LONE EARLY = one speed horse controlling pace • HONEST = moderate early pressure • SLOW = closers’ race.
- Flag (★)
- A star above the bar means this horse’s pace bias figure is ≥ 1.5 — a meaningful pace advantage or disadvantage.
Total Pace Guide
- Bar Segments
- Green = Early Pace (E1) • Amber = Mid Pace (E2) • Red = Late Pace (LP)
- Bar Height
- Total height = sum of E1 + E2 + LP average pace figures. Taller bars indicate a faster-paced horse overall.
- Grades & Rankings
- Hover to see each horse’s letter grade and ranking vs. other horses in this race (e.g. 2/9 = 2nd best of 9).
- Border
- Thicker border = this horse’s post position.
Performance vs. Peers Guide
- Bars (per post)
- Blue = avg career performance • Amber = avg last 3 races • Green = last race (improved vs. avg) • Red = last race (declined vs. avg)
- Trend Line
- Angled line above the bars: rising = improving form • falling = declining form.
- Horizontal Line
- Field average — the mean career performance of all horses in this race.
- Color Circles
- Standard post-position colors below each lane — same as the Total Pace chart.
- Border
- Thicker border = this horse’s post position.
Figure Comparison
- Rating
- The three Pick Pony algorithm ratings (Algo 1, Algo 2, Algo 3) that make up the overall PP AI Rating — higher is a stronger contender rating.
- Speed
- Career average speed, recent 3-race average, and last-race speed figure — spot horses in improving or declining form.
- Pace
- Average Early (E1), Mid (E2), and Stretch (LP) pace figures — reveals pace-setters vs. closers vs. all-the-way types.
- This horse
- The horse whose stats card is open is highlighted with a darker column background.
Winning Profiles
- Axes
- X: Win % from last 10 starts — Y: In-the-money % (top-3 finishes) from last 10 starts.
- Quadrants
- Consistent Winners (top-right): high win & ITM — reliable performers.
Place Threats (top-left): boards often but doesn’t win often — good exacta/trifecta angles.
Streaky (bottom-right): wins occasionally, misses the board often — all-or-nothing.
Developing (bottom-left): still finding form — longshot territory. - Reference Lines
- Dashed lines mark field averages. Dots to the right win more; dots higher board more.
- This horse
- Highlighted with a gold border and larger dot.
AI Model Comparison
- Winner Models (green)
- Mod1(W), Mod2(W), and Mod3(W) trained to predict race winners. Higher score = stronger contender.
- Longshot Models (red)
- Mod1-LS, Mod2-LS, and Mod3-LS trained to find high-value longshots. Higher score = stronger longshot candidate.
- Form Model (blue)
- Mod4 sequence model trained on recent form patterns. Higher score = stronger recent form profile.
- This horse
- Highlighted with a darker column background.
Race Pace Simulation Guide
- Slider
- Drag left→right to advance from gate to finish. Drag all the way back to reset the race.
- Predicted Finish Order
- Factors in contested pace burn, each horse’s effort curve (peaked-early vs. peaked-late), and wide trip cost from outside posts. Updated live when Track Bias changes.
- Pace Scenario
- Lone Speed: single E horse likely rates and holds. Contested: two E horses burn each other — closers benefit. Hot Pace: speed meltdown, deep closers thrive. Soft: no early speed, moderate fractions throughout.
- Track Bias
- Slider below canvas. −2 = strong closer/wet bias; +2 = strong speed/rail bias. Recomputes the predicted finish order.
- Boxed Indicator
- Dashed orange ring = horse is surrounded (rival ahead, rival behind, wall outside). In a real race this horse must find a clear path to run.
- Running Styles
- E/EE = early speed (rushes to rail). P = presser (stalks the pace). S = stalker. SS = slow starter / closer.
| Stat | vs. Current Card | vs. All Horses |
|---|---|---|
| Averages
Career-average metrics across all AI race analysis. Performance and pace averages reflect estimated historical performance; trainer and jockey grades score in-the-money percentages. Grading scale: A = elite • B = above average • C = average • D = below average • F = poor • — = no data |
||
| Pick Pony AI Rating | C | D |
| Pace Trip Longshot | — | — |
| Connections Longshot | — | — |
| Situational Longshot | — | — |
| Speed | B | C |
| Early Pace | A | A |
| Mid Pace | A | A |
| Late Pace | C | D |
| Finish Pos | C | C |
| Dirt Speed | A | C |
| Turf Speed | C | D |
| Distance Speed | C | F |
| Trainer Effectiveness | C | D |
| Jockey Effectiveness | F | F |
| 3rd Party Ratings | A | B |
| Recent
Performance analysis from the horse's recent races, weighted to reflect current form. Sprint and Route FPS (Foot Per Second) measure pace efficiency over the horse's recent sprints and routes respectively. Grading scale: A = elite • B = above average • C = average • D = below average • F = poor • — = no data |
||
| Speed | B | D |
| Early Pace | A | A |
| Mid Pace | A | A |
| Late Pace | C | D |
| Sprint FPS | B | C |
| Route FPS | A | C |
| Trainer Effectiveness | C | D |
| Jockey Effectiveness | F | F |
| 3rd Party Ratings | A | B |
| Predictions
AI-generated projections for the upcoming race, derived from prior AI analysis for speed and pace trends, surface and distance suitability, and current conditions. Grading scale: A = elite • B = above average • C = average • D = below average • F = poor • — = no data |
||
| Speed | B | C |
| Early Pace | A | A |
| Mid Pace | A | A |
| Late Pace | C | C |
✓ Positives:(1) Hot trainer - high ITM rate (50%). (2) Strong trainer/jockey combo - 5 wins from 20 starts (25%). (3) Hot jockey — high ITM rate (52%). (4) 4 workouts in last 30 days — horse appears sharp and fit. (5) Has a bullet work (fastest at track that day) — sharp conditioning signal. (6) Closer/presser in a race with pace pressure — ideal race setup for late runners. (7) Consistent workout spacing (8, 7 days) — disciplined training regimen. (8) One gate workout in recent training — sharpness signal from the gate. (9) Pick Pony Daily Edge Radar pick — value score 8/10 — angles: Hot Trainer-Jockey Pairing, Closer in Pace Duel, Hot Trainer, Hot Jockey, Bullet Workout, Sharp Gate Work, Sharp Workout Pattern.
⚠ Concerns:(1) First-time starter - no previous race record. (2) Consider there will be likely pace pressure in this race - multiple E types entered. (3) First time at today's distance. (4) Has never raced on dirt surface.
Mod1(W): 46 (4/5) Mod2(W): 29 (4/5) Mod3(W): 23 (4/5) Mod1-LS: 68 (3/5) Mod2-LS: 30 (4/5) Mod3-LS: 14 (4/5) Mod4(Form): 74 (2/5) Win Prob: 63.3% Value Score: 3.26 ★ ML: 3.00 (2/1) Overlay %: -2.01 Fair Odds: 4.74 (7/2) O/U: Fair
Score Definitions
- Mod1(W)
- Winner Model 1 score (0–100) — AI composite rating among field contenders (higher = stronger). The number in parentheses (e.g. 1/9) shows this horse’s rank out of the field size.
- Mod2(W)
- Winner Model 2 score (0–100) — AI rating among field contenders (higher = stronger). The number in parentheses shows rank within the field.
- Mod3(W)
- Winner Model 3 score (0–100) — AI rating among field contenders (higher = stronger). The number in parentheses shows rank within the field.
- Mod1-LS
- Longshot Model 1 score (0–100) — AI model trained to surface high-value longshots. Higher = stronger longshot profile. Rank in parentheses shows position within the field.
- Mod2-LS
- Longshot Model 2 score (0–100) — AI longshot model. Higher = stronger longshot profile.
- Mod3-LS
- Longshot Model 3 score (0–100) — AI longshot model. Higher = stronger longshot profile.
- Mod4(Form)
- Form Model score (0–100) — AI sequence model trained on recent form patterns to capture momentum and trajectory. Higher = stronger recent form profile. Rank in parentheses shows position within the field.
- Win Prob
- LightGBM estimated win probability expressed as a percentage. This is a raw model output, not normalized to sum to 100% across the field — use it for comparison rather than as an absolute probability.
- Value Score
- Win Prob divided by the market-implied probability (derived from morning line). Values above 1.0 mean the model sees more win chance than the odds imply — a ★ star appears when Value Score ≥ 1.3, indicating a 30%+ model edge over the market.
- ML
- Morning line odds set by the track handicapper before wagering opens
- Overlay %
- How much the fair odds exceed the morning line, expressed as a percentage — positive values indicate value
- Fair Odds
- Model-derived fair-value odds based on estimated win probability
- O/U
- Overlay or Underlay — whether the horse offers value (O) or is overbet (U) relative to fair odds
Lane Bias Guide
- Bar Direction
- Bars above the line = more favorable lane • Bars below = less favorable, relative to the average at this track.
- Color
- Green = above-average advantage • Yellow = near-average • Red = below-average • Blue = this horse’s lane.
- Bias Score
- Derived from weighted average finishing positions across historical races at this track. Shown in the tooltip on hover. To use the bias score, calculate your handicap for the horse (e.g. finish position), then add (detrimental bias) or subtract (favorable bias) the bias score.
- Races
- Number of historical races used to compute each lane’s bias score.
Race Pace Bias Guide
- Bar Height & Direction
- Positive (green) = pace favors this horse • Negative (red) = pace works against this horse • Near-zero (amber) = neutral.
- Race Shape
- Projected race shape based on running styles of all horses (e.g. EE = two early horses, EP = one early presser).
- Pace Category
- FAST = contested early pace • LONE EARLY = one speed horse controlling pace • HONEST = moderate early pressure • SLOW = closers’ race.
- Flag (★)
- A star above the bar means this horse’s pace bias figure is ≥ 1.5 — a meaningful pace advantage or disadvantage.
Total Pace Guide
- Bar Segments
- Green = Early Pace (E1) • Amber = Mid Pace (E2) • Red = Late Pace (LP)
- Bar Height
- Total height = sum of E1 + E2 + LP average pace figures. Taller bars indicate a faster-paced horse overall.
- Grades & Rankings
- Hover to see each horse’s letter grade and ranking vs. other horses in this race (e.g. 2/9 = 2nd best of 9).
- Border
- Thicker border = this horse’s post position.
Performance vs. Peers Guide
- Bars (per post)
- Blue = avg career performance • Amber = avg last 3 races • Green = last race (improved vs. avg) • Red = last race (declined vs. avg)
- Trend Line
- Angled line above the bars: rising = improving form • falling = declining form.
- Horizontal Line
- Field average — the mean career performance of all horses in this race.
- Color Circles
- Standard post-position colors below each lane — same as the Total Pace chart.
- Border
- Thicker border = this horse’s post position.
Figure Comparison
- Rating
- The three Pick Pony algorithm ratings (Algo 1, Algo 2, Algo 3) that make up the overall PP AI Rating — higher is a stronger contender rating.
- Speed
- Career average speed, recent 3-race average, and last-race speed figure — spot horses in improving or declining form.
- Pace
- Average Early (E1), Mid (E2), and Stretch (LP) pace figures — reveals pace-setters vs. closers vs. all-the-way types.
- This horse
- The horse whose stats card is open is highlighted with a darker column background.
Winning Profiles
- Axes
- X: Win % from last 10 starts — Y: In-the-money % (top-3 finishes) from last 10 starts.
- Quadrants
- Consistent Winners (top-right): high win & ITM — reliable performers.
Place Threats (top-left): boards often but doesn’t win often — good exacta/trifecta angles.
Streaky (bottom-right): wins occasionally, misses the board often — all-or-nothing.
Developing (bottom-left): still finding form — longshot territory. - Reference Lines
- Dashed lines mark field averages. Dots to the right win more; dots higher board more.
- This horse
- Highlighted with a gold border and larger dot.
AI Model Comparison
- Winner Models (green)
- Mod1(W), Mod2(W), and Mod3(W) trained to predict race winners. Higher score = stronger contender.
- Longshot Models (red)
- Mod1-LS, Mod2-LS, and Mod3-LS trained to find high-value longshots. Higher score = stronger longshot candidate.
- Form Model (blue)
- Mod4 sequence model trained on recent form patterns. Higher score = stronger recent form profile.
- This horse
- Highlighted with a darker column background.
Race Pace Simulation Guide
- Slider
- Drag left→right to advance from gate to finish. Drag all the way back to reset the race.
- Predicted Finish Order
- Factors in contested pace burn, each horse’s effort curve (peaked-early vs. peaked-late), and wide trip cost from outside posts. Updated live when Track Bias changes.
- Pace Scenario
- Lone Speed: single E horse likely rates and holds. Contested: two E horses burn each other — closers benefit. Hot Pace: speed meltdown, deep closers thrive. Soft: no early speed, moderate fractions throughout.
- Track Bias
- Slider below canvas. −2 = strong closer/wet bias; +2 = strong speed/rail bias. Recomputes the predicted finish order.
- Boxed Indicator
- Dashed orange ring = horse is surrounded (rival ahead, rival behind, wall outside). In a real race this horse must find a clear path to run.
- Running Styles
- E/EE = early speed (rushes to rail). P = presser (stalks the pace). S = stalker. SS = slow starter / closer.
| Stat | vs. Current Card | vs. All Horses |
|---|---|---|
| Averages
Career-average metrics across all AI race analysis. Performance and pace averages reflect estimated historical performance; trainer and jockey grades score in-the-money percentages. Grading scale: A = elite • B = above average • C = average • D = below average • F = poor • — = no data |
||
| Pick Pony AI Rating | A | C |
| Pace Trip Longshot | — | — |
| Connections Longshot | — | — |
| Situational Longshot | — | — |
| Speed | F | F |
| Early Pace | F | F |
| Mid Pace | F | F |
| Late Pace | F | F |
| Finish Pos | A | A |
| Dirt Speed | F | F |
| Turf Speed | C | D |
| Distance Speed | C | F |
| Trainer Effectiveness | A | A |
| Jockey Effectiveness | A | A |
| 3rd Party Ratings | F | F |
| Recent
Performance analysis from the horse's recent races, weighted to reflect current form. Sprint and Route FPS (Foot Per Second) measure pace efficiency over the horse's recent sprints and routes respectively. Grading scale: A = elite • B = above average • C = average • D = below average • F = poor • — = no data |
||
| Speed | F | F |
| Early Pace | F | F |
| Mid Pace | F | F |
| Late Pace | F | F |
| Sprint FPS | F | F |
| Route FPS | F | F |
| Trainer Effectiveness | A | A |
| Jockey Effectiveness | A | A |
| 3rd Party Ratings | F | F |
| Predictions
AI-generated projections for the upcoming race, derived from prior AI analysis for speed and pace trends, surface and distance suitability, and current conditions. Grading scale: A = elite • B = above average • C = average • D = below average • F = poor • — = no data |
||
| Speed | F | F |
| Early Pace | D | F |
| Mid Pace | D | F |
| Late Pace | C | C |
Chart Guide (2.0.35)
- Bubbles
- Color = surface: green (turf), brown (dirt), blue (synthetic)
- Top number = finishing position; bottom number in parentheses = starting post position
- Height above line = beaten lengths — closer means a smaller margin
- Border = track conditions: green (FST/GD/FM), yellow (WF/SL/YLD), red (SY/MY/FRZ/SFT/HVY)
- Connecting Line
- Solid = good conditions; dashed = bad conditions
- Line Symbol
- ▲ Triangle = sprint (7f or less); ● Circle = route (more than 7f)
- Days Between Races
- Small number above each bubble (e.g. 19d) = days since the previous race — helps spot freshness, layoffs, and tight scheduling.
- Shaded Band (Bollinger)
- Highlights volatility — a wider band means more variation in recent performance
- Performance Trend
- Straight line showing the overall performance direction — angled up = improving, angled down = declining
- Dashed Reference Line
- AI Opponent = AI analysis class-level par for the race
✓ Positives:(1) Speed average (74) well above field median (68). (2) Hot trainer - high ITM rate (25%). (3) Career-best speed figure (78) recorded in last 1-2 starts — peaking form. (4) Hot jockey — high ITM rate (41%). (5) Has a bullet work (fastest at track that day) — sharp conditioning signal. (6) Early pace significantly above field median (E1: 94 vs field 87). (7) Had documented trouble last race (codes: ['D', 'L', 'O', 'T', 'U']) yet still finished 2nd — a clean trip today sets up a form reversal. (8) Pick Pony Daily Edge Radar pick — value score 9/10 — angles: Class Superiority, Career-Best Recent Figure, Troubled Trip Comeback, Bullet Workout, Early Speed Edge.
⚠ Concerns:(1) Consider there will be likely pace pressure in this race - multiple E types entered. (2) Limited experience at today's distance (1 start). (3) Moving from a sprint to a route today. (4) Unproven on dirt surface (2 starts). (5) Trip note from last race: Out;3p;led;denied late.
Mod1(W): 100 (1/5) Mod2(W): 100 (1/5) Mod3(W): 100 (1/5) Mod1-LS: 100 (1/5) Mod2-LS: 100 (1/5) Mod3-LS: 100 (1/5) Mod4(Form): 100 (1/5) Win Prob: 86.5% Value Score: 2.23 ★ ML: 1.00 Overlay %: -13.42 Fair Odds: 2.93 (2/1) O/U: Underlay
Score Definitions
- Mod1(W)
- Winner Model 1 score (0–100) — AI composite rating among field contenders (higher = stronger). The number in parentheses (e.g. 1/9) shows this horse’s rank out of the field size.
- Mod2(W)
- Winner Model 2 score (0–100) — AI rating among field contenders (higher = stronger). The number in parentheses shows rank within the field.
- Mod3(W)
- Winner Model 3 score (0–100) — AI rating among field contenders (higher = stronger). The number in parentheses shows rank within the field.
- Mod1-LS
- Longshot Model 1 score (0–100) — AI model trained to surface high-value longshots. Higher = stronger longshot profile. Rank in parentheses shows position within the field.
- Mod2-LS
- Longshot Model 2 score (0–100) — AI longshot model. Higher = stronger longshot profile.
- Mod3-LS
- Longshot Model 3 score (0–100) — AI longshot model. Higher = stronger longshot profile.
- Mod4(Form)
- Form Model score (0–100) — AI sequence model trained on recent form patterns to capture momentum and trajectory. Higher = stronger recent form profile. Rank in parentheses shows position within the field.
- Win Prob
- LightGBM estimated win probability expressed as a percentage. This is a raw model output, not normalized to sum to 100% across the field — use it for comparison rather than as an absolute probability.
- Value Score
- Win Prob divided by the market-implied probability (derived from morning line). Values above 1.0 mean the model sees more win chance than the odds imply — a ★ star appears when Value Score ≥ 1.3, indicating a 30%+ model edge over the market.
- ML
- Morning line odds set by the track handicapper before wagering opens
- Overlay %
- How much the fair odds exceed the morning line, expressed as a percentage — positive values indicate value
- Fair Odds
- Model-derived fair-value odds based on estimated win probability
- O/U
- Overlay or Underlay — whether the horse offers value (O) or is overbet (U) relative to fair odds
Lane Bias Guide
- Bar Direction
- Bars above the line = more favorable lane • Bars below = less favorable, relative to the average at this track.
- Color
- Green = above-average advantage • Yellow = near-average • Red = below-average • Blue = this horse’s lane.
- Bias Score
- Derived from weighted average finishing positions across historical races at this track. Shown in the tooltip on hover. To use the bias score, calculate your handicap for the horse (e.g. finish position), then add (detrimental bias) or subtract (favorable bias) the bias score.
- Races
- Number of historical races used to compute each lane’s bias score.
Race Pace Bias Guide
- Bar Height & Direction
- Positive (green) = pace favors this horse • Negative (red) = pace works against this horse • Near-zero (amber) = neutral.
- Race Shape
- Projected race shape based on running styles of all horses (e.g. EE = two early horses, EP = one early presser).
- Pace Category
- FAST = contested early pace • LONE EARLY = one speed horse controlling pace • HONEST = moderate early pressure • SLOW = closers’ race.
- Flag (★)
- A star above the bar means this horse’s pace bias figure is ≥ 1.5 — a meaningful pace advantage or disadvantage.
Total Pace Guide
- Bar Segments
- Green = Early Pace (E1) • Amber = Mid Pace (E2) • Red = Late Pace (LP)
- Bar Height
- Total height = sum of E1 + E2 + LP average pace figures. Taller bars indicate a faster-paced horse overall.
- Grades & Rankings
- Hover to see each horse’s letter grade and ranking vs. other horses in this race (e.g. 2/9 = 2nd best of 9).
- Border
- Thicker border = this horse’s post position.
Performance vs. Peers Guide
- Bars (per post)
- Blue = avg career performance • Amber = avg last 3 races • Green = last race (improved vs. avg) • Red = last race (declined vs. avg)
- Trend Line
- Angled line above the bars: rising = improving form • falling = declining form.
- Horizontal Line
- Field average — the mean career performance of all horses in this race.
- Color Circles
- Standard post-position colors below each lane — same as the Total Pace chart.
- Border
- Thicker border = this horse’s post position.
Figure Comparison
- Rating
- The three Pick Pony algorithm ratings (Algo 1, Algo 2, Algo 3) that make up the overall PP AI Rating — higher is a stronger contender rating.
- Speed
- Career average speed, recent 3-race average, and last-race speed figure — spot horses in improving or declining form.
- Pace
- Average Early (E1), Mid (E2), and Stretch (LP) pace figures — reveals pace-setters vs. closers vs. all-the-way types.
- This horse
- The horse whose stats card is open is highlighted with a darker column background.
Winning Profiles
- Axes
- X: Win % from last 10 starts — Y: In-the-money % (top-3 finishes) from last 10 starts.
- Quadrants
- Consistent Winners (top-right): high win & ITM — reliable performers.
Place Threats (top-left): boards often but doesn’t win often — good exacta/trifecta angles.
Streaky (bottom-right): wins occasionally, misses the board often — all-or-nothing.
Developing (bottom-left): still finding form — longshot territory. - Reference Lines
- Dashed lines mark field averages. Dots to the right win more; dots higher board more.
- This horse
- Highlighted with a gold border and larger dot.
AI Model Comparison
- Winner Models (green)
- Mod1(W), Mod2(W), and Mod3(W) trained to predict race winners. Higher score = stronger contender.
- Longshot Models (red)
- Mod1-LS, Mod2-LS, and Mod3-LS trained to find high-value longshots. Higher score = stronger longshot candidate.
- Form Model (blue)
- Mod4 sequence model trained on recent form patterns. Higher score = stronger recent form profile.
- This horse
- Highlighted with a darker column background.
Race Pace Simulation Guide
- Slider
- Drag left→right to advance from gate to finish. Drag all the way back to reset the race.
- Predicted Finish Order
- Factors in contested pace burn, each horse’s effort curve (peaked-early vs. peaked-late), and wide trip cost from outside posts. Updated live when Track Bias changes.
- Pace Scenario
- Lone Speed: single E horse likely rates and holds. Contested: two E horses burn each other — closers benefit. Hot Pace: speed meltdown, deep closers thrive. Soft: no early speed, moderate fractions throughout.
- Track Bias
- Slider below canvas. −2 = strong closer/wet bias; +2 = strong speed/rail bias. Recomputes the predicted finish order.
- Boxed Indicator
- Dashed orange ring = horse is surrounded (rival ahead, rival behind, wall outside). In a real race this horse must find a clear path to run.
- Running Styles
- E/EE = early speed (rushes to rail). P = presser (stalks the pace). S = stalker. SS = slow starter / closer.
| Stat | vs. Current Card | vs. All Horses |
|---|---|---|
| Averages
Career-average metrics across all AI race analysis. Performance and pace averages reflect estimated historical performance; trainer and jockey grades score in-the-money percentages. Grading scale: A = elite • B = above average • C = average • D = below average • F = poor • — = no data |
||
| Pick Pony AI Rating | A | A |
| Pace Trip Longshot | — | — |
| Connections Longshot | — | — |
| Situational Longshot | — | — |
| Speed | A | B |
| Early Pace | A | A |
| Mid Pace | A | A |
| Late Pace | B | C |
| Finish Pos | A | A |
| Dirt Speed | A | B |
| Turf Speed | C | D |
| Distance Speed | C | F |
| Trainer Effectiveness | F | F |
| Jockey Effectiveness | B | C |
| 3rd Party Ratings | A | A |
| Recent
Performance analysis from the horse's recent races, weighted to reflect current form. Sprint and Route FPS (Foot Per Second) measure pace efficiency over the horse's recent sprints and routes respectively. Grading scale: A = elite • B = above average • C = average • D = below average • F = poor • — = no data |
||
| Speed | A | B |
| Early Pace | A | A |
| Mid Pace | A | A |
| Late Pace | B | C |
| Sprint FPS | A | B |
| Route FPS | A | B |
| Trainer Effectiveness | F | F |
| Jockey Effectiveness | B | C |
| 3rd Party Ratings | A | A |
| Predictions
AI-generated projections for the upcoming race, derived from prior AI analysis for speed and pace trends, surface and distance suitability, and current conditions. Grading scale: A = elite • B = above average • C = average • D = below average • F = poor • — = no data |
||
| Speed | A | A |
| Early Pace | A | A |
| Mid Pace | A | A |
| Late Pace | C | C |
Chart Guide (2.0.35)
- Bubbles
- Color = surface: green (turf), brown (dirt), blue (synthetic)
- Top number = finishing position; bottom number in parentheses = starting post position
- Height above line = beaten lengths — closer means a smaller margin
- Border = track conditions: green (FST/GD/FM), yellow (WF/SL/YLD), red (SY/MY/FRZ/SFT/HVY)
- Connecting Line
- Solid = good conditions; dashed = bad conditions
- Line Symbol
- ▲ Triangle = sprint (7f or less); ● Circle = route (more than 7f)
- Days Between Races
- Small number above each bubble (e.g. 19d) = days since the previous race — helps spot freshness, layoffs, and tight scheduling.
- Shaded Band (Bollinger)
- Highlights volatility — a wider band means more variation in recent performance
- Performance Trend
- Straight line showing the overall performance direction — angled up = improving, angled down = declining
- Dashed Reference Line
- AI Opponent = AI analysis class-level par for the race
✓ Positives:(1) Hot trainer - high ITM rate (31%). (2) Career-best speed figure (71) recorded in last 1-2 starts — peaking form. (3) Hot jockey — high ITM rate (50%). (4) Late pace significantly above field median (LP: 72 vs field 68). (5) Closer/presser in a race with pace pressure — ideal race setup for late runners. (6) Pick Pony Daily Edge Radar pick — value score 7/10 — angles: Career-Best Recent Figure, Closer in Pace Duel, Hot Jockey, Late Kick Advantage.
⚠ Concerns:(1) Consider there will be likely pace pressure in this race - multiple E types entered. (2) Limited experience at today's distance (1 start). (3) Moving from a sprint to a route today. (4) Unproven on dirt surface (1 start). (5) Trip note from last race: Awkward brk;taken up.
Mod1(W): 76 (2/5) Mod2(W): 33 (3/5) Mod3(W): 27 (2/5) Mod1-LS: 8 (5/5) Mod2-LS: 35 (2/5) Mod3-LS: 31 (3/5) Mod4(Form): 54 (3/5) Win Prob: 48.6% Value Score: 3.44 ★ ML: 4.50 (7/2) Overlay %: 2.75 Fair Odds: 4.92 (4/1) O/U: Fair
Score Definitions
- Mod1(W)
- Winner Model 1 score (0–100) — AI composite rating among field contenders (higher = stronger). The number in parentheses (e.g. 1/9) shows this horse’s rank out of the field size.
- Mod2(W)
- Winner Model 2 score (0–100) — AI rating among field contenders (higher = stronger). The number in parentheses shows rank within the field.
- Mod3(W)
- Winner Model 3 score (0–100) — AI rating among field contenders (higher = stronger). The number in parentheses shows rank within the field.
- Mod1-LS
- Longshot Model 1 score (0–100) — AI model trained to surface high-value longshots. Higher = stronger longshot profile. Rank in parentheses shows position within the field.
- Mod2-LS
- Longshot Model 2 score (0–100) — AI longshot model. Higher = stronger longshot profile.
- Mod3-LS
- Longshot Model 3 score (0–100) — AI longshot model. Higher = stronger longshot profile.
- Mod4(Form)
- Form Model score (0–100) — AI sequence model trained on recent form patterns to capture momentum and trajectory. Higher = stronger recent form profile. Rank in parentheses shows position within the field.
- Win Prob
- LightGBM estimated win probability expressed as a percentage. This is a raw model output, not normalized to sum to 100% across the field — use it for comparison rather than as an absolute probability.
- Value Score
- Win Prob divided by the market-implied probability (derived from morning line). Values above 1.0 mean the model sees more win chance than the odds imply — a ★ star appears when Value Score ≥ 1.3, indicating a 30%+ model edge over the market.
- ML
- Morning line odds set by the track handicapper before wagering opens
- Overlay %
- How much the fair odds exceed the morning line, expressed as a percentage — positive values indicate value
- Fair Odds
- Model-derived fair-value odds based on estimated win probability
- O/U
- Overlay or Underlay — whether the horse offers value (O) or is overbet (U) relative to fair odds
Lane Bias Guide
- Bar Direction
- Bars above the line = more favorable lane • Bars below = less favorable, relative to the average at this track.
- Color
- Green = above-average advantage • Yellow = near-average • Red = below-average • Blue = this horse’s lane.
- Bias Score
- Derived from weighted average finishing positions across historical races at this track. Shown in the tooltip on hover. To use the bias score, calculate your handicap for the horse (e.g. finish position), then add (detrimental bias) or subtract (favorable bias) the bias score.
- Races
- Number of historical races used to compute each lane’s bias score.
Race Pace Bias Guide
- Bar Height & Direction
- Positive (green) = pace favors this horse • Negative (red) = pace works against this horse • Near-zero (amber) = neutral.
- Race Shape
- Projected race shape based on running styles of all horses (e.g. EE = two early horses, EP = one early presser).
- Pace Category
- FAST = contested early pace • LONE EARLY = one speed horse controlling pace • HONEST = moderate early pressure • SLOW = closers’ race.
- Flag (★)
- A star above the bar means this horse’s pace bias figure is ≥ 1.5 — a meaningful pace advantage or disadvantage.
Total Pace Guide
- Bar Segments
- Green = Early Pace (E1) • Amber = Mid Pace (E2) • Red = Late Pace (LP)
- Bar Height
- Total height = sum of E1 + E2 + LP average pace figures. Taller bars indicate a faster-paced horse overall.
- Grades & Rankings
- Hover to see each horse’s letter grade and ranking vs. other horses in this race (e.g. 2/9 = 2nd best of 9).
- Border
- Thicker border = this horse’s post position.
Performance vs. Peers Guide
- Bars (per post)
- Blue = avg career performance • Amber = avg last 3 races • Green = last race (improved vs. avg) • Red = last race (declined vs. avg)
- Trend Line
- Angled line above the bars: rising = improving form • falling = declining form.
- Horizontal Line
- Field average — the mean career performance of all horses in this race.
- Color Circles
- Standard post-position colors below each lane — same as the Total Pace chart.
- Border
- Thicker border = this horse’s post position.
Figure Comparison
- Rating
- The three Pick Pony algorithm ratings (Algo 1, Algo 2, Algo 3) that make up the overall PP AI Rating — higher is a stronger contender rating.
- Speed
- Career average speed, recent 3-race average, and last-race speed figure — spot horses in improving or declining form.
- Pace
- Average Early (E1), Mid (E2), and Stretch (LP) pace figures — reveals pace-setters vs. closers vs. all-the-way types.
- This horse
- The horse whose stats card is open is highlighted with a darker column background.
Winning Profiles
- Axes
- X: Win % from last 10 starts — Y: In-the-money % (top-3 finishes) from last 10 starts.
- Quadrants
- Consistent Winners (top-right): high win & ITM — reliable performers.
Place Threats (top-left): boards often but doesn’t win often — good exacta/trifecta angles.
Streaky (bottom-right): wins occasionally, misses the board often — all-or-nothing.
Developing (bottom-left): still finding form — longshot territory. - Reference Lines
- Dashed lines mark field averages. Dots to the right win more; dots higher board more.
- This horse
- Highlighted with a gold border and larger dot.
AI Model Comparison
- Winner Models (green)
- Mod1(W), Mod2(W), and Mod3(W) trained to predict race winners. Higher score = stronger contender.
- Longshot Models (red)
- Mod1-LS, Mod2-LS, and Mod3-LS trained to find high-value longshots. Higher score = stronger longshot candidate.
- Form Model (blue)
- Mod4 sequence model trained on recent form patterns. Higher score = stronger recent form profile.
- This horse
- Highlighted with a darker column background.
Race Pace Simulation Guide
- Slider
- Drag left→right to advance from gate to finish. Drag all the way back to reset the race.
- Predicted Finish Order
- Factors in contested pace burn, each horse’s effort curve (peaked-early vs. peaked-late), and wide trip cost from outside posts. Updated live when Track Bias changes.
- Pace Scenario
- Lone Speed: single E horse likely rates and holds. Contested: two E horses burn each other — closers benefit. Hot Pace: speed meltdown, deep closers thrive. Soft: no early speed, moderate fractions throughout.
- Track Bias
- Slider below canvas. −2 = strong closer/wet bias; +2 = strong speed/rail bias. Recomputes the predicted finish order.
- Boxed Indicator
- Dashed orange ring = horse is surrounded (rival ahead, rival behind, wall outside). In a real race this horse must find a clear path to run.
- Running Styles
- E/EE = early speed (rushes to rail). P = presser (stalks the pace). S = stalker. SS = slow starter / closer.
| Stat | vs. Current Card | vs. All Horses |
|---|---|---|
| Averages
Career-average metrics across all AI race analysis. Performance and pace averages reflect estimated historical performance; trainer and jockey grades score in-the-money percentages. Grading scale: A = elite • B = above average • C = average • D = below average • F = poor • — = no data |
||
| Pick Pony AI Rating | B | C |
| Pace Trip Longshot | — | — |
| Connections Longshot | — | — |
| Situational Longshot | — | — |
| Speed | A | C |
| Early Pace | C | C |
| Mid Pace | B | B |
| Late Pace | A | C |
| Finish Pos | A | A |
| Dirt Speed | B | C |
| Turf Speed | C | D |
| Distance Speed | C | F |
| Trainer Effectiveness | D | D |
| Jockey Effectiveness | A | A |
| 3rd Party Ratings | B | B |
| Recent
Performance analysis from the horse's recent races, weighted to reflect current form. Sprint and Route FPS (Foot Per Second) measure pace efficiency over the horse's recent sprints and routes respectively. Grading scale: A = elite • B = above average • C = average • D = below average • F = poor • — = no data |
||
| Speed | A | C |
| Early Pace | C | C |
| Mid Pace | B | B |
| Late Pace | A | C |
| Sprint FPS | D | D |
| Route FPS | D | D |
| Trainer Effectiveness | D | D |
| Jockey Effectiveness | A | A |
| 3rd Party Ratings | B | B |
| Predictions
AI-generated projections for the upcoming race, derived from prior AI analysis for speed and pace trends, surface and distance suitability, and current conditions. Grading scale: A = elite • B = above average • C = average • D = below average • F = poor • — = no data |
||
| Speed | A | C |
| Early Pace | D | F |
| Mid Pace | D | F |
| Late Pace | C | C |
Chart Guide (2.0.35)
- Bubbles
- Color = surface: green (turf), brown (dirt), blue (synthetic)
- Top number = finishing position; bottom number in parentheses = starting post position
- Height above line = beaten lengths — closer means a smaller margin
- Border = track conditions: green (FST/GD/FM), yellow (WF/SL/YLD), red (SY/MY/FRZ/SFT/HVY)
- Connecting Line
- Solid = good conditions; dashed = bad conditions
- Line Symbol
- ▲ Triangle = sprint (7f or less); ● Circle = route (more than 7f)
- Days Between Races
- Small number above each bubble (e.g. 19d) = days since the previous race — helps spot freshness, layoffs, and tight scheduling.
- Shaded Band (Bollinger)
- Highlights volatility — a wider band means more variation in recent performance
- Performance Trend
- Straight line showing the overall performance direction — angled up = improving, angled down = declining
- Dashed Reference Line
- AI Opponent = AI analysis class-level par for the race
✓ Positives:(1) Hot trainer - high ITM rate (45%). (2) Hot jockey — high ITM rate (59%). (3) Won last 2 consecutive starts. (4) Track specialist — 3 wins from 8 starts here (38%). (5) Fourth race back from a 52-day layoff — often the peak fitness race. (6) Strong speed 2 back (83), modest dip last out (74) — form reversal angle, ready to bounce back to top form. (7) Has won at today's distance (1760 yds) within the last 10 starts — proven ability at this trip. (8) Has won at AQU on dirt in the last 10 starts — proven at today's exact track/surface combo. (9) Career-best figure (90) buried in races 4–10 back — 15 pts above race median and 7 pts above recent form — market has forgotten the peak effort. (10) Had documented trouble last race (codes: ['D', 'L', 'T', 'U']) yet still finished 1st — a clean trip today sets up a form reversal. (11) Pick Pony Daily Edge Radar pick — value score 9/10 — angles: Win Streak Momentum, Troubled Trip Comeback, Won Here Before, Hot Jockey, Hidden Figure, Form Reversal, Won at This Distance, Track Specialist, Classic Fourth Race Pattern.
⚠ Concerns:(1) Was claimed from its most recent race - new connections. (2) Trip note from last race: 5path turn;rallied;clr.
Mod1(W): 100 (1/5) Mod2(W): 100 (1/5) Mod3(W): 100 (1/5) Mod1-LS: 100 (1/5) Mod2-LS: 100 (1/5) Mod3-LS: 100 (1/5) Mod4(Form): 100 (1/5) Win Prob: 82.4% Value Score: 2.1 ★ ML: 1.00 Overlay %: -15.84 Fair Odds: 3.27 (5/2) O/U: Underlay
Score Definitions
- Mod1(W)
- Winner Model 1 score (0–100) — AI composite rating among field contenders (higher = stronger). The number in parentheses (e.g. 1/9) shows this horse’s rank out of the field size.
- Mod2(W)
- Winner Model 2 score (0–100) — AI rating among field contenders (higher = stronger). The number in parentheses shows rank within the field.
- Mod3(W)
- Winner Model 3 score (0–100) — AI rating among field contenders (higher = stronger). The number in parentheses shows rank within the field.
- Mod1-LS
- Longshot Model 1 score (0–100) — AI model trained to surface high-value longshots. Higher = stronger longshot profile. Rank in parentheses shows position within the field.
- Mod2-LS
- Longshot Model 2 score (0–100) — AI longshot model. Higher = stronger longshot profile.
- Mod3-LS
- Longshot Model 3 score (0–100) — AI longshot model. Higher = stronger longshot profile.
- Mod4(Form)
- Form Model score (0–100) — AI sequence model trained on recent form patterns to capture momentum and trajectory. Higher = stronger recent form profile. Rank in parentheses shows position within the field.
- Win Prob
- LightGBM estimated win probability expressed as a percentage. This is a raw model output, not normalized to sum to 100% across the field — use it for comparison rather than as an absolute probability.
- Value Score
- Win Prob divided by the market-implied probability (derived from morning line). Values above 1.0 mean the model sees more win chance than the odds imply — a ★ star appears when Value Score ≥ 1.3, indicating a 30%+ model edge over the market.
- ML
- Morning line odds set by the track handicapper before wagering opens
- Overlay %
- How much the fair odds exceed the morning line, expressed as a percentage — positive values indicate value
- Fair Odds
- Model-derived fair-value odds based on estimated win probability
- O/U
- Overlay or Underlay — whether the horse offers value (O) or is overbet (U) relative to fair odds
Lane Bias Guide
- Bar Direction
- Bars above the line = more favorable lane • Bars below = less favorable, relative to the average at this track.
- Color
- Green = above-average advantage • Yellow = near-average • Red = below-average • Blue = this horse’s lane.
- Bias Score
- Derived from weighted average finishing positions across historical races at this track. Shown in the tooltip on hover. To use the bias score, calculate your handicap for the horse (e.g. finish position), then add (detrimental bias) or subtract (favorable bias) the bias score.
- Races
- Number of historical races used to compute each lane’s bias score.
Race Pace Bias Guide
- Bar Height & Direction
- Positive (green) = pace favors this horse • Negative (red) = pace works against this horse • Near-zero (amber) = neutral.
- Race Shape
- Projected race shape based on running styles of all horses (e.g. EE = two early horses, EP = one early presser).
- Pace Category
- FAST = contested early pace • LONE EARLY = one speed horse controlling pace • HONEST = moderate early pressure • SLOW = closers’ race.
- Flag (★)
- A star above the bar means this horse’s pace bias figure is ≥ 1.5 — a meaningful pace advantage or disadvantage.
Total Pace Guide
- Bar Segments
- Green = Early Pace (E1) • Amber = Mid Pace (E2) • Red = Late Pace (LP)
- Bar Height
- Total height = sum of E1 + E2 + LP average pace figures. Taller bars indicate a faster-paced horse overall.
- Grades & Rankings
- Hover to see each horse’s letter grade and ranking vs. other horses in this race (e.g. 2/9 = 2nd best of 9).
- Border
- Thicker border = this horse’s post position.
Performance vs. Peers Guide
- Bars (per post)
- Blue = avg career performance • Amber = avg last 3 races • Green = last race (improved vs. avg) • Red = last race (declined vs. avg)
- Trend Line
- Angled line above the bars: rising = improving form • falling = declining form.
- Horizontal Line
- Field average — the mean career performance of all horses in this race.
- Color Circles
- Standard post-position colors below each lane — same as the Total Pace chart.
- Border
- Thicker border = this horse’s post position.
Figure Comparison
- Rating
- The three Pick Pony algorithm ratings (Algo 1, Algo 2, Algo 3) that make up the overall PP AI Rating — higher is a stronger contender rating.
- Speed
- Career average speed, recent 3-race average, and last-race speed figure — spot horses in improving or declining form.
- Pace
- Average Early (E1), Mid (E2), and Stretch (LP) pace figures — reveals pace-setters vs. closers vs. all-the-way types.
- This horse
- The horse whose stats card is open is highlighted with a darker column background.
Winning Profiles
- Axes
- X: Win % from last 10 starts — Y: In-the-money % (top-3 finishes) from last 10 starts.
- Quadrants
- Consistent Winners (top-right): high win & ITM — reliable performers.
Place Threats (top-left): boards often but doesn’t win often — good exacta/trifecta angles.
Streaky (bottom-right): wins occasionally, misses the board often — all-or-nothing.
Developing (bottom-left): still finding form — longshot territory. - Reference Lines
- Dashed lines mark field averages. Dots to the right win more; dots higher board more.
- This horse
- Highlighted with a gold border and larger dot.
AI Model Comparison
- Winner Models (green)
- Mod1(W), Mod2(W), and Mod3(W) trained to predict race winners. Higher score = stronger contender.
- Longshot Models (red)
- Mod1-LS, Mod2-LS, and Mod3-LS trained to find high-value longshots. Higher score = stronger longshot candidate.
- Form Model (blue)
- Mod4 sequence model trained on recent form patterns. Higher score = stronger recent form profile.
- This horse
- Highlighted with a darker column background.
Race Pace Simulation Guide
- Slider
- Drag left→right to advance from gate to finish. Drag all the way back to reset the race.
- Predicted Finish Order
- Factors in contested pace burn, each horse’s effort curve (peaked-early vs. peaked-late), and wide trip cost from outside posts. Updated live when Track Bias changes.
- Pace Scenario
- Lone Speed: single E horse likely rates and holds. Contested: two E horses burn each other — closers benefit. Hot Pace: speed meltdown, deep closers thrive. Soft: no early speed, moderate fractions throughout.
- Track Bias
- Slider below canvas. −2 = strong closer/wet bias; +2 = strong speed/rail bias. Recomputes the predicted finish order.
- Boxed Indicator
- Dashed orange ring = horse is surrounded (rival ahead, rival behind, wall outside). In a real race this horse must find a clear path to run.
- Running Styles
- E/EE = early speed (rushes to rail). P = presser (stalks the pace). S = stalker. SS = slow starter / closer.
| Stat | vs. Current Card | vs. All Horses |
|---|---|---|
| Averages
Career-average metrics across all AI race analysis. Performance and pace averages reflect estimated historical performance; trainer and jockey grades score in-the-money percentages. Grading scale: A = elite • B = above average • C = average • D = below average • F = poor • — = no data |
||
| Pick Pony AI Rating | A | A |
| Pace Trip Longshot | — | — |
| Connections Longshot | — | — |
| Situational Longshot | — | — |
| Speed | A | B |
| Early Pace | C | D |
| Mid Pace | C | C |
| Late Pace | B | A |
| Finish Pos | A | B |
| Dirt Speed | A | A |
| Turf Speed | C | C |
| Distance Speed | D | A |
| Trainer Effectiveness | B | B |
| Jockey Effectiveness | A | A |
| 3rd Party Ratings | A | A |
| Recent
Performance analysis from the horse's recent races, weighted to reflect current form. Sprint and Route FPS (Foot Per Second) measure pace efficiency over the horse's recent sprints and routes respectively. Grading scale: A = elite • B = above average • C = average • D = below average • F = poor • — = no data |
||
| Speed | A | B |
| Early Pace | B | C |
| Mid Pace | B | C |
| Late Pace | A | A |
| Sprint FPS | A | B |
| Route FPS | A | A |
| Trainer Effectiveness | B | B |
| Jockey Effectiveness | A | A |
| 3rd Party Ratings | A | A |
| Predictions
AI-generated projections for the upcoming race, derived from prior AI analysis for speed and pace trends, surface and distance suitability, and current conditions. Grading scale: A = elite • B = above average • C = average • D = below average • F = poor • — = no data |
||
| Speed | A | B |
| Early Pace | A | C |
| Mid Pace | D | C |
| Late Pace | C | C |
Chart Guide (2.0.35)
- Bubbles
- Color = surface: green (turf), brown (dirt), blue (synthetic)
- Top number = finishing position; bottom number in parentheses = starting post position
- Height above line = beaten lengths — closer means a smaller margin
- Border = track conditions: green (FST/GD/FM), yellow (WF/SL/YLD), red (SY/MY/FRZ/SFT/HVY)
- Connecting Line
- Solid = good conditions; dashed = bad conditions
- Line Symbol
- ▲ Triangle = sprint (7f or less); ● Circle = route (more than 7f)
- Days Between Races
- Small number above each bubble (e.g. 19d) = days since the previous race — helps spot freshness, layoffs, and tight scheduling.
- Shaded Band (Bollinger)
- Highlights volatility — a wider band means more variation in recent performance
- Performance Trend
- Straight line showing the overall performance direction — angled up = improving, angled down = declining
- Dashed Reference Line
- AI Opponent = AI analysis class-level par for the race
✓ Positives:(1) Hot trainer - high ITM rate (53%). (2) Strong trainer/jockey combo - 2 wins from 6 starts (33%). (3) Big last-race effort (82) — 10 pts above recent average. (4) Hot jockey — high ITM rate (48%). (5) Track specialist — 3 wins from 7 starts here (43%). (6) Has won at today's distance (1760 yds) within the last 10 starts — proven ability at this trip. (7) Has won at AQU on dirt in the last 10 starts — proven at today's exact track/surface combo. (8) Had documented trouble last race (codes: ['D', 'L', 'S', 'T', 'U']) yet still finished 1st — a clean trip today sets up a form reversal. (9) Pick Pony Daily Edge Radar pick — value score 9/10 — angles: Big Last Effort, Hot Trainer-Jockey Pairing, Troubled Trip Comeback, Hot Trainer, Hot Jockey, Won Here Before, Won at This Distance, Track Specialist.
⚠ Concerns:(1) Trip note from last race: Ins; duel str; gamely. (2) Speed figures are highly erratic over last 5 starts (σ = 8.8 pts: [82, 63, 84, 69, 76]) — unpredictable performer.
Mod1(W): 67 (2/5) Mod2(W): 49 (2/5) Mod3(W): 62 (3/5) Mod1-LS: 7 (4/5) Mod2-LS: 62 (2/5) Mod3-LS: 44 (2/5) Mod4(Form): 50 (3/5) Win Prob: 52.9% Value Score: 3.7 ★ ML: 4.50 (7/2) Overlay %: 4.06 Fair Odds: 4.45 (7/2) O/U: Overlay
Score Definitions
- Mod1(W)
- Winner Model 1 score (0–100) — AI composite rating among field contenders (higher = stronger). The number in parentheses (e.g. 1/9) shows this horse’s rank out of the field size.
- Mod2(W)
- Winner Model 2 score (0–100) — AI rating among field contenders (higher = stronger). The number in parentheses shows rank within the field.
- Mod3(W)
- Winner Model 3 score (0–100) — AI rating among field contenders (higher = stronger). The number in parentheses shows rank within the field.
- Mod1-LS
- Longshot Model 1 score (0–100) — AI model trained to surface high-value longshots. Higher = stronger longshot profile. Rank in parentheses shows position within the field.
- Mod2-LS
- Longshot Model 2 score (0–100) — AI longshot model. Higher = stronger longshot profile.
- Mod3-LS
- Longshot Model 3 score (0–100) — AI longshot model. Higher = stronger longshot profile.
- Mod4(Form)
- Form Model score (0–100) — AI sequence model trained on recent form patterns to capture momentum and trajectory. Higher = stronger recent form profile. Rank in parentheses shows position within the field.
- Win Prob
- LightGBM estimated win probability expressed as a percentage. This is a raw model output, not normalized to sum to 100% across the field — use it for comparison rather than as an absolute probability.
- Value Score
- Win Prob divided by the market-implied probability (derived from morning line). Values above 1.0 mean the model sees more win chance than the odds imply — a ★ star appears when Value Score ≥ 1.3, indicating a 30%+ model edge over the market.
- ML
- Morning line odds set by the track handicapper before wagering opens
- Overlay %
- How much the fair odds exceed the morning line, expressed as a percentage — positive values indicate value
- Fair Odds
- Model-derived fair-value odds based on estimated win probability
- O/U
- Overlay or Underlay — whether the horse offers value (O) or is overbet (U) relative to fair odds
Lane Bias Guide
- Bar Direction
- Bars above the line = more favorable lane • Bars below = less favorable, relative to the average at this track.
- Color
- Green = above-average advantage • Yellow = near-average • Red = below-average • Blue = this horse’s lane.
- Bias Score
- Derived from weighted average finishing positions across historical races at this track. Shown in the tooltip on hover. To use the bias score, calculate your handicap for the horse (e.g. finish position), then add (detrimental bias) or subtract (favorable bias) the bias score.
- Races
- Number of historical races used to compute each lane’s bias score.
Race Pace Bias Guide
- Bar Height & Direction
- Positive (green) = pace favors this horse • Negative (red) = pace works against this horse • Near-zero (amber) = neutral.
- Race Shape
- Projected race shape based on running styles of all horses (e.g. EE = two early horses, EP = one early presser).
- Pace Category
- FAST = contested early pace • LONE EARLY = one speed horse controlling pace • HONEST = moderate early pressure • SLOW = closers’ race.
- Flag (★)
- A star above the bar means this horse’s pace bias figure is ≥ 1.5 — a meaningful pace advantage or disadvantage.
Total Pace Guide
- Bar Segments
- Green = Early Pace (E1) • Amber = Mid Pace (E2) • Red = Late Pace (LP)
- Bar Height
- Total height = sum of E1 + E2 + LP average pace figures. Taller bars indicate a faster-paced horse overall.
- Grades & Rankings
- Hover to see each horse’s letter grade and ranking vs. other horses in this race (e.g. 2/9 = 2nd best of 9).
- Border
- Thicker border = this horse’s post position.
Performance vs. Peers Guide
- Bars (per post)
- Blue = avg career performance • Amber = avg last 3 races • Green = last race (improved vs. avg) • Red = last race (declined vs. avg)
- Trend Line
- Angled line above the bars: rising = improving form • falling = declining form.
- Horizontal Line
- Field average — the mean career performance of all horses in this race.
- Color Circles
- Standard post-position colors below each lane — same as the Total Pace chart.
- Border
- Thicker border = this horse’s post position.
Figure Comparison
- Rating
- The three Pick Pony algorithm ratings (Algo 1, Algo 2, Algo 3) that make up the overall PP AI Rating — higher is a stronger contender rating.
- Speed
- Career average speed, recent 3-race average, and last-race speed figure — spot horses in improving or declining form.
- Pace
- Average Early (E1), Mid (E2), and Stretch (LP) pace figures — reveals pace-setters vs. closers vs. all-the-way types.
- This horse
- The horse whose stats card is open is highlighted with a darker column background.
Winning Profiles
- Axes
- X: Win % from last 10 starts — Y: In-the-money % (top-3 finishes) from last 10 starts.
- Quadrants
- Consistent Winners (top-right): high win & ITM — reliable performers.
Place Threats (top-left): boards often but doesn’t win often — good exacta/trifecta angles.
Streaky (bottom-right): wins occasionally, misses the board often — all-or-nothing.
Developing (bottom-left): still finding form — longshot territory. - Reference Lines
- Dashed lines mark field averages. Dots to the right win more; dots higher board more.
- This horse
- Highlighted with a gold border and larger dot.
AI Model Comparison
- Winner Models (green)
- Mod1(W), Mod2(W), and Mod3(W) trained to predict race winners. Higher score = stronger contender.
- Longshot Models (red)
- Mod1-LS, Mod2-LS, and Mod3-LS trained to find high-value longshots. Higher score = stronger longshot candidate.
- Form Model (blue)
- Mod4 sequence model trained on recent form patterns. Higher score = stronger recent form profile.
- This horse
- Highlighted with a darker column background.
Race Pace Simulation Guide
- Slider
- Drag left→right to advance from gate to finish. Drag all the way back to reset the race.
- Predicted Finish Order
- Factors in contested pace burn, each horse’s effort curve (peaked-early vs. peaked-late), and wide trip cost from outside posts. Updated live when Track Bias changes.
- Pace Scenario
- Lone Speed: single E horse likely rates and holds. Contested: two E horses burn each other — closers benefit. Hot Pace: speed meltdown, deep closers thrive. Soft: no early speed, moderate fractions throughout.
- Track Bias
- Slider below canvas. −2 = strong closer/wet bias; +2 = strong speed/rail bias. Recomputes the predicted finish order.
- Boxed Indicator
- Dashed orange ring = horse is surrounded (rival ahead, rival behind, wall outside). In a real race this horse must find a clear path to run.
- Running Styles
- E/EE = early speed (rushes to rail). P = presser (stalks the pace). S = stalker. SS = slow starter / closer.
| Stat | vs. Current Card | vs. All Horses |
|---|---|---|
| Averages
Career-average metrics across all AI race analysis. Performance and pace averages reflect estimated historical performance; trainer and jockey grades score in-the-money percentages. Grading scale: A = elite • B = above average • C = average • D = below average • F = poor • — = no data |
||
| Pick Pony AI Rating | A | B |
| Pace Trip Longshot | — | — |
| Connections Longshot | — | — |
| Situational Longshot | — | — |
| Speed | D | B |
| Early Pace | A | C |
| Mid Pace | A | B |
| Late Pace | F | B |
| Finish Pos | A | B |
| Dirt Speed | D | B |
| Turf Speed | D | D |
| Distance Speed | C | A |
| Trainer Effectiveness | A | A |
| Jockey Effectiveness | A | A |
| 3rd Party Ratings | A | A |
| Recent
Performance analysis from the horse's recent races, weighted to reflect current form. Sprint and Route FPS (Foot Per Second) measure pace efficiency over the horse's recent sprints and routes respectively. Grading scale: A = elite • B = above average • C = average • D = below average • F = poor • — = no data |
||
| Speed | A | B |
| Early Pace | A | C |
| Mid Pace | A | B |
| Late Pace | F | C |
| Sprint FPS | B | C |
| Route FPS | A | A |
| Trainer Effectiveness | A | A |
| Jockey Effectiveness | A | A |
| 3rd Party Ratings | A | A |
| Predictions
AI-generated projections for the upcoming race, derived from prior AI analysis for speed and pace trends, surface and distance suitability, and current conditions. Grading scale: A = elite • B = above average • C = average • D = below average • F = poor • — = no data |
||
| Speed | F | C |
| Early Pace | A | C |
| Mid Pace | A | B |
| Late Pace | C | C |
Chart Guide (2.0.35)
- Bubbles
- Color = surface: green (turf), brown (dirt), blue (synthetic)
- Top number = finishing position; bottom number in parentheses = starting post position
- Height above line = beaten lengths — closer means a smaller margin
- Border = track conditions: green (FST/GD/FM), yellow (WF/SL/YLD), red (SY/MY/FRZ/SFT/HVY)
- Connecting Line
- Solid = good conditions; dashed = bad conditions
- Line Symbol
- ▲ Triangle = sprint (7f or less); ● Circle = route (more than 7f)
- Days Between Races
- Small number above each bubble (e.g. 19d) = days since the previous race — helps spot freshness, layoffs, and tight scheduling.
- Shaded Band (Bollinger)
- Highlights volatility — a wider band means more variation in recent performance
- Performance Trend
- Straight line showing the overall performance direction — angled up = improving, angled down = declining
- Dashed Reference Line
- AI Opponent = AI analysis class-level par for the race
✓ Positives:(1) Dropping in class today ($30,000 → $20,000). (2) Hot trainer - high ITM rate (21%). (3) Equipment change today (code: 2). (4) Hot jockey — high ITM rate (31%). (5) Consistent workout spacing (7, 9 days) — disciplined training regimen. (6) Has won at today's distance (1760 yds) within the last 10 starts — proven ability at this trip. (7) Career-best figure (86) buried in races 4–10 back — 11 pts above race median and 12 pts above recent form — market has forgotten the peak effort. (8) Pick Pony Daily Edge Radar pick — value score 5/10 — angles: Hidden Figure, Class Drop, Won at This Distance, Equipment Change.
⚠ Concerns:(1) Trip note from last race: 2-4path turn;empty. (2) Consistently breaks behind post position (3 of last 5 starts). (3) Consistently runs wide at the first call (3 of last 5 starts). (4) Dropping in class in consecutive starts ($50,000 → $32,000 → $30,000).
Mod1(W): 12 (5/5) Mod2(W): 8 (5/5) Mod3(W): 23 (5/5) Mod1-LS: 77 (2/5) Mod2-LS: 6 (5/5) Mod3-LS: 0 Mod4(Form): 12 (5/5) Win Prob: 26.7% Value Score: 3.06 ★ ML: 8.00 (7/1) Overlay %: 4.89 Fair Odds: 6.34 (5/1) O/U: Overlay
Score Definitions
- Mod1(W)
- Winner Model 1 score (0–100) — AI composite rating among field contenders (higher = stronger). The number in parentheses (e.g. 1/9) shows this horse’s rank out of the field size.
- Mod2(W)
- Winner Model 2 score (0–100) — AI rating among field contenders (higher = stronger). The number in parentheses shows rank within the field.
- Mod3(W)
- Winner Model 3 score (0–100) — AI rating among field contenders (higher = stronger). The number in parentheses shows rank within the field.
- Mod1-LS
- Longshot Model 1 score (0–100) — AI model trained to surface high-value longshots. Higher = stronger longshot profile. Rank in parentheses shows position within the field.
- Mod2-LS
- Longshot Model 2 score (0–100) — AI longshot model. Higher = stronger longshot profile.
- Mod3-LS
- Longshot Model 3 score (0–100) — AI longshot model. Higher = stronger longshot profile.
- Mod4(Form)
- Form Model score (0–100) — AI sequence model trained on recent form patterns to capture momentum and trajectory. Higher = stronger recent form profile. Rank in parentheses shows position within the field.
- Win Prob
- LightGBM estimated win probability expressed as a percentage. This is a raw model output, not normalized to sum to 100% across the field — use it for comparison rather than as an absolute probability.
- Value Score
- Win Prob divided by the market-implied probability (derived from morning line). Values above 1.0 mean the model sees more win chance than the odds imply — a ★ star appears when Value Score ≥ 1.3, indicating a 30%+ model edge over the market.
- ML
- Morning line odds set by the track handicapper before wagering opens
- Overlay %
- How much the fair odds exceed the morning line, expressed as a percentage — positive values indicate value
- Fair Odds
- Model-derived fair-value odds based on estimated win probability
- O/U
- Overlay or Underlay — whether the horse offers value (O) or is overbet (U) relative to fair odds
Lane Bias Guide
- Bar Direction
- Bars above the line = more favorable lane • Bars below = less favorable, relative to the average at this track.
- Color
- Green = above-average advantage • Yellow = near-average • Red = below-average • Blue = this horse’s lane.
- Bias Score
- Derived from weighted average finishing positions across historical races at this track. Shown in the tooltip on hover. To use the bias score, calculate your handicap for the horse (e.g. finish position), then add (detrimental bias) or subtract (favorable bias) the bias score.
- Races
- Number of historical races used to compute each lane’s bias score.
Race Pace Bias Guide
- Bar Height & Direction
- Positive (green) = pace favors this horse • Negative (red) = pace works against this horse • Near-zero (amber) = neutral.
- Race Shape
- Projected race shape based on running styles of all horses (e.g. EE = two early horses, EP = one early presser).
- Pace Category
- FAST = contested early pace • LONE EARLY = one speed horse controlling pace • HONEST = moderate early pressure • SLOW = closers’ race.
- Flag (★)
- A star above the bar means this horse’s pace bias figure is ≥ 1.5 — a meaningful pace advantage or disadvantage.
Total Pace Guide
- Bar Segments
- Green = Early Pace (E1) • Amber = Mid Pace (E2) • Red = Late Pace (LP)
- Bar Height
- Total height = sum of E1 + E2 + LP average pace figures. Taller bars indicate a faster-paced horse overall.
- Grades & Rankings
- Hover to see each horse’s letter grade and ranking vs. other horses in this race (e.g. 2/9 = 2nd best of 9).
- Border
- Thicker border = this horse’s post position.
Performance vs. Peers Guide
- Bars (per post)
- Blue = avg career performance • Amber = avg last 3 races • Green = last race (improved vs. avg) • Red = last race (declined vs. avg)
- Trend Line
- Angled line above the bars: rising = improving form • falling = declining form.
- Horizontal Line
- Field average — the mean career performance of all horses in this race.
- Color Circles
- Standard post-position colors below each lane — same as the Total Pace chart.
- Border
- Thicker border = this horse’s post position.
Figure Comparison
- Rating
- The three Pick Pony algorithm ratings (Algo 1, Algo 2, Algo 3) that make up the overall PP AI Rating — higher is a stronger contender rating.
- Speed
- Career average speed, recent 3-race average, and last-race speed figure — spot horses in improving or declining form.
- Pace
- Average Early (E1), Mid (E2), and Stretch (LP) pace figures — reveals pace-setters vs. closers vs. all-the-way types.
- This horse
- The horse whose stats card is open is highlighted with a darker column background.
Winning Profiles
- Axes
- X: Win % from last 10 starts — Y: In-the-money % (top-3 finishes) from last 10 starts.
- Quadrants
- Consistent Winners (top-right): high win & ITM — reliable performers.
Place Threats (top-left): boards often but doesn’t win often — good exacta/trifecta angles.
Streaky (bottom-right): wins occasionally, misses the board often — all-or-nothing.
Developing (bottom-left): still finding form — longshot territory. - Reference Lines
- Dashed lines mark field averages. Dots to the right win more; dots higher board more.
- This horse
- Highlighted with a gold border and larger dot.
AI Model Comparison
- Winner Models (green)
- Mod1(W), Mod2(W), and Mod3(W) trained to predict race winners. Higher score = stronger contender.
- Longshot Models (red)
- Mod1-LS, Mod2-LS, and Mod3-LS trained to find high-value longshots. Higher score = stronger longshot candidate.
- Form Model (blue)
- Mod4 sequence model trained on recent form patterns. Higher score = stronger recent form profile.
- This horse
- Highlighted with a darker column background.
Race Pace Simulation Guide
- Slider
- Drag left→right to advance from gate to finish. Drag all the way back to reset the race.
- Predicted Finish Order
- Factors in contested pace burn, each horse’s effort curve (peaked-early vs. peaked-late), and wide trip cost from outside posts. Updated live when Track Bias changes.
- Pace Scenario
- Lone Speed: single E horse likely rates and holds. Contested: two E horses burn each other — closers benefit. Hot Pace: speed meltdown, deep closers thrive. Soft: no early speed, moderate fractions throughout.
- Track Bias
- Slider below canvas. −2 = strong closer/wet bias; +2 = strong speed/rail bias. Recomputes the predicted finish order.
- Boxed Indicator
- Dashed orange ring = horse is surrounded (rival ahead, rival behind, wall outside). In a real race this horse must find a clear path to run.
- Running Styles
- E/EE = early speed (rushes to rail). P = presser (stalks the pace). S = stalker. SS = slow starter / closer.
| Stat | vs. Current Card | vs. All Horses |
|---|---|---|
| Averages
Career-average metrics across all AI race analysis. Performance and pace averages reflect estimated historical performance; trainer and jockey grades score in-the-money percentages. Grading scale: A = elite • B = above average • C = average • D = below average • F = poor • — = no data |
||
| Pick Pony AI Rating | D | D |
| Pace Trip Longshot | — | — |
| Connections Longshot | — | — |
| Situational Longshot | — | — |
| Speed | C | B |
| Early Pace | B | C |
| Mid Pace | B | C |
| Late Pace | D | B |
| Finish Pos | F | F |
| Dirt Speed | B | A |
| Turf Speed | A | A |
| Distance Speed | A | A |
| Trainer Effectiveness | D | F |
| Jockey Effectiveness | F | D |
| 3rd Party Ratings | F | C |
| Recent
Performance analysis from the horse's recent races, weighted to reflect current form. Sprint and Route FPS (Foot Per Second) measure pace efficiency over the horse's recent sprints and routes respectively. Grading scale: A = elite • B = above average • C = average • D = below average • F = poor • — = no data |
||
| Speed | F | C |
| Early Pace | C | D |
| Mid Pace | F | D |
| Late Pace | C | C |
| Sprint FPS | C | D |
| Route FPS | F | D |
| Trainer Effectiveness | D | F |
| Jockey Effectiveness | F | D |
| 3rd Party Ratings | F | C |
| Predictions
AI-generated projections for the upcoming race, derived from prior AI analysis for speed and pace trends, surface and distance suitability, and current conditions. Grading scale: A = elite • B = above average • C = average • D = below average • F = poor • — = no data |
||
| Speed | C | B |
| Early Pace | C | D |
| Mid Pace | C | C |
| Late Pace | C | C |
Chart Guide (2.0.35)
- Bubbles
- Color = surface: green (turf), brown (dirt), blue (synthetic)
- Top number = finishing position; bottom number in parentheses = starting post position
- Height above line = beaten lengths — closer means a smaller margin
- Border = track conditions: green (FST/GD/FM), yellow (WF/SL/YLD), red (SY/MY/FRZ/SFT/HVY)
- Connecting Line
- Solid = good conditions; dashed = bad conditions
- Line Symbol
- ▲ Triangle = sprint (7f or less); ● Circle = route (more than 7f)
- Days Between Races
- Small number above each bubble (e.g. 19d) = days since the previous race — helps spot freshness, layoffs, and tight scheduling.
- Shaded Band (Bollinger)
- Highlights volatility — a wider band means more variation in recent performance
- Performance Trend
- Straight line showing the overall performance direction — angled up = improving, angled down = declining
- Dashed Reference Line
- AI Opponent = AI analysis class-level par for the race
✓ Positives:(1) Hot trainer - high ITM rate. (2) Hot jockey — high ITM rate (38%). (3) Has won at AQU on dirt in the last 10 starts — proven at today's exact track/surface combo. (4) Career-best figure (85) buried in races 4–10 back — 10 pts above race median and 8 pts above recent form — market has forgotten the peak effort. (5) Pick Pony Daily Edge Radar pick — value score 4/10 — angles: Hidden Figure, Won Here Before.
⚠ Concerns:(1) Poor record at this distance (0 wins from 9 recent starts). (2) Trip note from last race: Trailed throughout.
Mod1(W): 0 Mod2(W): 0 Mod3(W): 0 Mod1-LS: 67 (3/5) Mod2-LS: 0 Mod3-LS: 26 (4/5) Mod4(Form): 0 Win Prob: 20.5% Value Score: 2.87 ★ ML: 10.00 (9/1) Overlay %: 4.27 Fair Odds: 7.76 (7/1) O/U: Overlay
Score Definitions
- Mod1(W)
- Winner Model 1 score (0–100) — AI composite rating among field contenders (higher = stronger). The number in parentheses (e.g. 1/9) shows this horse’s rank out of the field size.
- Mod2(W)
- Winner Model 2 score (0–100) — AI rating among field contenders (higher = stronger). The number in parentheses shows rank within the field.
- Mod3(W)
- Winner Model 3 score (0–100) — AI rating among field contenders (higher = stronger). The number in parentheses shows rank within the field.
- Mod1-LS
- Longshot Model 1 score (0–100) — AI model trained to surface high-value longshots. Higher = stronger longshot profile. Rank in parentheses shows position within the field.
- Mod2-LS
- Longshot Model 2 score (0–100) — AI longshot model. Higher = stronger longshot profile.
- Mod3-LS
- Longshot Model 3 score (0–100) — AI longshot model. Higher = stronger longshot profile.
- Mod4(Form)
- Form Model score (0–100) — AI sequence model trained on recent form patterns to capture momentum and trajectory. Higher = stronger recent form profile. Rank in parentheses shows position within the field.
- Win Prob
- LightGBM estimated win probability expressed as a percentage. This is a raw model output, not normalized to sum to 100% across the field — use it for comparison rather than as an absolute probability.
- Value Score
- Win Prob divided by the market-implied probability (derived from morning line). Values above 1.0 mean the model sees more win chance than the odds imply — a ★ star appears when Value Score ≥ 1.3, indicating a 30%+ model edge over the market.
- ML
- Morning line odds set by the track handicapper before wagering opens
- Overlay %
- How much the fair odds exceed the morning line, expressed as a percentage — positive values indicate value
- Fair Odds
- Model-derived fair-value odds based on estimated win probability
- O/U
- Overlay or Underlay — whether the horse offers value (O) or is overbet (U) relative to fair odds
Lane Bias Guide
- Bar Direction
- Bars above the line = more favorable lane • Bars below = less favorable, relative to the average at this track.
- Color
- Green = above-average advantage • Yellow = near-average • Red = below-average • Blue = this horse’s lane.
- Bias Score
- Derived from weighted average finishing positions across historical races at this track. Shown in the tooltip on hover. To use the bias score, calculate your handicap for the horse (e.g. finish position), then add (detrimental bias) or subtract (favorable bias) the bias score.
- Races
- Number of historical races used to compute each lane’s bias score.
Race Pace Bias Guide
- Bar Height & Direction
- Positive (green) = pace favors this horse • Negative (red) = pace works against this horse • Near-zero (amber) = neutral.
- Race Shape
- Projected race shape based on running styles of all horses (e.g. EE = two early horses, EP = one early presser).
- Pace Category
- FAST = contested early pace • LONE EARLY = one speed horse controlling pace • HONEST = moderate early pressure • SLOW = closers’ race.
- Flag (★)
- A star above the bar means this horse’s pace bias figure is ≥ 1.5 — a meaningful pace advantage or disadvantage.
Total Pace Guide
- Bar Segments
- Green = Early Pace (E1) • Amber = Mid Pace (E2) • Red = Late Pace (LP)
- Bar Height
- Total height = sum of E1 + E2 + LP average pace figures. Taller bars indicate a faster-paced horse overall.
- Grades & Rankings
- Hover to see each horse’s letter grade and ranking vs. other horses in this race (e.g. 2/9 = 2nd best of 9).
- Border
- Thicker border = this horse’s post position.
Performance vs. Peers Guide
- Bars (per post)
- Blue = avg career performance • Amber = avg last 3 races • Green = last race (improved vs. avg) • Red = last race (declined vs. avg)
- Trend Line
- Angled line above the bars: rising = improving form • falling = declining form.
- Horizontal Line
- Field average — the mean career performance of all horses in this race.
- Color Circles
- Standard post-position colors below each lane — same as the Total Pace chart.
- Border
- Thicker border = this horse’s post position.
Figure Comparison
- Rating
- The three Pick Pony algorithm ratings (Algo 1, Algo 2, Algo 3) that make up the overall PP AI Rating — higher is a stronger contender rating.
- Speed
- Career average speed, recent 3-race average, and last-race speed figure — spot horses in improving or declining form.
- Pace
- Average Early (E1), Mid (E2), and Stretch (LP) pace figures — reveals pace-setters vs. closers vs. all-the-way types.
- This horse
- The horse whose stats card is open is highlighted with a darker column background.
Winning Profiles
- Axes
- X: Win % from last 10 starts — Y: In-the-money % (top-3 finishes) from last 10 starts.
- Quadrants
- Consistent Winners (top-right): high win & ITM — reliable performers.
Place Threats (top-left): boards often but doesn’t win often — good exacta/trifecta angles.
Streaky (bottom-right): wins occasionally, misses the board often — all-or-nothing.
Developing (bottom-left): still finding form — longshot territory. - Reference Lines
- Dashed lines mark field averages. Dots to the right win more; dots higher board more.
- This horse
- Highlighted with a gold border and larger dot.
AI Model Comparison
- Winner Models (green)
- Mod1(W), Mod2(W), and Mod3(W) trained to predict race winners. Higher score = stronger contender.
- Longshot Models (red)
- Mod1-LS, Mod2-LS, and Mod3-LS trained to find high-value longshots. Higher score = stronger longshot candidate.
- Form Model (blue)
- Mod4 sequence model trained on recent form patterns. Higher score = stronger recent form profile.
- This horse
- Highlighted with a darker column background.
Race Pace Simulation Guide
- Slider
- Drag left→right to advance from gate to finish. Drag all the way back to reset the race.
- Predicted Finish Order
- Factors in contested pace burn, each horse’s effort curve (peaked-early vs. peaked-late), and wide trip cost from outside posts. Updated live when Track Bias changes.
- Pace Scenario
- Lone Speed: single E horse likely rates and holds. Contested: two E horses burn each other — closers benefit. Hot Pace: speed meltdown, deep closers thrive. Soft: no early speed, moderate fractions throughout.
- Track Bias
- Slider below canvas. −2 = strong closer/wet bias; +2 = strong speed/rail bias. Recomputes the predicted finish order.
- Boxed Indicator
- Dashed orange ring = horse is surrounded (rival ahead, rival behind, wall outside). In a real race this horse must find a clear path to run.
- Running Styles
- E/EE = early speed (rushes to rail). P = presser (stalks the pace). S = stalker. SS = slow starter / closer.
| Stat | vs. Current Card | vs. All Horses |
|---|---|---|
| Averages
Career-average metrics across all AI race analysis. Performance and pace averages reflect estimated historical performance; trainer and jockey grades score in-the-money percentages. Grading scale: A = elite • B = above average • C = average • D = below average • F = poor • — = no data |
||
| Pick Pony AI Rating | F | D |
| Pace Trip Longshot | — | — |
| Connections Longshot | — | — |
| Situational Longshot | — | — |
| Speed | C | B |
| Early Pace | F | D |
| Mid Pace | F | D |
| Late Pace | A | A |
| Finish Pos | C | B |
| Dirt Speed | B | A |
| Turf Speed | A | A |
| Distance Speed | A | A |
| Trainer Effectiveness | F | F |
| Jockey Effectiveness | D | C |
| 3rd Party Ratings | D | B |
| Recent
Performance analysis from the horse's recent races, weighted to reflect current form. Sprint and Route FPS (Foot Per Second) measure pace efficiency over the horse's recent sprints and routes respectively. Grading scale: A = elite • B = above average • C = average • D = below average • F = poor • — = no data |
||
| Speed | D | C |
| Early Pace | F | D |
| Mid Pace | C | C |
| Late Pace | D | C |
| Sprint FPS | F | D |
| Route FPS | C | D |
| Trainer Effectiveness | F | F |
| Jockey Effectiveness | D | C |
| 3rd Party Ratings | D | B |
| Predictions
AI-generated projections for the upcoming race, derived from prior AI analysis for speed and pace trends, surface and distance suitability, and current conditions. Grading scale: A = elite • B = above average • C = average • D = below average • F = poor • — = no data |
||
| Speed | C | B |
| Early Pace | F | D |
| Mid Pace | F | D |
| Late Pace | C | C |
Chart Guide (2.0.35)
- Bubbles
- Color = surface: green (turf), brown (dirt), blue (synthetic)
- Top number = finishing position; bottom number in parentheses = starting post position
- Height above line = beaten lengths — closer means a smaller margin
- Border = track conditions: green (FST/GD/FM), yellow (WF/SL/YLD), red (SY/MY/FRZ/SFT/HVY)
- Connecting Line
- Solid = good conditions; dashed = bad conditions
- Line Symbol
- ▲ Triangle = sprint (7f or less); ● Circle = route (more than 7f)
- Days Between Races
- Small number above each bubble (e.g. 19d) = days since the previous race — helps spot freshness, layoffs, and tight scheduling.
- Shaded Band (Bollinger)
- Highlights volatility — a wider band means more variation in recent performance
- Performance Trend
- Straight line showing the overall performance direction — angled up = improving, angled down = declining
- Dashed Reference Line
- AI Opponent = AI analysis class-level par for the race
✓ Positives:(1) Dropping in class today ($30,000 → $20,000). (2) Hot trainer - high ITM rate (54%). (3) Hot jockey — high ITM rate (39%). (4) Strong speed 2 back (81), modest dip last out (69) — form reversal angle, ready to bounce back to top form. (5) Has won at today's distance (1760 yds) within the last 10 starts — proven ability at this trip. (6) Outstanding wet-track record: 1W from 4 starts (25%) — thrives when the going is off. (7) Pick Pony Daily Edge Radar pick — value score 6/10 — angles: Hot Trainer, Off-Track Ace, Class Drop, Form Reversal, Won at This Distance.
⚠ Concerns:(1) Trip note from last race: Off step slow;forcd in.
Mod1(W): 49 (3/5) Mod2(W): 42 (3/5) Mod3(W): 63 (2/5) Mod1-LS: 1 (5/5) Mod2-LS: 44 (3/5) Mod3-LS: 42 (3/5) Mod4(Form): 65 (2/5) Win Prob: 56% Value Score: 3.21 ★ ML: 3.50 (5/2) Overlay %: 0.49 Fair Odds: 4.57 (7/2) O/U: Fair
Score Definitions
- Mod1(W)
- Winner Model 1 score (0–100) — AI composite rating among field contenders (higher = stronger). The number in parentheses (e.g. 1/9) shows this horse’s rank out of the field size.
- Mod2(W)
- Winner Model 2 score (0–100) — AI rating among field contenders (higher = stronger). The number in parentheses shows rank within the field.
- Mod3(W)
- Winner Model 3 score (0–100) — AI rating among field contenders (higher = stronger). The number in parentheses shows rank within the field.
- Mod1-LS
- Longshot Model 1 score (0–100) — AI model trained to surface high-value longshots. Higher = stronger longshot profile. Rank in parentheses shows position within the field.
- Mod2-LS
- Longshot Model 2 score (0–100) — AI longshot model. Higher = stronger longshot profile.
- Mod3-LS
- Longshot Model 3 score (0–100) — AI longshot model. Higher = stronger longshot profile.
- Mod4(Form)
- Form Model score (0–100) — AI sequence model trained on recent form patterns to capture momentum and trajectory. Higher = stronger recent form profile. Rank in parentheses shows position within the field.
- Win Prob
- LightGBM estimated win probability expressed as a percentage. This is a raw model output, not normalized to sum to 100% across the field — use it for comparison rather than as an absolute probability.
- Value Score
- Win Prob divided by the market-implied probability (derived from morning line). Values above 1.0 mean the model sees more win chance than the odds imply — a ★ star appears when Value Score ≥ 1.3, indicating a 30%+ model edge over the market.
- ML
- Morning line odds set by the track handicapper before wagering opens
- Overlay %
- How much the fair odds exceed the morning line, expressed as a percentage — positive values indicate value
- Fair Odds
- Model-derived fair-value odds based on estimated win probability
- O/U
- Overlay or Underlay — whether the horse offers value (O) or is overbet (U) relative to fair odds
Lane Bias Guide
- Bar Direction
- Bars above the line = more favorable lane • Bars below = less favorable, relative to the average at this track.
- Color
- Green = above-average advantage • Yellow = near-average • Red = below-average • Blue = this horse’s lane.
- Bias Score
- Derived from weighted average finishing positions across historical races at this track. Shown in the tooltip on hover. To use the bias score, calculate your handicap for the horse (e.g. finish position), then add (detrimental bias) or subtract (favorable bias) the bias score.
- Races
- Number of historical races used to compute each lane’s bias score.
Race Pace Bias Guide
- Bar Height & Direction
- Positive (green) = pace favors this horse • Negative (red) = pace works against this horse • Near-zero (amber) = neutral.
- Race Shape
- Projected race shape based on running styles of all horses (e.g. EE = two early horses, EP = one early presser).
- Pace Category
- FAST = contested early pace • LONE EARLY = one speed horse controlling pace • HONEST = moderate early pressure • SLOW = closers’ race.
- Flag (★)
- A star above the bar means this horse’s pace bias figure is ≥ 1.5 — a meaningful pace advantage or disadvantage.
Total Pace Guide
- Bar Segments
- Green = Early Pace (E1) • Amber = Mid Pace (E2) • Red = Late Pace (LP)
- Bar Height
- Total height = sum of E1 + E2 + LP average pace figures. Taller bars indicate a faster-paced horse overall.
- Grades & Rankings
- Hover to see each horse’s letter grade and ranking vs. other horses in this race (e.g. 2/9 = 2nd best of 9).
- Border
- Thicker border = this horse’s post position.
Performance vs. Peers Guide
- Bars (per post)
- Blue = avg career performance • Amber = avg last 3 races • Green = last race (improved vs. avg) • Red = last race (declined vs. avg)
- Trend Line
- Angled line above the bars: rising = improving form • falling = declining form.
- Horizontal Line
- Field average — the mean career performance of all horses in this race.
- Color Circles
- Standard post-position colors below each lane — same as the Total Pace chart.
- Border
- Thicker border = this horse’s post position.
Figure Comparison
- Rating
- The three Pick Pony algorithm ratings (Algo 1, Algo 2, Algo 3) that make up the overall PP AI Rating — higher is a stronger contender rating.
- Speed
- Career average speed, recent 3-race average, and last-race speed figure — spot horses in improving or declining form.
- Pace
- Average Early (E1), Mid (E2), and Stretch (LP) pace figures — reveals pace-setters vs. closers vs. all-the-way types.
- This horse
- The horse whose stats card is open is highlighted with a darker column background.
Winning Profiles
- Axes
- X: Win % from last 10 starts — Y: In-the-money % (top-3 finishes) from last 10 starts.
- Quadrants
- Consistent Winners (top-right): high win & ITM — reliable performers.
Place Threats (top-left): boards often but doesn’t win often — good exacta/trifecta angles.
Streaky (bottom-right): wins occasionally, misses the board often — all-or-nothing.
Developing (bottom-left): still finding form — longshot territory. - Reference Lines
- Dashed lines mark field averages. Dots to the right win more; dots higher board more.
- This horse
- Highlighted with a gold border and larger dot.
AI Model Comparison
- Winner Models (green)
- Mod1(W), Mod2(W), and Mod3(W) trained to predict race winners. Higher score = stronger contender.
- Longshot Models (red)
- Mod1-LS, Mod2-LS, and Mod3-LS trained to find high-value longshots. Higher score = stronger longshot candidate.
- Form Model (blue)
- Mod4 sequence model trained on recent form patterns. Higher score = stronger recent form profile.
- This horse
- Highlighted with a darker column background.
Race Pace Simulation Guide
- Slider
- Drag left→right to advance from gate to finish. Drag all the way back to reset the race.
- Predicted Finish Order
- Factors in contested pace burn, each horse’s effort curve (peaked-early vs. peaked-late), and wide trip cost from outside posts. Updated live when Track Bias changes.
- Pace Scenario
- Lone Speed: single E horse likely rates and holds. Contested: two E horses burn each other — closers benefit. Hot Pace: speed meltdown, deep closers thrive. Soft: no early speed, moderate fractions throughout.
- Track Bias
- Slider below canvas. −2 = strong closer/wet bias; +2 = strong speed/rail bias. Recomputes the predicted finish order.
- Boxed Indicator
- Dashed orange ring = horse is surrounded (rival ahead, rival behind, wall outside). In a real race this horse must find a clear path to run.
- Running Styles
- E/EE = early speed (rushes to rail). P = presser (stalks the pace). S = stalker. SS = slow starter / closer.
| Stat | vs. Current Card | vs. All Horses |
|---|---|---|
| Averages
Career-average metrics across all AI race analysis. Performance and pace averages reflect estimated historical performance; trainer and jockey grades score in-the-money percentages. Grading scale: A = elite • B = above average • C = average • D = below average • F = poor • — = no data |
||
| Pick Pony AI Rating | B | C |
| Pace Trip Longshot | — | — |
| Connections Longshot | — | — |
| Situational Longshot | — | — |
| Speed | A | B |
| Early Pace | D | D |
| Mid Pace | D | C |
| Late Pace | A | A |
| Finish Pos | B | B |
| Dirt Speed | F | B |
| Turf Speed | D | D |
| Distance Speed | C | A |
| Trainer Effectiveness | A | A |
| Jockey Effectiveness | C | C |
| 3rd Party Ratings | C | B |
| Recent
Performance analysis from the horse's recent races, weighted to reflect current form. Sprint and Route FPS (Foot Per Second) measure pace efficiency over the horse's recent sprints and routes respectively. Grading scale: A = elite • B = above average • C = average • D = below average • F = poor • — = no data |
||
| Speed | B | C |
| Early Pace | D | D |
| Mid Pace | D | C |
| Late Pace | A | B |
| Sprint FPS | D | D |
| Route FPS | D | D |
| Trainer Effectiveness | A | A |
| Jockey Effectiveness | C | C |
| 3rd Party Ratings | C | B |
| Predictions
AI-generated projections for the upcoming race, derived from prior AI analysis for speed and pace trends, surface and distance suitability, and current conditions. Grading scale: A = elite • B = above average • C = average • D = below average • F = poor • — = no data |
||
| Speed | A | B |
| Early Pace | D | D |
| Mid Pace | A | B |
| Late Pace | C | C |
Chart Guide (2.0.35)
- Bubbles
- Color = surface: green (turf), brown (dirt), blue (synthetic)
- Top number = finishing position; bottom number in parentheses = starting post position
- Height above line = beaten lengths — closer means a smaller margin
- Border = track conditions: green (FST/GD/FM), yellow (WF/SL/YLD), red (SY/MY/FRZ/SFT/HVY)
- Connecting Line
- Solid = good conditions; dashed = bad conditions
- Line Symbol
- ▲ Triangle = sprint (7f or less); ● Circle = route (more than 7f)
- Days Between Races
- Small number above each bubble (e.g. 19d) = days since the previous race — helps spot freshness, layoffs, and tight scheduling.
- Shaded Band (Bollinger)
- Highlights volatility — a wider band means more variation in recent performance
- Performance Trend
- Straight line showing the overall performance direction — angled up = improving, angled down = declining
- Dashed Reference Line
- AI Opponent = AI analysis class-level par for the race
✓ Positives:(1) Hot trainer - high ITM rate (30%). (2) Hot jockey — high ITM rate (41%). (3) In the money in last 3 consecutive starts. (4) Has won at today's distance (1760 yds) within the last 10 starts — proven ability at this trip. (5) Has won at AQU on dirt in the last 10 starts — proven at today's exact track/surface combo. (6) Had documented trouble last race (codes: ['D', 'L', 'T', 'U']) yet still finished 2nd — a clean trip today sets up a form reversal. (7) Pick Pony Daily Edge Radar pick — value score 7/10 — angles: Consistent In-The-Money, Troubled Trip Comeback, Won Here Before, Won at This Distance.
⚠ Concerns:(1) Trip note from last race: 2-3p turn; held place.
Mod1(W): 35 (4/5) Mod2(W): 25 (4/5) Mod3(W): 41 (4/5) Mod1-LS: 0 Mod2-LS: 26 (4/5) Mod3-LS: 22 (5/5) Mod4(Form): 43 (4/5) Win Prob: 45.6% Value Score: 3.48 ★ ML: 5.00 (4/1) Overlay %: 2.13 Fair Odds: 5.57 (9/2) O/U: Fair
Score Definitions
- Mod1(W)
- Winner Model 1 score (0–100) — AI composite rating among field contenders (higher = stronger). The number in parentheses (e.g. 1/9) shows this horse’s rank out of the field size.
- Mod2(W)
- Winner Model 2 score (0–100) — AI rating among field contenders (higher = stronger). The number in parentheses shows rank within the field.
- Mod3(W)
- Winner Model 3 score (0–100) — AI rating among field contenders (higher = stronger). The number in parentheses shows rank within the field.
- Mod1-LS
- Longshot Model 1 score (0–100) — AI model trained to surface high-value longshots. Higher = stronger longshot profile. Rank in parentheses shows position within the field.
- Mod2-LS
- Longshot Model 2 score (0–100) — AI longshot model. Higher = stronger longshot profile.
- Mod3-LS
- Longshot Model 3 score (0–100) — AI longshot model. Higher = stronger longshot profile.
- Mod4(Form)
- Form Model score (0–100) — AI sequence model trained on recent form patterns to capture momentum and trajectory. Higher = stronger recent form profile. Rank in parentheses shows position within the field.
- Win Prob
- LightGBM estimated win probability expressed as a percentage. This is a raw model output, not normalized to sum to 100% across the field — use it for comparison rather than as an absolute probability.
- Value Score
- Win Prob divided by the market-implied probability (derived from morning line). Values above 1.0 mean the model sees more win chance than the odds imply — a ★ star appears when Value Score ≥ 1.3, indicating a 30%+ model edge over the market.
- ML
- Morning line odds set by the track handicapper before wagering opens
- Overlay %
- How much the fair odds exceed the morning line, expressed as a percentage — positive values indicate value
- Fair Odds
- Model-derived fair-value odds based on estimated win probability
- O/U
- Overlay or Underlay — whether the horse offers value (O) or is overbet (U) relative to fair odds
Lane Bias Guide
- Bar Direction
- Bars above the line = more favorable lane • Bars below = less favorable, relative to the average at this track.
- Color
- Green = above-average advantage • Yellow = near-average • Red = below-average • Blue = this horse’s lane.
- Bias Score
- Derived from weighted average finishing positions across historical races at this track. Shown in the tooltip on hover. To use the bias score, calculate your handicap for the horse (e.g. finish position), then add (detrimental bias) or subtract (favorable bias) the bias score.
- Races
- Number of historical races used to compute each lane’s bias score.
Race Pace Bias Guide
- Bar Height & Direction
- Positive (green) = pace favors this horse • Negative (red) = pace works against this horse • Near-zero (amber) = neutral.
- Race Shape
- Projected race shape based on running styles of all horses (e.g. EE = two early horses, EP = one early presser).
- Pace Category
- FAST = contested early pace • LONE EARLY = one speed horse controlling pace • HONEST = moderate early pressure • SLOW = closers’ race.
- Flag (★)
- A star above the bar means this horse’s pace bias figure is ≥ 1.5 — a meaningful pace advantage or disadvantage.
Total Pace Guide
- Bar Segments
- Green = Early Pace (E1) • Amber = Mid Pace (E2) • Red = Late Pace (LP)
- Bar Height
- Total height = sum of E1 + E2 + LP average pace figures. Taller bars indicate a faster-paced horse overall.
- Grades & Rankings
- Hover to see each horse’s letter grade and ranking vs. other horses in this race (e.g. 2/9 = 2nd best of 9).
- Border
- Thicker border = this horse’s post position.
Performance vs. Peers Guide
- Bars (per post)
- Blue = avg career performance • Amber = avg last 3 races • Green = last race (improved vs. avg) • Red = last race (declined vs. avg)
- Trend Line
- Angled line above the bars: rising = improving form • falling = declining form.
- Horizontal Line
- Field average — the mean career performance of all horses in this race.
- Color Circles
- Standard post-position colors below each lane — same as the Total Pace chart.
- Border
- Thicker border = this horse’s post position.
Figure Comparison
- Rating
- The three Pick Pony algorithm ratings (Algo 1, Algo 2, Algo 3) that make up the overall PP AI Rating — higher is a stronger contender rating.
- Speed
- Career average speed, recent 3-race average, and last-race speed figure — spot horses in improving or declining form.
- Pace
- Average Early (E1), Mid (E2), and Stretch (LP) pace figures — reveals pace-setters vs. closers vs. all-the-way types.
- This horse
- The horse whose stats card is open is highlighted with a darker column background.
Winning Profiles
- Axes
- X: Win % from last 10 starts — Y: In-the-money % (top-3 finishes) from last 10 starts.
- Quadrants
- Consistent Winners (top-right): high win & ITM — reliable performers.
Place Threats (top-left): boards often but doesn’t win often — good exacta/trifecta angles.
Streaky (bottom-right): wins occasionally, misses the board often — all-or-nothing.
Developing (bottom-left): still finding form — longshot territory. - Reference Lines
- Dashed lines mark field averages. Dots to the right win more; dots higher board more.
- This horse
- Highlighted with a gold border and larger dot.
AI Model Comparison
- Winner Models (green)
- Mod1(W), Mod2(W), and Mod3(W) trained to predict race winners. Higher score = stronger contender.
- Longshot Models (red)
- Mod1-LS, Mod2-LS, and Mod3-LS trained to find high-value longshots. Higher score = stronger longshot candidate.
- Form Model (blue)
- Mod4 sequence model trained on recent form patterns. Higher score = stronger recent form profile.
- This horse
- Highlighted with a darker column background.
Race Pace Simulation Guide
- Slider
- Drag left→right to advance from gate to finish. Drag all the way back to reset the race.
- Predicted Finish Order
- Factors in contested pace burn, each horse’s effort curve (peaked-early vs. peaked-late), and wide trip cost from outside posts. Updated live when Track Bias changes.
- Pace Scenario
- Lone Speed: single E horse likely rates and holds. Contested: two E horses burn each other — closers benefit. Hot Pace: speed meltdown, deep closers thrive. Soft: no early speed, moderate fractions throughout.
- Track Bias
- Slider below canvas. −2 = strong closer/wet bias; +2 = strong speed/rail bias. Recomputes the predicted finish order.
- Boxed Indicator
- Dashed orange ring = horse is surrounded (rival ahead, rival behind, wall outside). In a real race this horse must find a clear path to run.
- Running Styles
- E/EE = early speed (rushes to rail). P = presser (stalks the pace). S = stalker. SS = slow starter / closer.
| Stat | vs. Current Card | vs. All Horses |
|---|---|---|
| Averages
Career-average metrics across all AI race analysis. Performance and pace averages reflect estimated historical performance; trainer and jockey grades score in-the-money percentages. Grading scale: A = elite • B = above average • C = average • D = below average • F = poor • — = no data |
||
| Pick Pony AI Rating | C | D |
| Pace Trip Longshot | — | — |
| Connections Longshot | — | — |
| Situational Longshot | — | — |
| Speed | F | B |
| Early Pace | B | C |
| Mid Pace | A | C |
| Late Pace | C | A |
| Finish Pos | D | C |
| Dirt Speed | C | A |
| Turf Speed | B | B |
| Distance Speed | F | B |
| Trainer Effectiveness | C | D |
| Jockey Effectiveness | B | C |
| 3rd Party Ratings | B | B |
| Recent
Performance analysis from the horse's recent races, weighted to reflect current form. Sprint and Route FPS (Foot Per Second) measure pace efficiency over the horse's recent sprints and routes respectively. Grading scale: A = elite • B = above average • C = average • D = below average • F = poor • — = no data |
||
| Speed | C | C |
| Early Pace | A | C |
| Mid Pace | A | B |
| Late Pace | B | B |
| Sprint FPS | A | B |
| Route FPS | B | B |
| Trainer Effectiveness | C | D |
| Jockey Effectiveness | B | C |
| 3rd Party Ratings | B | B |
| Predictions
AI-generated projections for the upcoming race, derived from prior AI analysis for speed and pace trends, surface and distance suitability, and current conditions. Grading scale: A = elite • B = above average • C = average • D = below average • F = poor • — = no data |
||
| Speed | D | B |
| Early Pace | B | C |
| Mid Pace | B | C |
| Late Pace | C | C |
Chart Guide (2.0.35)
- Bubbles
- Color = surface: green (turf), brown (dirt), blue (synthetic)
- Top number = finishing position; bottom number in parentheses = starting post position
- Height above line = beaten lengths — closer means a smaller margin
- Border = track conditions: green (FST/GD/FM), yellow (WF/SL/YLD), red (SY/MY/FRZ/SFT/HVY)
- Connecting Line
- Solid = good conditions; dashed = bad conditions
- Line Symbol
- ▲ Triangle = sprint (7f or less); ● Circle = route (more than 7f)
- Days Between Races
- Small number above each bubble (e.g. 19d) = days since the previous race — helps spot freshness, layoffs, and tight scheduling.
- Shaded Band (Bollinger)
- Highlights volatility — a wider band means more variation in recent performance
- Performance Trend
- Straight line showing the overall performance direction — angled up = improving, angled down = declining
- Dashed Reference Line
- AI Opponent = AI analysis class-level par for the race
✓ Positives:(1) Returning from 67-day layoff with a recent workout. (2) Hot trainer - high ITM rate (32%). (3) Career-best speed figure (75) recorded in last 1-2 starts — peaking form. (4) Hot jockey — high ITM rate (48%). (5) 3 workouts in last 30 days — horse appears sharp and fit. (6) Early pace significantly above field median (E1: 62 vs field 59). (7) Late pace significantly above field median (LP: 79 vs field 76). (8) Strong speed 2 back (75), modest dip last out (66) — form reversal angle, ready to bounce back to top form. (9) Consistent workout spacing (9, 7 days) — disciplined training regimen. (10) Career-best figure (82) buried in races 4–10 back — 12 pts above race median and 7 pts above recent form — market has forgotten the peak effort. (11) Had documented trouble last race (codes: ['D', 'L', 'T', 'U']) yet still finished 3rd — a clean trip today sets up a form reversal. (12) Pick Pony Daily Edge Radar pick — value score 7/10 — angles: Career-Best Recent Figure, Troubled Trip Comeback, Hidden Figure, Form Reversal, Late Kick Advantage, Sharp Workout Pattern.
⚠ Concerns:(1) Has not raced in 67 days. (2) Unproven on dirt surface (2 starts). (3) Tends to fade in the stretch at similar distances (2 of 3 starts). (4) Trip note from last race: 5w upper; wknd late.
Mod1(W): 87 (5/6) Mod2(W): 81 (6/6) Mod3(W): 85 (6/6) Mod1-LS: 0 Mod2-LS: 78 (6/6) Mod3-LS: 42 (4/6) Mod4(Form): 68 (6/6) Win Prob: 42.8% Value Score: 3.3 ★ ML: 5.00 (4/1) Overlay %: 2.06 Fair Odds: 5.64 (9/2) O/U: Fair
Score Definitions
- Mod1(W)
- Winner Model 1 score (0–100) — AI composite rating among field contenders (higher = stronger). The number in parentheses (e.g. 1/9) shows this horse’s rank out of the field size.
- Mod2(W)
- Winner Model 2 score (0–100) — AI rating among field contenders (higher = stronger). The number in parentheses shows rank within the field.
- Mod3(W)
- Winner Model 3 score (0–100) — AI rating among field contenders (higher = stronger). The number in parentheses shows rank within the field.
- Mod1-LS
- Longshot Model 1 score (0–100) — AI model trained to surface high-value longshots. Higher = stronger longshot profile. Rank in parentheses shows position within the field.
- Mod2-LS
- Longshot Model 2 score (0–100) — AI longshot model. Higher = stronger longshot profile.
- Mod3-LS
- Longshot Model 3 score (0–100) — AI longshot model. Higher = stronger longshot profile.
- Mod4(Form)
- Form Model score (0–100) — AI sequence model trained on recent form patterns to capture momentum and trajectory. Higher = stronger recent form profile. Rank in parentheses shows position within the field.
- Win Prob
- LightGBM estimated win probability expressed as a percentage. This is a raw model output, not normalized to sum to 100% across the field — use it for comparison rather than as an absolute probability.
- Value Score
- Win Prob divided by the market-implied probability (derived from morning line). Values above 1.0 mean the model sees more win chance than the odds imply — a ★ star appears when Value Score ≥ 1.3, indicating a 30%+ model edge over the market.
- ML
- Morning line odds set by the track handicapper before wagering opens
- Overlay %
- How much the fair odds exceed the morning line, expressed as a percentage — positive values indicate value
- Fair Odds
- Model-derived fair-value odds based on estimated win probability
- O/U
- Overlay or Underlay — whether the horse offers value (O) or is overbet (U) relative to fair odds
Lane Bias Guide
- Bar Direction
- Bars above the line = more favorable lane • Bars below = less favorable, relative to the average at this track.
- Color
- Green = above-average advantage • Yellow = near-average • Red = below-average • Blue = this horse’s lane.
- Bias Score
- Derived from weighted average finishing positions across historical races at this track. Shown in the tooltip on hover. To use the bias score, calculate your handicap for the horse (e.g. finish position), then add (detrimental bias) or subtract (favorable bias) the bias score.
- Races
- Number of historical races used to compute each lane’s bias score.
Race Pace Bias Guide
- Bar Height & Direction
- Positive (green) = pace favors this horse • Negative (red) = pace works against this horse • Near-zero (amber) = neutral.
- Race Shape
- Projected race shape based on running styles of all horses (e.g. EE = two early horses, EP = one early presser).
- Pace Category
- FAST = contested early pace • LONE EARLY = one speed horse controlling pace • HONEST = moderate early pressure • SLOW = closers’ race.
- Flag (★)
- A star above the bar means this horse’s pace bias figure is ≥ 1.5 — a meaningful pace advantage or disadvantage.
Total Pace Guide
- Bar Segments
- Green = Early Pace (E1) • Amber = Mid Pace (E2) • Red = Late Pace (LP)
- Bar Height
- Total height = sum of E1 + E2 + LP average pace figures. Taller bars indicate a faster-paced horse overall.
- Grades & Rankings
- Hover to see each horse’s letter grade and ranking vs. other horses in this race (e.g. 2/9 = 2nd best of 9).
- Border
- Thicker border = this horse’s post position.
Performance vs. Peers Guide
- Bars (per post)
- Blue = avg career performance • Amber = avg last 3 races • Green = last race (improved vs. avg) • Red = last race (declined vs. avg)
- Trend Line
- Angled line above the bars: rising = improving form • falling = declining form.
- Horizontal Line
- Field average — the mean career performance of all horses in this race.
- Color Circles
- Standard post-position colors below each lane — same as the Total Pace chart.
- Border
- Thicker border = this horse’s post position.
Figure Comparison
- Rating
- The three Pick Pony algorithm ratings (Algo 1, Algo 2, Algo 3) that make up the overall PP AI Rating — higher is a stronger contender rating.
- Speed
- Career average speed, recent 3-race average, and last-race speed figure — spot horses in improving or declining form.
- Pace
- Average Early (E1), Mid (E2), and Stretch (LP) pace figures — reveals pace-setters vs. closers vs. all-the-way types.
- This horse
- The horse whose stats card is open is highlighted with a darker column background.
Winning Profiles
- Axes
- X: Win % from last 10 starts — Y: In-the-money % (top-3 finishes) from last 10 starts.
- Quadrants
- Consistent Winners (top-right): high win & ITM — reliable performers.
Place Threats (top-left): boards often but doesn’t win often — good exacta/trifecta angles.
Streaky (bottom-right): wins occasionally, misses the board often — all-or-nothing.
Developing (bottom-left): still finding form — longshot territory. - Reference Lines
- Dashed lines mark field averages. Dots to the right win more; dots higher board more.
- This horse
- Highlighted with a gold border and larger dot.
AI Model Comparison
- Winner Models (green)
- Mod1(W), Mod2(W), and Mod3(W) trained to predict race winners. Higher score = stronger contender.
- Longshot Models (red)
- Mod1-LS, Mod2-LS, and Mod3-LS trained to find high-value longshots. Higher score = stronger longshot candidate.
- Form Model (blue)
- Mod4 sequence model trained on recent form patterns. Higher score = stronger recent form profile.
- This horse
- Highlighted with a darker column background.
Race Pace Simulation Guide
- Slider
- Drag left→right to advance from gate to finish. Drag all the way back to reset the race.
- Predicted Finish Order
- Factors in contested pace burn, each horse’s effort curve (peaked-early vs. peaked-late), and wide trip cost from outside posts. Updated live when Track Bias changes.
- Pace Scenario
- Lone Speed: single E horse likely rates and holds. Contested: two E horses burn each other — closers benefit. Hot Pace: speed meltdown, deep closers thrive. Soft: no early speed, moderate fractions throughout.
- Track Bias
- Slider below canvas. −2 = strong closer/wet bias; +2 = strong speed/rail bias. Recomputes the predicted finish order.
- Boxed Indicator
- Dashed orange ring = horse is surrounded (rival ahead, rival behind, wall outside). In a real race this horse must find a clear path to run.
- Running Styles
- E/EE = early speed (rushes to rail). P = presser (stalks the pace). S = stalker. SS = slow starter / closer.
| Stat | vs. Current Card | vs. All Horses |
|---|---|---|
| Averages
Career-average metrics across all AI race analysis. Performance and pace averages reflect estimated historical performance; trainer and jockey grades score in-the-money percentages. Grading scale: A = elite • B = above average • C = average • D = below average • F = poor • — = no data |
||
| Pick Pony AI Rating | B | A |
| Pace Trip Longshot | — | — |
| Connections Longshot | — | — |
| Situational Longshot | — | — |
| Speed | A | B |
| Early Pace | D | D |
| Mid Pace | D | C |
| Late Pace | A | B |
| Finish Pos | D | C |
| Dirt Speed | B | C |
| Turf Speed | A | A |
| Distance Speed | C | B |
| Trainer Effectiveness | C | D |
| Jockey Effectiveness | C | A |
| 3rd Party Ratings | D | B |
| Recent
Performance analysis from the horse's recent races, weighted to reflect current form. Sprint and Route FPS (Foot Per Second) measure pace efficiency over the horse's recent sprints and routes respectively. Grading scale: A = elite • B = above average • C = average • D = below average • F = poor • — = no data |
||
| Speed | A | C |
| Early Pace | C | C |
| Mid Pace | C | C |
| Late Pace | B | B |
| Sprint FPS | C | B |
| Route FPS | C | B |
| Trainer Effectiveness | C | D |
| Jockey Effectiveness | C | A |
| 3rd Party Ratings | D | B |
| Predictions
AI-generated projections for the upcoming race, derived from prior AI analysis for speed and pace trends, surface and distance suitability, and current conditions. Grading scale: A = elite • B = above average • C = average • D = below average • F = poor • — = no data |
||
| Speed | B | C |
| Early Pace | D | C |
| Mid Pace | D | C |
| Late Pace | C | C |
Chart Guide (2.0.35)
- Bubbles
- Color = surface: green (turf), brown (dirt), blue (synthetic)
- Top number = finishing position; bottom number in parentheses = starting post position
- Height above line = beaten lengths — closer means a smaller margin
- Border = track conditions: green (FST/GD/FM), yellow (WF/SL/YLD), red (SY/MY/FRZ/SFT/HVY)
- Connecting Line
- Solid = good conditions; dashed = bad conditions
- Line Symbol
- ▲ Triangle = sprint (7f or less); ● Circle = route (more than 7f)
- Days Between Races
- Small number above each bubble (e.g. 19d) = days since the previous race — helps spot freshness, layoffs, and tight scheduling.
- Shaded Band (Bollinger)
- Highlights volatility — a wider band means more variation in recent performance
- Performance Trend
- Straight line showing the overall performance direction — angled up = improving, angled down = declining
- Dashed Reference Line
- AI Opponent = AI analysis class-level par for the race
✓ Positives:(1) Hot trainer - high ITM rate (50%). (2) Big last-race effort (73) — 10 pts above recent average. (3) Hot jockey — high ITM rate (39%). (4) Early pace significantly above field median (E1: 86 vs field 59). (5) Fourth race back from a 109-day layoff — often the peak fitness race. (6) Trainer 'ENGLEHART CHRIS' has 2 horses in today's card all showing last-race improvement — barn appears sharp right now. (7) Had documented trouble last race (codes: ['B', 'D', 'L', 'O', 'S', 'T']) yet still finished 2nd — a clean trip today sets up a form reversal. (8) Pick Pony Daily Edge Radar pick — value score 7/10 — angles: Big Last Effort, Troubled Trip Comeback, Hot Trainer, Stable on Fire, Classic Fourth Race Pattern.
⚠ Concerns:(1) Moving from a route to a sprint today. (2) 0 wins from 4 career starts on off tracks. (3) Poor record at this distance (0 wins from 4 recent starts). (4) Poor record at this track (0 wins from 9 starts). (5) Tends to fade in the stretch at similar distances (3 of 4 starts). (6) Trip note from last race: Bobble st; nailed. (7) 0 wins from post 2 in 5 recent starts. (8) Last race was career-best speed (73) — bounce risk after peak effort. (9) No workout in last 30 days despite 25 days since last race. (10) 0 wins from 10 starts on dirt in last 10 — repeated failure on today's surface.
Mod1(W): 91 (4/6) Mod2(W): 96 (4/6) Mod3(W): 99 (2/6) Mod1-LS: 4 (5/6) Mod2-LS: 92 (4/6) Mod3-LS: 30 (6/6) Mod4(Form): 84 (3/6) Win Prob: 58.1% Value Score: 3.73 ★ ML: 4.00 (3/1) Overlay %: -0.86 Fair Odds: 5.79 (5/1) O/U: Fair
Score Definitions
- Mod1(W)
- Winner Model 1 score (0–100) — AI composite rating among field contenders (higher = stronger). The number in parentheses (e.g. 1/9) shows this horse’s rank out of the field size.
- Mod2(W)
- Winner Model 2 score (0–100) — AI rating among field contenders (higher = stronger). The number in parentheses shows rank within the field.
- Mod3(W)
- Winner Model 3 score (0–100) — AI rating among field contenders (higher = stronger). The number in parentheses shows rank within the field.
- Mod1-LS
- Longshot Model 1 score (0–100) — AI model trained to surface high-value longshots. Higher = stronger longshot profile. Rank in parentheses shows position within the field.
- Mod2-LS
- Longshot Model 2 score (0–100) — AI longshot model. Higher = stronger longshot profile.
- Mod3-LS
- Longshot Model 3 score (0–100) — AI longshot model. Higher = stronger longshot profile.
- Mod4(Form)
- Form Model score (0–100) — AI sequence model trained on recent form patterns to capture momentum and trajectory. Higher = stronger recent form profile. Rank in parentheses shows position within the field.
- Win Prob
- LightGBM estimated win probability expressed as a percentage. This is a raw model output, not normalized to sum to 100% across the field — use it for comparison rather than as an absolute probability.
- Value Score
- Win Prob divided by the market-implied probability (derived from morning line). Values above 1.0 mean the model sees more win chance than the odds imply — a ★ star appears when Value Score ≥ 1.3, indicating a 30%+ model edge over the market.
- ML
- Morning line odds set by the track handicapper before wagering opens
- Overlay %
- How much the fair odds exceed the morning line, expressed as a percentage — positive values indicate value
- Fair Odds
- Model-derived fair-value odds based on estimated win probability
- O/U
- Overlay or Underlay — whether the horse offers value (O) or is overbet (U) relative to fair odds
Lane Bias Guide
- Bar Direction
- Bars above the line = more favorable lane • Bars below = less favorable, relative to the average at this track.
- Color
- Green = above-average advantage • Yellow = near-average • Red = below-average • Blue = this horse’s lane.
- Bias Score
- Derived from weighted average finishing positions across historical races at this track. Shown in the tooltip on hover. To use the bias score, calculate your handicap for the horse (e.g. finish position), then add (detrimental bias) or subtract (favorable bias) the bias score.
- Races
- Number of historical races used to compute each lane’s bias score.
Race Pace Bias Guide
- Bar Height & Direction
- Positive (green) = pace favors this horse • Negative (red) = pace works against this horse • Near-zero (amber) = neutral.
- Race Shape
- Projected race shape based on running styles of all horses (e.g. EE = two early horses, EP = one early presser).
- Pace Category
- FAST = contested early pace • LONE EARLY = one speed horse controlling pace • HONEST = moderate early pressure • SLOW = closers’ race.
- Flag (★)
- A star above the bar means this horse’s pace bias figure is ≥ 1.5 — a meaningful pace advantage or disadvantage.
Total Pace Guide
- Bar Segments
- Green = Early Pace (E1) • Amber = Mid Pace (E2) • Red = Late Pace (LP)
- Bar Height
- Total height = sum of E1 + E2 + LP average pace figures. Taller bars indicate a faster-paced horse overall.
- Grades & Rankings
- Hover to see each horse’s letter grade and ranking vs. other horses in this race (e.g. 2/9 = 2nd best of 9).
- Border
- Thicker border = this horse’s post position.
Performance vs. Peers Guide
- Bars (per post)
- Blue = avg career performance • Amber = avg last 3 races • Green = last race (improved vs. avg) • Red = last race (declined vs. avg)
- Trend Line
- Angled line above the bars: rising = improving form • falling = declining form.
- Horizontal Line
- Field average — the mean career performance of all horses in this race.
- Color Circles
- Standard post-position colors below each lane — same as the Total Pace chart.
- Border
- Thicker border = this horse’s post position.
Figure Comparison
- Rating
- The three Pick Pony algorithm ratings (Algo 1, Algo 2, Algo 3) that make up the overall PP AI Rating — higher is a stronger contender rating.
- Speed
- Career average speed, recent 3-race average, and last-race speed figure — spot horses in improving or declining form.
- Pace
- Average Early (E1), Mid (E2), and Stretch (LP) pace figures — reveals pace-setters vs. closers vs. all-the-way types.
- This horse
- The horse whose stats card is open is highlighted with a darker column background.
Winning Profiles
- Axes
- X: Win % from last 10 starts — Y: In-the-money % (top-3 finishes) from last 10 starts.
- Quadrants
- Consistent Winners (top-right): high win & ITM — reliable performers.
Place Threats (top-left): boards often but doesn’t win often — good exacta/trifecta angles.
Streaky (bottom-right): wins occasionally, misses the board often — all-or-nothing.
Developing (bottom-left): still finding form — longshot territory. - Reference Lines
- Dashed lines mark field averages. Dots to the right win more; dots higher board more.
- This horse
- Highlighted with a gold border and larger dot.
AI Model Comparison
- Winner Models (green)
- Mod1(W), Mod2(W), and Mod3(W) trained to predict race winners. Higher score = stronger contender.
- Longshot Models (red)
- Mod1-LS, Mod2-LS, and Mod3-LS trained to find high-value longshots. Higher score = stronger longshot candidate.
- Form Model (blue)
- Mod4 sequence model trained on recent form patterns. Higher score = stronger recent form profile.
- This horse
- Highlighted with a darker column background.
Race Pace Simulation Guide
- Slider
- Drag left→right to advance from gate to finish. Drag all the way back to reset the race.
- Predicted Finish Order
- Factors in contested pace burn, each horse’s effort curve (peaked-early vs. peaked-late), and wide trip cost from outside posts. Updated live when Track Bias changes.
- Pace Scenario
- Lone Speed: single E horse likely rates and holds. Contested: two E horses burn each other — closers benefit. Hot Pace: speed meltdown, deep closers thrive. Soft: no early speed, moderate fractions throughout.
- Track Bias
- Slider below canvas. −2 = strong closer/wet bias; +2 = strong speed/rail bias. Recomputes the predicted finish order.
- Boxed Indicator
- Dashed orange ring = horse is surrounded (rival ahead, rival behind, wall outside). In a real race this horse must find a clear path to run.
- Running Styles
- E/EE = early speed (rushes to rail). P = presser (stalks the pace). S = stalker. SS = slow starter / closer.
| Stat | vs. Current Card | vs. All Horses |
|---|---|---|
| Averages
Career-average metrics across all AI race analysis. Performance and pace averages reflect estimated historical performance; trainer and jockey grades score in-the-money percentages. Grading scale: A = elite • B = above average • C = average • D = below average • F = poor • — = no data |
||
| Pick Pony AI Rating | D | C |
| Pace Trip Longshot | — | — |
| Connections Longshot | — | — |
| Situational Longshot | — | — |
| Speed | C | C |
| Early Pace | B | B |
| Mid Pace | B | B |
| Late Pace | C | D |
| Finish Pos | C | B |
| Dirt Speed | C | C |
| Turf Speed | B | C |
| Distance Speed | D | D |
| Trainer Effectiveness | A | A |
| Jockey Effectiveness | F | C |
| 3rd Party Ratings | A | B |
| Recent
Performance analysis from the horse's recent races, weighted to reflect current form. Sprint and Route FPS (Foot Per Second) measure pace efficiency over the horse's recent sprints and routes respectively. Grading scale: A = elite • B = above average • C = average • D = below average • F = poor • — = no data |
||
| Speed | C | C |
| Early Pace | B | B |
| Mid Pace | D | C |
| Late Pace | C | D |
| Sprint FPS | A | A |
| Route FPS | A | A |
| Trainer Effectiveness | A | A |
| Jockey Effectiveness | F | C |
| 3rd Party Ratings | A | B |
| Predictions
AI-generated projections for the upcoming race, derived from prior AI analysis for speed and pace trends, surface and distance suitability, and current conditions. Grading scale: A = elite • B = above average • C = average • D = below average • F = poor • — = no data |
||
| Speed | C | C |
| Early Pace | B | B |
| Mid Pace | B | B |
| Late Pace | C | C |
Chart Guide (2.0.35)
- Bubbles
- Color = surface: green (turf), brown (dirt), blue (synthetic)
- Top number = finishing position; bottom number in parentheses = starting post position
- Height above line = beaten lengths — closer means a smaller margin
- Border = track conditions: green (FST/GD/FM), yellow (WF/SL/YLD), red (SY/MY/FRZ/SFT/HVY)
- Connecting Line
- Solid = good conditions; dashed = bad conditions
- Line Symbol
- ▲ Triangle = sprint (7f or less); ● Circle = route (more than 7f)
- Days Between Races
- Small number above each bubble (e.g. 19d) = days since the previous race — helps spot freshness, layoffs, and tight scheduling.
- Shaded Band (Bollinger)
- Highlights volatility — a wider band means more variation in recent performance
- Performance Trend
- Straight line showing the overall performance direction — angled up = improving, angled down = declining
- Dashed Reference Line
- AI Opponent = AI analysis class-level par for the race
✓ Positives:(1) Returning from 35-day layoff with a recent workout. (2) Hot trainer - high ITM rate (50%). (3) Strong trainer/jockey combo - 3 wins from 9 starts (33%). (4) Career-best speed figure (75) recorded in last 1-2 starts — peaking form. (5) Hot jockey — high ITM rate (59%). (6) Late pace significantly above field median (LP: 81 vs field 76). (7) Fourth race back from a 94-day layoff — often the peak fitness race. (8) Career-best figure (82) buried in races 4–10 back — 12 pts above race median and 6 pts above recent form — market has forgotten the peak effort. (9) Had documented trouble last race (codes: ['D', 'T', 'U']) yet still finished 3rd — a clean trip today sets up a form reversal. (10) Pick Pony Daily Edge Radar pick — value score 9/10 — angles: Career-Best Recent Figure, Hot Trainer-Jockey Pairing, Troubled Trip Comeback, Hot Trainer, Hot Jockey, Hidden Figure, Late Kick Advantage, Classic Fourth Race Pattern.
⚠ Concerns:(1) Has not raced in 35 days. (2) Poor record at this distance (0 wins from 7 recent starts). (3) Trip note from last race: 3p turn;4p1/4;weakened.
Mod1(W): 100 (1/6) Mod2(W): 100 (1/6) Mod3(W): 100 (1/6) Mod1-LS: 1 (6/6) Mod2-LS: 100 (1/6) Mod3-LS: 100 (1/6) Mod4(Form): 75 (5/6) Win Prob: 57.5% Value Score: 4.06 ★ ML: 4.50 (7/2) Overlay %: 1.88 Fair Odds: 5.23 (4/1) O/U: Fair
Score Definitions
- Mod1(W)
- Winner Model 1 score (0–100) — AI composite rating among field contenders (higher = stronger). The number in parentheses (e.g. 1/9) shows this horse’s rank out of the field size.
- Mod2(W)
- Winner Model 2 score (0–100) — AI rating among field contenders (higher = stronger). The number in parentheses shows rank within the field.
- Mod3(W)
- Winner Model 3 score (0–100) — AI rating among field contenders (higher = stronger). The number in parentheses shows rank within the field.
- Mod1-LS
- Longshot Model 1 score (0–100) — AI model trained to surface high-value longshots. Higher = stronger longshot profile. Rank in parentheses shows position within the field.
- Mod2-LS
- Longshot Model 2 score (0–100) — AI longshot model. Higher = stronger longshot profile.
- Mod3-LS
- Longshot Model 3 score (0–100) — AI longshot model. Higher = stronger longshot profile.
- Mod4(Form)
- Form Model score (0–100) — AI sequence model trained on recent form patterns to capture momentum and trajectory. Higher = stronger recent form profile. Rank in parentheses shows position within the field.
- Win Prob
- LightGBM estimated win probability expressed as a percentage. This is a raw model output, not normalized to sum to 100% across the field — use it for comparison rather than as an absolute probability.
- Value Score
- Win Prob divided by the market-implied probability (derived from morning line). Values above 1.0 mean the model sees more win chance than the odds imply — a ★ star appears when Value Score ≥ 1.3, indicating a 30%+ model edge over the market.
- ML
- Morning line odds set by the track handicapper before wagering opens
- Overlay %
- How much the fair odds exceed the morning line, expressed as a percentage — positive values indicate value
- Fair Odds
- Model-derived fair-value odds based on estimated win probability
- O/U
- Overlay or Underlay — whether the horse offers value (O) or is overbet (U) relative to fair odds
Lane Bias Guide
- Bar Direction
- Bars above the line = more favorable lane • Bars below = less favorable, relative to the average at this track.
- Color
- Green = above-average advantage • Yellow = near-average • Red = below-average • Blue = this horse’s lane.
- Bias Score
- Derived from weighted average finishing positions across historical races at this track. Shown in the tooltip on hover. To use the bias score, calculate your handicap for the horse (e.g. finish position), then add (detrimental bias) or subtract (favorable bias) the bias score.
- Races
- Number of historical races used to compute each lane’s bias score.
Race Pace Bias Guide
- Bar Height & Direction
- Positive (green) = pace favors this horse • Negative (red) = pace works against this horse • Near-zero (amber) = neutral.
- Race Shape
- Projected race shape based on running styles of all horses (e.g. EE = two early horses, EP = one early presser).
- Pace Category
- FAST = contested early pace • LONE EARLY = one speed horse controlling pace • HONEST = moderate early pressure • SLOW = closers’ race.
- Flag (★)
- A star above the bar means this horse’s pace bias figure is ≥ 1.5 — a meaningful pace advantage or disadvantage.
Total Pace Guide
- Bar Segments
- Green = Early Pace (E1) • Amber = Mid Pace (E2) • Red = Late Pace (LP)
- Bar Height
- Total height = sum of E1 + E2 + LP average pace figures. Taller bars indicate a faster-paced horse overall.
- Grades & Rankings
- Hover to see each horse’s letter grade and ranking vs. other horses in this race (e.g. 2/9 = 2nd best of 9).
- Border
- Thicker border = this horse’s post position.
Performance vs. Peers Guide
- Bars (per post)
- Blue = avg career performance • Amber = avg last 3 races • Green = last race (improved vs. avg) • Red = last race (declined vs. avg)
- Trend Line
- Angled line above the bars: rising = improving form • falling = declining form.
- Horizontal Line
- Field average — the mean career performance of all horses in this race.
- Color Circles
- Standard post-position colors below each lane — same as the Total Pace chart.
- Border
- Thicker border = this horse’s post position.
Figure Comparison
- Rating
- The three Pick Pony algorithm ratings (Algo 1, Algo 2, Algo 3) that make up the overall PP AI Rating — higher is a stronger contender rating.
- Speed
- Career average speed, recent 3-race average, and last-race speed figure — spot horses in improving or declining form.
- Pace
- Average Early (E1), Mid (E2), and Stretch (LP) pace figures — reveals pace-setters vs. closers vs. all-the-way types.
- This horse
- The horse whose stats card is open is highlighted with a darker column background.
Winning Profiles
- Axes
- X: Win % from last 10 starts — Y: In-the-money % (top-3 finishes) from last 10 starts.
- Quadrants
- Consistent Winners (top-right): high win & ITM — reliable performers.
Place Threats (top-left): boards often but doesn’t win often — good exacta/trifecta angles.
Streaky (bottom-right): wins occasionally, misses the board often — all-or-nothing.
Developing (bottom-left): still finding form — longshot territory. - Reference Lines
- Dashed lines mark field averages. Dots to the right win more; dots higher board more.
- This horse
- Highlighted with a gold border and larger dot.
AI Model Comparison
- Winner Models (green)
- Mod1(W), Mod2(W), and Mod3(W) trained to predict race winners. Higher score = stronger contender.
- Longshot Models (red)
- Mod1-LS, Mod2-LS, and Mod3-LS trained to find high-value longshots. Higher score = stronger longshot candidate.
- Form Model (blue)
- Mod4 sequence model trained on recent form patterns. Higher score = stronger recent form profile.
- This horse
- Highlighted with a darker column background.
Race Pace Simulation Guide
- Slider
- Drag left→right to advance from gate to finish. Drag all the way back to reset the race.
- Predicted Finish Order
- Factors in contested pace burn, each horse’s effort curve (peaked-early vs. peaked-late), and wide trip cost from outside posts. Updated live when Track Bias changes.
- Pace Scenario
- Lone Speed: single E horse likely rates and holds. Contested: two E horses burn each other — closers benefit. Hot Pace: speed meltdown, deep closers thrive. Soft: no early speed, moderate fractions throughout.
- Track Bias
- Slider below canvas. −2 = strong closer/wet bias; +2 = strong speed/rail bias. Recomputes the predicted finish order.
- Boxed Indicator
- Dashed orange ring = horse is surrounded (rival ahead, rival behind, wall outside). In a real race this horse must find a clear path to run.
- Running Styles
- E/EE = early speed (rushes to rail). P = presser (stalks the pace). S = stalker. SS = slow starter / closer.
| Stat | vs. Current Card | vs. All Horses |
|---|---|---|
| Averages
Career-average metrics across all AI race analysis. Performance and pace averages reflect estimated historical performance; trainer and jockey grades score in-the-money percentages. Grading scale: A = elite • B = above average • C = average • D = below average • F = poor • — = no data |
||
| Pick Pony AI Rating | A | A |
| Pace Trip Longshot | — | — |
| Connections Longshot | — | — |
| Situational Longshot | — | — |
| Speed | A | B |
| Early Pace | C | B |
| Mid Pace | A | B |
| Late Pace | A | A |
| Finish Pos | C | B |
| Dirt Speed | B | C |
| Turf Speed | A | A |
| Distance Speed | C | B |
| Trainer Effectiveness | B | A |
| Jockey Effectiveness | A | A |
| 3rd Party Ratings | B | B |
| Recent
Performance analysis from the horse's recent races, weighted to reflect current form. Sprint and Route FPS (Foot Per Second) measure pace efficiency over the horse's recent sprints and routes respectively. Grading scale: A = elite • B = above average • C = average • D = below average • F = poor • — = no data |
||
| Speed | B | C |
| Early Pace | D | C |
| Mid Pace | B | C |
| Late Pace | A | B |
| Sprint FPS | D | D |
| Route FPS | C | C |
| Trainer Effectiveness | B | A |
| Jockey Effectiveness | A | A |
| 3rd Party Ratings | B | B |
| Predictions
AI-generated projections for the upcoming race, derived from prior AI analysis for speed and pace trends, surface and distance suitability, and current conditions. Grading scale: A = elite • B = above average • C = average • D = below average • F = poor • — = no data |
||
| Speed | A | C |
| Early Pace | C | B |
| Mid Pace | A | B |
| Late Pace | C | C |
Chart Guide (2.0.35)
- Bubbles
- Color = surface: green (turf), brown (dirt), blue (synthetic)
- Top number = finishing position; bottom number in parentheses = starting post position
- Height above line = beaten lengths — closer means a smaller margin
- Border = track conditions: green (FST/GD/FM), yellow (WF/SL/YLD), red (SY/MY/FRZ/SFT/HVY)
- Connecting Line
- Solid = good conditions; dashed = bad conditions
- Line Symbol
- ▲ Triangle = sprint (7f or less); ● Circle = route (more than 7f)
- Days Between Races
- Small number above each bubble (e.g. 19d) = days since the previous race — helps spot freshness, layoffs, and tight scheduling.
- Shaded Band (Bollinger)
- Highlights volatility — a wider band means more variation in recent performance
- Performance Trend
- Straight line showing the overall performance direction — angled up = improving, angled down = declining
- Dashed Reference Line
- AI Opponent = AI analysis class-level par for the race
✓ Positives:(1) Returning from 35-day layoff with a recent workout. (2) Hot trainer - high ITM rate (31%). (3) Career-best speed figure (76) recorded in last 1-2 starts — peaking form. (4) Hot jockey — high ITM rate (50%). (5) Had documented trouble last race (codes: ['D', 'S', 'T', 'V']) yet still finished 4th — a clean trip today sets up a form reversal. (6) Pick Pony Daily Edge Radar pick — value score 6/10 — angles: Career-Best Recent Figure, Troubled Trip Comeback, Hot Jockey.
⚠ Concerns:(1) Has not raced in 35 days. (2) Poor record at this distance (0 wins from 5 recent starts). (3) Poor record at this track (0 wins from 6 starts). (4) Trip note from last race: Ins-2p;stdy3/16;mvd in. (5) Was the betting favorite in the last race but finished off the board. (6) 0 wins from 6 starts on dirt in last 10 — repeated failure on today's surface.
Mod1(W): 92 (3/6) Mod2(W): 98 (2/6) Mod3(W): 95 (4/6) Mod1-LS: 5 (4/6) Mod2-LS: 96 (2/6) Mod3-LS: 30 (5/6) Mod4(Form): 83 (4/6) Win Prob: 53.6% Value Score: 3.44 ★ ML: 4.00 (3/1) Overlay %: 0.30 Fair Odds: 5.29 (9/2) O/U: Fair
Score Definitions
- Mod1(W)
- Winner Model 1 score (0–100) — AI composite rating among field contenders (higher = stronger). The number in parentheses (e.g. 1/9) shows this horse’s rank out of the field size.
- Mod2(W)
- Winner Model 2 score (0–100) — AI rating among field contenders (higher = stronger). The number in parentheses shows rank within the field.
- Mod3(W)
- Winner Model 3 score (0–100) — AI rating among field contenders (higher = stronger). The number in parentheses shows rank within the field.
- Mod1-LS
- Longshot Model 1 score (0–100) — AI model trained to surface high-value longshots. Higher = stronger longshot profile. Rank in parentheses shows position within the field.
- Mod2-LS
- Longshot Model 2 score (0–100) — AI longshot model. Higher = stronger longshot profile.
- Mod3-LS
- Longshot Model 3 score (0–100) — AI longshot model. Higher = stronger longshot profile.
- Mod4(Form)
- Form Model score (0–100) — AI sequence model trained on recent form patterns to capture momentum and trajectory. Higher = stronger recent form profile. Rank in parentheses shows position within the field.
- Win Prob
- LightGBM estimated win probability expressed as a percentage. This is a raw model output, not normalized to sum to 100% across the field — use it for comparison rather than as an absolute probability.
- Value Score
- Win Prob divided by the market-implied probability (derived from morning line). Values above 1.0 mean the model sees more win chance than the odds imply — a ★ star appears when Value Score ≥ 1.3, indicating a 30%+ model edge over the market.
- ML
- Morning line odds set by the track handicapper before wagering opens
- Overlay %
- How much the fair odds exceed the morning line, expressed as a percentage — positive values indicate value
- Fair Odds
- Model-derived fair-value odds based on estimated win probability
- O/U
- Overlay or Underlay — whether the horse offers value (O) or is overbet (U) relative to fair odds
Lane Bias Guide
- Bar Direction
- Bars above the line = more favorable lane • Bars below = less favorable, relative to the average at this track.
- Color
- Green = above-average advantage • Yellow = near-average • Red = below-average • Blue = this horse’s lane.
- Bias Score
- Derived from weighted average finishing positions across historical races at this track. Shown in the tooltip on hover. To use the bias score, calculate your handicap for the horse (e.g. finish position), then add (detrimental bias) or subtract (favorable bias) the bias score.
- Races
- Number of historical races used to compute each lane’s bias score.
Race Pace Bias Guide
- Bar Height & Direction
- Positive (green) = pace favors this horse • Negative (red) = pace works against this horse • Near-zero (amber) = neutral.
- Race Shape
- Projected race shape based on running styles of all horses (e.g. EE = two early horses, EP = one early presser).
- Pace Category
- FAST = contested early pace • LONE EARLY = one speed horse controlling pace • HONEST = moderate early pressure • SLOW = closers’ race.
- Flag (★)
- A star above the bar means this horse’s pace bias figure is ≥ 1.5 — a meaningful pace advantage or disadvantage.
Total Pace Guide
- Bar Segments
- Green = Early Pace (E1) • Amber = Mid Pace (E2) • Red = Late Pace (LP)
- Bar Height
- Total height = sum of E1 + E2 + LP average pace figures. Taller bars indicate a faster-paced horse overall.
- Grades & Rankings
- Hover to see each horse’s letter grade and ranking vs. other horses in this race (e.g. 2/9 = 2nd best of 9).
- Border
- Thicker border = this horse’s post position.
Performance vs. Peers Guide
- Bars (per post)
- Blue = avg career performance • Amber = avg last 3 races • Green = last race (improved vs. avg) • Red = last race (declined vs. avg)
- Trend Line
- Angled line above the bars: rising = improving form • falling = declining form.
- Horizontal Line
- Field average — the mean career performance of all horses in this race.
- Color Circles
- Standard post-position colors below each lane — same as the Total Pace chart.
- Border
- Thicker border = this horse’s post position.
Figure Comparison
- Rating
- The three Pick Pony algorithm ratings (Algo 1, Algo 2, Algo 3) that make up the overall PP AI Rating — higher is a stronger contender rating.
- Speed
- Career average speed, recent 3-race average, and last-race speed figure — spot horses in improving or declining form.
- Pace
- Average Early (E1), Mid (E2), and Stretch (LP) pace figures — reveals pace-setters vs. closers vs. all-the-way types.
- This horse
- The horse whose stats card is open is highlighted with a darker column background.
Winning Profiles
- Axes
- X: Win % from last 10 starts — Y: In-the-money % (top-3 finishes) from last 10 starts.
- Quadrants
- Consistent Winners (top-right): high win & ITM — reliable performers.
Place Threats (top-left): boards often but doesn’t win often — good exacta/trifecta angles.
Streaky (bottom-right): wins occasionally, misses the board often — all-or-nothing.
Developing (bottom-left): still finding form — longshot territory. - Reference Lines
- Dashed lines mark field averages. Dots to the right win more; dots higher board more.
- This horse
- Highlighted with a gold border and larger dot.
AI Model Comparison
- Winner Models (green)
- Mod1(W), Mod2(W), and Mod3(W) trained to predict race winners. Higher score = stronger contender.
- Longshot Models (red)
- Mod1-LS, Mod2-LS, and Mod3-LS trained to find high-value longshots. Higher score = stronger longshot candidate.
- Form Model (blue)
- Mod4 sequence model trained on recent form patterns. Higher score = stronger recent form profile.
- This horse
- Highlighted with a darker column background.
Race Pace Simulation Guide
- Slider
- Drag left→right to advance from gate to finish. Drag all the way back to reset the race.
- Predicted Finish Order
- Factors in contested pace burn, each horse’s effort curve (peaked-early vs. peaked-late), and wide trip cost from outside posts. Updated live when Track Bias changes.
- Pace Scenario
- Lone Speed: single E horse likely rates and holds. Contested: two E horses burn each other — closers benefit. Hot Pace: speed meltdown, deep closers thrive. Soft: no early speed, moderate fractions throughout.
- Track Bias
- Slider below canvas. −2 = strong closer/wet bias; +2 = strong speed/rail bias. Recomputes the predicted finish order.
- Boxed Indicator
- Dashed orange ring = horse is surrounded (rival ahead, rival behind, wall outside). In a real race this horse must find a clear path to run.
- Running Styles
- E/EE = early speed (rushes to rail). P = presser (stalks the pace). S = stalker. SS = slow starter / closer.
| Stat | vs. Current Card | vs. All Horses |
|---|---|---|
| Averages
Career-average metrics across all AI race analysis. Performance and pace averages reflect estimated historical performance; trainer and jockey grades score in-the-money percentages. Grading scale: A = elite • B = above average • C = average • D = below average • F = poor • — = no data |
||
| Pick Pony AI Rating | A | A |
| Pace Trip Longshot | — | — |
| Connections Longshot | — | — |
| Situational Longshot | — | — |
| Speed | B | C |
| Early Pace | C | C |
| Mid Pace | C | B |
| Late Pace | B | B |
| Finish Pos | D | C |
| Dirt Speed | A | B |
| Turf Speed | D | D |
| Distance Speed | A | B |
| Trainer Effectiveness | D | D |
| Jockey Effectiveness | B | A |
| 3rd Party Ratings | A | B |
| Recent
Performance analysis from the horse's recent races, weighted to reflect current form. Sprint and Route FPS (Foot Per Second) measure pace efficiency over the horse's recent sprints and routes respectively. Grading scale: A = elite • B = above average • C = average • D = below average • F = poor • — = no data |
||
| Speed | A | C |
| Early Pace | C | C |
| Mid Pace | A | B |
| Late Pace | A | B |
| Sprint FPS | C | C |
| Route FPS | A | B |
| Trainer Effectiveness | D | D |
| Jockey Effectiveness | B | A |
| 3rd Party Ratings | A | B |
| Predictions
AI-generated projections for the upcoming race, derived from prior AI analysis for speed and pace trends, surface and distance suitability, and current conditions. Grading scale: A = elite • B = above average • C = average • D = below average • F = poor • — = no data |
||
| Speed | C | C |
| Early Pace | C | C |
| Mid Pace | C | B |
| Late Pace | C | C |
✓ Positives:(1) Hot trainer - high ITM rate (28%). (2) Hot jockey — high ITM rate (40%). (3) Has a bullet work (fastest at track that day) — sharp conditioning signal. (4) Carries 6 lbs less than field median (120 lbs vs median 126 lbs). (5) Pick Pony Daily Edge Radar pick — value score 4/10 — angles: Bullet Workout, Weight Advantage.
⚠ Concerns:(1) First-time starter - no previous race record. (2) First time at today's distance. (3) Has never raced on dirt surface.
Mod1(W): 0 Mod2(W): 0 Mod3(W): 0 Mod1-LS: 75 (2/6) Mod2-LS: 0 Mod3-LS: 0 Mod4(Form): 0 Win Prob: 17.7% Value Score: 3.64 ★ ML: 15.00 (15/1) Overlay %: 3.41 Fair Odds: 11.07 (10/1) O/U: Overlay
Score Definitions
- Mod1(W)
- Winner Model 1 score (0–100) — AI composite rating among field contenders (higher = stronger). The number in parentheses (e.g. 1/9) shows this horse’s rank out of the field size.
- Mod2(W)
- Winner Model 2 score (0–100) — AI rating among field contenders (higher = stronger). The number in parentheses shows rank within the field.
- Mod3(W)
- Winner Model 3 score (0–100) — AI rating among field contenders (higher = stronger). The number in parentheses shows rank within the field.
- Mod1-LS
- Longshot Model 1 score (0–100) — AI model trained to surface high-value longshots. Higher = stronger longshot profile. Rank in parentheses shows position within the field.
- Mod2-LS
- Longshot Model 2 score (0–100) — AI longshot model. Higher = stronger longshot profile.
- Mod3-LS
- Longshot Model 3 score (0–100) — AI longshot model. Higher = stronger longshot profile.
- Mod4(Form)
- Form Model score (0–100) — AI sequence model trained on recent form patterns to capture momentum and trajectory. Higher = stronger recent form profile. Rank in parentheses shows position within the field.
- Win Prob
- LightGBM estimated win probability expressed as a percentage. This is a raw model output, not normalized to sum to 100% across the field — use it for comparison rather than as an absolute probability.
- Value Score
- Win Prob divided by the market-implied probability (derived from morning line). Values above 1.0 mean the model sees more win chance than the odds imply — a ★ star appears when Value Score ≥ 1.3, indicating a 30%+ model edge over the market.
- ML
- Morning line odds set by the track handicapper before wagering opens
- Overlay %
- How much the fair odds exceed the morning line, expressed as a percentage — positive values indicate value
- Fair Odds
- Model-derived fair-value odds based on estimated win probability
- O/U
- Overlay or Underlay — whether the horse offers value (O) or is overbet (U) relative to fair odds
Lane Bias Guide
- Bar Direction
- Bars above the line = more favorable lane • Bars below = less favorable, relative to the average at this track.
- Color
- Green = above-average advantage • Yellow = near-average • Red = below-average • Blue = this horse’s lane.
- Bias Score
- Derived from weighted average finishing positions across historical races at this track. Shown in the tooltip on hover. To use the bias score, calculate your handicap for the horse (e.g. finish position), then add (detrimental bias) or subtract (favorable bias) the bias score.
- Races
- Number of historical races used to compute each lane’s bias score.
Race Pace Bias Guide
- Bar Height & Direction
- Positive (green) = pace favors this horse • Negative (red) = pace works against this horse • Near-zero (amber) = neutral.
- Race Shape
- Projected race shape based on running styles of all horses (e.g. EE = two early horses, EP = one early presser).
- Pace Category
- FAST = contested early pace • LONE EARLY = one speed horse controlling pace • HONEST = moderate early pressure • SLOW = closers’ race.
- Flag (★)
- A star above the bar means this horse’s pace bias figure is ≥ 1.5 — a meaningful pace advantage or disadvantage.
Total Pace Guide
- Bar Segments
- Green = Early Pace (E1) • Amber = Mid Pace (E2) • Red = Late Pace (LP)
- Bar Height
- Total height = sum of E1 + E2 + LP average pace figures. Taller bars indicate a faster-paced horse overall.
- Grades & Rankings
- Hover to see each horse’s letter grade and ranking vs. other horses in this race (e.g. 2/9 = 2nd best of 9).
- Border
- Thicker border = this horse’s post position.
Performance vs. Peers Guide
- Bars (per post)
- Blue = avg career performance • Amber = avg last 3 races • Green = last race (improved vs. avg) • Red = last race (declined vs. avg)
- Trend Line
- Angled line above the bars: rising = improving form • falling = declining form.
- Horizontal Line
- Field average — the mean career performance of all horses in this race.
- Color Circles
- Standard post-position colors below each lane — same as the Total Pace chart.
- Border
- Thicker border = this horse’s post position.
Figure Comparison
- Rating
- The three Pick Pony algorithm ratings (Algo 1, Algo 2, Algo 3) that make up the overall PP AI Rating — higher is a stronger contender rating.
- Speed
- Career average speed, recent 3-race average, and last-race speed figure — spot horses in improving or declining form.
- Pace
- Average Early (E1), Mid (E2), and Stretch (LP) pace figures — reveals pace-setters vs. closers vs. all-the-way types.
- This horse
- The horse whose stats card is open is highlighted with a darker column background.
Winning Profiles
- Axes
- X: Win % from last 10 starts — Y: In-the-money % (top-3 finishes) from last 10 starts.
- Quadrants
- Consistent Winners (top-right): high win & ITM — reliable performers.
Place Threats (top-left): boards often but doesn’t win often — good exacta/trifecta angles.
Streaky (bottom-right): wins occasionally, misses the board often — all-or-nothing.
Developing (bottom-left): still finding form — longshot territory. - Reference Lines
- Dashed lines mark field averages. Dots to the right win more; dots higher board more.
- This horse
- Highlighted with a gold border and larger dot.
AI Model Comparison
- Winner Models (green)
- Mod1(W), Mod2(W), and Mod3(W) trained to predict race winners. Higher score = stronger contender.
- Longshot Models (red)
- Mod1-LS, Mod2-LS, and Mod3-LS trained to find high-value longshots. Higher score = stronger longshot candidate.
- Form Model (blue)
- Mod4 sequence model trained on recent form patterns. Higher score = stronger recent form profile.
- This horse
- Highlighted with a darker column background.
Race Pace Simulation Guide
- Slider
- Drag left→right to advance from gate to finish. Drag all the way back to reset the race.
- Predicted Finish Order
- Factors in contested pace burn, each horse’s effort curve (peaked-early vs. peaked-late), and wide trip cost from outside posts. Updated live when Track Bias changes.
- Pace Scenario
- Lone Speed: single E horse likely rates and holds. Contested: two E horses burn each other — closers benefit. Hot Pace: speed meltdown, deep closers thrive. Soft: no early speed, moderate fractions throughout.
- Track Bias
- Slider below canvas. −2 = strong closer/wet bias; +2 = strong speed/rail bias. Recomputes the predicted finish order.
- Boxed Indicator
- Dashed orange ring = horse is surrounded (rival ahead, rival behind, wall outside). In a real race this horse must find a clear path to run.
- Running Styles
- E/EE = early speed (rushes to rail). P = presser (stalks the pace). S = stalker. SS = slow starter / closer.
| Stat | vs. Current Card | vs. All Horses |
|---|---|---|
| Averages
Career-average metrics across all AI race analysis. Performance and pace averages reflect estimated historical performance; trainer and jockey grades score in-the-money percentages. Grading scale: A = elite • B = above average • C = average • D = below average • F = poor • — = no data |
||
| Pick Pony AI Rating | F | D |
| Pace Trip Longshot | — | — |
| Connections Longshot | — | — |
| Situational Longshot | — | — |
| Speed | F | F |
| Early Pace | F | F |
| Mid Pace | F | F |
| Late Pace | F | F |
| Finish Pos | A | A |
| Dirt Speed | F | F |
| Turf Speed | D | D |
| Distance Speed | F | F |
| Trainer Effectiveness | F | D |
| Jockey Effectiveness | D | C |
| 3rd Party Ratings | F | F |
| Recent
Performance analysis from the horse's recent races, weighted to reflect current form. Sprint and Route FPS (Foot Per Second) measure pace efficiency over the horse's recent sprints and routes respectively. Grading scale: A = elite • B = above average • C = average • D = below average • F = poor • — = no data |
||
| Speed | F | F |
| Early Pace | F | F |
| Mid Pace | F | F |
| Late Pace | F | F |
| Sprint FPS | F | F |
| Route FPS | F | F |
| Trainer Effectiveness | F | D |
| Jockey Effectiveness | D | C |
| 3rd Party Ratings | F | F |
| Predictions
AI-generated projections for the upcoming race, derived from prior AI analysis for speed and pace trends, surface and distance suitability, and current conditions. Grading scale: A = elite • B = above average • C = average • D = below average • F = poor • — = no data |
||
| Speed | F | F |
| Early Pace | F | F |
| Mid Pace | F | F |
| Late Pace | C | C |
Chart Guide (2.0.35)
- Bubbles
- Color = surface: green (turf), brown (dirt), blue (synthetic)
- Top number = finishing position; bottom number in parentheses = starting post position
- Height above line = beaten lengths — closer means a smaller margin
- Border = track conditions: green (FST/GD/FM), yellow (WF/SL/YLD), red (SY/MY/FRZ/SFT/HVY)
- Connecting Line
- Solid = good conditions; dashed = bad conditions
- Line Symbol
- ▲ Triangle = sprint (7f or less); ● Circle = route (more than 7f)
- Days Between Races
- Small number above each bubble (e.g. 19d) = days since the previous race — helps spot freshness, layoffs, and tight scheduling.
- Shaded Band (Bollinger)
- Highlights volatility — a wider band means more variation in recent performance
- Performance Trend
- Straight line showing the overall performance direction — angled up = improving, angled down = declining
- Dashed Reference Line
- AI Opponent = AI analysis class-level par for the race
✓ Positives:(1) Significantly better on off tracks (off: 75 vs fast: 57). (2) Hot trainer - high ITM rate (52%). (3) Career-best speed figure (57) recorded in last 1-2 starts — peaking form. (4) Hot jockey — high ITM rate (52%). (5) Pick Pony Daily Edge Radar pick — value score 7/10 — angles: Career-Best Recent Figure, Hot Trainer, Hot Jockey, Off-Track Preference.
⚠ Concerns:(1) Moving from a route to a sprint today. (2) Trip note from last race: Prompted 3w; tired. (3) Speed figures are highly erratic over last 5 starts (σ = 8.7 pts: [57, 75, 69, 78, 77]) — unpredictable performer. (4) 0 wins from 6 starts on dirt in last 10 — repeated failure on today's surface.
Mod1(W): 95 (2/6) Mod2(W): 97 (3/6) Mod3(W): 97 (3/6) Mod1-LS: 100 (1/6) Mod2-LS: 93 (3/6) Mod3-LS: 66 (3/6) Mod4(Form): 100 (1/6) Win Prob: 64.3% Value Score: 3.3 ★ ML: 3.00 (2/1) Overlay %: -4.11 Fair Odds: 5.50 (9/2) O/U: Underlay
Score Definitions
- Mod1(W)
- Winner Model 1 score (0–100) — AI composite rating among field contenders (higher = stronger). The number in parentheses (e.g. 1/9) shows this horse’s rank out of the field size.
- Mod2(W)
- Winner Model 2 score (0–100) — AI rating among field contenders (higher = stronger). The number in parentheses shows rank within the field.
- Mod3(W)
- Winner Model 3 score (0–100) — AI rating among field contenders (higher = stronger). The number in parentheses shows rank within the field.
- Mod1-LS
- Longshot Model 1 score (0–100) — AI model trained to surface high-value longshots. Higher = stronger longshot profile. Rank in parentheses shows position within the field.
- Mod2-LS
- Longshot Model 2 score (0–100) — AI longshot model. Higher = stronger longshot profile.
- Mod3-LS
- Longshot Model 3 score (0–100) — AI longshot model. Higher = stronger longshot profile.
- Mod4(Form)
- Form Model score (0–100) — AI sequence model trained on recent form patterns to capture momentum and trajectory. Higher = stronger recent form profile. Rank in parentheses shows position within the field.
- Win Prob
- LightGBM estimated win probability expressed as a percentage. This is a raw model output, not normalized to sum to 100% across the field — use it for comparison rather than as an absolute probability.
- Value Score
- Win Prob divided by the market-implied probability (derived from morning line). Values above 1.0 mean the model sees more win chance than the odds imply — a ★ star appears when Value Score ≥ 1.3, indicating a 30%+ model edge over the market.
- ML
- Morning line odds set by the track handicapper before wagering opens
- Overlay %
- How much the fair odds exceed the morning line, expressed as a percentage — positive values indicate value
- Fair Odds
- Model-derived fair-value odds based on estimated win probability
- O/U
- Overlay or Underlay — whether the horse offers value (O) or is overbet (U) relative to fair odds
Lane Bias Guide
- Bar Direction
- Bars above the line = more favorable lane • Bars below = less favorable, relative to the average at this track.
- Color
- Green = above-average advantage • Yellow = near-average • Red = below-average • Blue = this horse’s lane.
- Bias Score
- Derived from weighted average finishing positions across historical races at this track. Shown in the tooltip on hover. To use the bias score, calculate your handicap for the horse (e.g. finish position), then add (detrimental bias) or subtract (favorable bias) the bias score.
- Races
- Number of historical races used to compute each lane’s bias score.
Race Pace Bias Guide
- Bar Height & Direction
- Positive (green) = pace favors this horse • Negative (red) = pace works against this horse • Near-zero (amber) = neutral.
- Race Shape
- Projected race shape based on running styles of all horses (e.g. EE = two early horses, EP = one early presser).
- Pace Category
- FAST = contested early pace • LONE EARLY = one speed horse controlling pace • HONEST = moderate early pressure • SLOW = closers’ race.
- Flag (★)
- A star above the bar means this horse’s pace bias figure is ≥ 1.5 — a meaningful pace advantage or disadvantage.
Total Pace Guide
- Bar Segments
- Green = Early Pace (E1) • Amber = Mid Pace (E2) • Red = Late Pace (LP)
- Bar Height
- Total height = sum of E1 + E2 + LP average pace figures. Taller bars indicate a faster-paced horse overall.
- Grades & Rankings
- Hover to see each horse’s letter grade and ranking vs. other horses in this race (e.g. 2/9 = 2nd best of 9).
- Border
- Thicker border = this horse’s post position.
Performance vs. Peers Guide
- Bars (per post)
- Blue = avg career performance • Amber = avg last 3 races • Green = last race (improved vs. avg) • Red = last race (declined vs. avg)
- Trend Line
- Angled line above the bars: rising = improving form • falling = declining form.
- Horizontal Line
- Field average — the mean career performance of all horses in this race.
- Color Circles
- Standard post-position colors below each lane — same as the Total Pace chart.
- Border
- Thicker border = this horse’s post position.
Figure Comparison
- Rating
- The three Pick Pony algorithm ratings (Algo 1, Algo 2, Algo 3) that make up the overall PP AI Rating — higher is a stronger contender rating.
- Speed
- Career average speed, recent 3-race average, and last-race speed figure — spot horses in improving or declining form.
- Pace
- Average Early (E1), Mid (E2), and Stretch (LP) pace figures — reveals pace-setters vs. closers vs. all-the-way types.
- This horse
- The horse whose stats card is open is highlighted with a darker column background.
Winning Profiles
- Axes
- X: Win % from last 10 starts — Y: In-the-money % (top-3 finishes) from last 10 starts.
- Quadrants
- Consistent Winners (top-right): high win & ITM — reliable performers.
Place Threats (top-left): boards often but doesn’t win often — good exacta/trifecta angles.
Streaky (bottom-right): wins occasionally, misses the board often — all-or-nothing.
Developing (bottom-left): still finding form — longshot territory. - Reference Lines
- Dashed lines mark field averages. Dots to the right win more; dots higher board more.
- This horse
- Highlighted with a gold border and larger dot.
AI Model Comparison
- Winner Models (green)
- Mod1(W), Mod2(W), and Mod3(W) trained to predict race winners. Higher score = stronger contender.
- Longshot Models (red)
- Mod1-LS, Mod2-LS, and Mod3-LS trained to find high-value longshots. Higher score = stronger longshot candidate.
- Form Model (blue)
- Mod4 sequence model trained on recent form patterns. Higher score = stronger recent form profile.
- This horse
- Highlighted with a darker column background.
Race Pace Simulation Guide
- Slider
- Drag left→right to advance from gate to finish. Drag all the way back to reset the race.
- Predicted Finish Order
- Factors in contested pace burn, each horse’s effort curve (peaked-early vs. peaked-late), and wide trip cost from outside posts. Updated live when Track Bias changes.
- Pace Scenario
- Lone Speed: single E horse likely rates and holds. Contested: two E horses burn each other — closers benefit. Hot Pace: speed meltdown, deep closers thrive. Soft: no early speed, moderate fractions throughout.
- Track Bias
- Slider below canvas. −2 = strong closer/wet bias; +2 = strong speed/rail bias. Recomputes the predicted finish order.
- Boxed Indicator
- Dashed orange ring = horse is surrounded (rival ahead, rival behind, wall outside). In a real race this horse must find a clear path to run.
- Running Styles
- E/EE = early speed (rushes to rail). P = presser (stalks the pace). S = stalker. SS = slow starter / closer.
| Stat | vs. Current Card | vs. All Horses |
|---|---|---|
| Averages
Career-average metrics across all AI race analysis. Performance and pace averages reflect estimated historical performance; trainer and jockey grades score in-the-money percentages. Grading scale: A = elite • B = above average • C = average • D = below average • F = poor • — = no data |
||
| Pick Pony AI Rating | C | B |
| Pace Trip Longshot | — | — |
| Connections Longshot | — | — |
| Situational Longshot | — | — |
| Speed | C | C |
| Early Pace | A | B |
| Mid Pace | C | B |
| Late Pace | C | C |
| Finish Pos | A | A |
| Dirt Speed | D | D |
| Turf Speed | D | D |
| Distance Speed | A | B |
| Trainer Effectiveness | A | A |
| Jockey Effectiveness | A | A |
| 3rd Party Ratings | C | B |
| Recent
Performance analysis from the horse's recent races, weighted to reflect current form. Sprint and Route FPS (Foot Per Second) measure pace efficiency over the horse's recent sprints and routes respectively. Grading scale: A = elite • B = above average • C = average • D = below average • F = poor • — = no data |
||
| Speed | C | C |
| Early Pace | A | B |
| Mid Pace | C | C |
| Late Pace | C | D |
| Sprint FPS | A | B |
| Route FPS | B | B |
| Trainer Effectiveness | A | A |
| Jockey Effectiveness | A | A |
| 3rd Party Ratings | C | B |
| Predictions
AI-generated projections for the upcoming race, derived from prior AI analysis for speed and pace trends, surface and distance suitability, and current conditions. Grading scale: A = elite • B = above average • C = average • D = below average • F = poor • — = no data |
||
| Speed | D | C |
| Early Pace | A | B |
| Mid Pace | C | B |
| Late Pace | C | C |
Chart Guide (2.0.35)
- Bubbles
- Color = surface: green (turf), brown (dirt), blue (synthetic)
- Top number = finishing position; bottom number in parentheses = starting post position
- Height above line = beaten lengths — closer means a smaller margin
- Border = track conditions: green (FST/GD/FM), yellow (WF/SL/YLD), red (SY/MY/FRZ/SFT/HVY)
- Connecting Line
- Solid = good conditions; dashed = bad conditions
- Line Symbol
- ▲ Triangle = sprint (7f or less); ● Circle = route (more than 7f)
- Days Between Races
- Small number above each bubble (e.g. 19d) = days since the previous race — helps spot freshness, layoffs, and tight scheduling.
- Shaded Band (Bollinger)
- Highlights volatility — a wider band means more variation in recent performance
- Performance Trend
- Straight line showing the overall performance direction — angled up = improving, angled down = declining
- Dashed Reference Line
- AI Opponent = AI analysis class-level par for the race
✓ Positives:(1) Only early-speed horse in the race - uncontested lead possible. (2) Significantly better on off tracks (off: 75 vs fast: 62). (3) Hot trainer - high ITM rate (44%). (4) Career-best speed figure (62) recorded in last 1-2 starts — peaking form. (5) Hot jockey — high ITM rate (41%). (6) Carries 6 lbs less than field median (120 lbs vs median 126 lbs). (7) Had documented trouble last race (codes: ['D', 'T', 'U']) yet still finished 3rd — a clean trip today sets up a form reversal. (8) Cutting back to sprint (1320 yds) from routes — sprint speed figures (48.2) are 7.3 pts better than route figures (40.9). (9) Pick Pony Daily Edge Radar pick — value score 9/10 — angles: Lone Speed Advantage, Career-Best Recent Figure, Troubled Trip Comeback, Distance Cutback, Off-Track Preference, Weight Advantage.
⚠ Concerns:(1) Speed average (63) well below field median (70). (2) Moving from a route to a sprint today. (3) Trip note from last race: Pace;2-3p turn;tired. (4) No workout in last 30 days despite 28 days since last race.
Mod1(W): 86 (6/6) Mod2(W): 84 (5/6) Mod3(W): 95 (5/6) Mod1-LS: 10 (3/6) Mod2-LS: 89 (5/6) Mod3-LS: 85 (2/6) Mod4(Form): 92 (2/6) Win Prob: 63.3% Value Score: 3.66 ★ ML: 3.50 (5/2) Overlay %: -2.68 Fair Odds: 5.83 (5/1) O/U: Fair
Score Definitions
- Mod1(W)
- Winner Model 1 score (0–100) — AI composite rating among field contenders (higher = stronger). The number in parentheses (e.g. 1/9) shows this horse’s rank out of the field size.
- Mod2(W)
- Winner Model 2 score (0–100) — AI rating among field contenders (higher = stronger). The number in parentheses shows rank within the field.
- Mod3(W)
- Winner Model 3 score (0–100) — AI rating among field contenders (higher = stronger). The number in parentheses shows rank within the field.
- Mod1-LS
- Longshot Model 1 score (0–100) — AI model trained to surface high-value longshots. Higher = stronger longshot profile. Rank in parentheses shows position within the field.
- Mod2-LS
- Longshot Model 2 score (0–100) — AI longshot model. Higher = stronger longshot profile.
- Mod3-LS
- Longshot Model 3 score (0–100) — AI longshot model. Higher = stronger longshot profile.
- Mod4(Form)
- Form Model score (0–100) — AI sequence model trained on recent form patterns to capture momentum and trajectory. Higher = stronger recent form profile. Rank in parentheses shows position within the field.
- Win Prob
- LightGBM estimated win probability expressed as a percentage. This is a raw model output, not normalized to sum to 100% across the field — use it for comparison rather than as an absolute probability.
- Value Score
- Win Prob divided by the market-implied probability (derived from morning line). Values above 1.0 mean the model sees more win chance than the odds imply — a ★ star appears when Value Score ≥ 1.3, indicating a 30%+ model edge over the market.
- ML
- Morning line odds set by the track handicapper before wagering opens
- Overlay %
- How much the fair odds exceed the morning line, expressed as a percentage — positive values indicate value
- Fair Odds
- Model-derived fair-value odds based on estimated win probability
- O/U
- Overlay or Underlay — whether the horse offers value (O) or is overbet (U) relative to fair odds
Lane Bias Guide
- Bar Direction
- Bars above the line = more favorable lane • Bars below = less favorable, relative to the average at this track.
- Color
- Green = above-average advantage • Yellow = near-average • Red = below-average • Blue = this horse’s lane.
- Bias Score
- Derived from weighted average finishing positions across historical races at this track. Shown in the tooltip on hover. To use the bias score, calculate your handicap for the horse (e.g. finish position), then add (detrimental bias) or subtract (favorable bias) the bias score.
- Races
- Number of historical races used to compute each lane’s bias score.
Race Pace Bias Guide
- Bar Height & Direction
- Positive (green) = pace favors this horse • Negative (red) = pace works against this horse • Near-zero (amber) = neutral.
- Race Shape
- Projected race shape based on running styles of all horses (e.g. EE = two early horses, EP = one early presser).
- Pace Category
- FAST = contested early pace • LONE EARLY = one speed horse controlling pace • HONEST = moderate early pressure • SLOW = closers’ race.
- Flag (★)
- A star above the bar means this horse’s pace bias figure is ≥ 1.5 — a meaningful pace advantage or disadvantage.
Total Pace Guide
- Bar Segments
- Green = Early Pace (E1) • Amber = Mid Pace (E2) • Red = Late Pace (LP)
- Bar Height
- Total height = sum of E1 + E2 + LP average pace figures. Taller bars indicate a faster-paced horse overall.
- Grades & Rankings
- Hover to see each horse’s letter grade and ranking vs. other horses in this race (e.g. 2/9 = 2nd best of 9).
- Border
- Thicker border = this horse’s post position.
Performance vs. Peers Guide
- Bars (per post)
- Blue = avg career performance • Amber = avg last 3 races • Green = last race (improved vs. avg) • Red = last race (declined vs. avg)
- Trend Line
- Angled line above the bars: rising = improving form • falling = declining form.
- Horizontal Line
- Field average — the mean career performance of all horses in this race.
- Color Circles
- Standard post-position colors below each lane — same as the Total Pace chart.
- Border
- Thicker border = this horse’s post position.
Figure Comparison
- Rating
- The three Pick Pony algorithm ratings (Algo 1, Algo 2, Algo 3) that make up the overall PP AI Rating — higher is a stronger contender rating.
- Speed
- Career average speed, recent 3-race average, and last-race speed figure — spot horses in improving or declining form.
- Pace
- Average Early (E1), Mid (E2), and Stretch (LP) pace figures — reveals pace-setters vs. closers vs. all-the-way types.
- This horse
- The horse whose stats card is open is highlighted with a darker column background.
Winning Profiles
- Axes
- X: Win % from last 10 starts — Y: In-the-money % (top-3 finishes) from last 10 starts.
- Quadrants
- Consistent Winners (top-right): high win & ITM — reliable performers.
Place Threats (top-left): boards often but doesn’t win often — good exacta/trifecta angles.
Streaky (bottom-right): wins occasionally, misses the board often — all-or-nothing.
Developing (bottom-left): still finding form — longshot territory. - Reference Lines
- Dashed lines mark field averages. Dots to the right win more; dots higher board more.
- This horse
- Highlighted with a gold border and larger dot.
AI Model Comparison
- Winner Models (green)
- Mod1(W), Mod2(W), and Mod3(W) trained to predict race winners. Higher score = stronger contender.
- Longshot Models (red)
- Mod1-LS, Mod2-LS, and Mod3-LS trained to find high-value longshots. Higher score = stronger longshot candidate.
- Form Model (blue)
- Mod4 sequence model trained on recent form patterns. Higher score = stronger recent form profile.
- This horse
- Highlighted with a darker column background.
Race Pace Simulation Guide
- Slider
- Drag left→right to advance from gate to finish. Drag all the way back to reset the race.
- Predicted Finish Order
- Factors in contested pace burn, each horse’s effort curve (peaked-early vs. peaked-late), and wide trip cost from outside posts. Updated live when Track Bias changes.
- Pace Scenario
- Lone Speed: single E horse likely rates and holds. Contested: two E horses burn each other — closers benefit. Hot Pace: speed meltdown, deep closers thrive. Soft: no early speed, moderate fractions throughout.
- Track Bias
- Slider below canvas. −2 = strong closer/wet bias; +2 = strong speed/rail bias. Recomputes the predicted finish order.
- Boxed Indicator
- Dashed orange ring = horse is surrounded (rival ahead, rival behind, wall outside). In a real race this horse must find a clear path to run.
- Running Styles
- E/EE = early speed (rushes to rail). P = presser (stalks the pace). S = stalker. SS = slow starter / closer.
| Stat | vs. Current Card | vs. All Horses |
|---|---|---|
| Averages
Career-average metrics across all AI race analysis. Performance and pace averages reflect estimated historical performance; trainer and jockey grades score in-the-money percentages. Grading scale: A = elite • B = above average • C = average • D = below average • F = poor • — = no data |
||
| Pick Pony AI Rating | C | C |
| Pace Trip Longshot | — | — |
| Connections Longshot | — | — |
| Situational Longshot | — | — |
| Speed | D | D |
| Early Pace | A | A |
| Mid Pace | A | B |
| Late Pace | D | D |
| Finish Pos | A | A |
| Dirt Speed | C | D |
| Turf Speed | D | D |
| Distance Speed | C | B |
| Trainer Effectiveness | C | B |
| Jockey Effectiveness | C | C |
| 3rd Party Ratings | C | B |
| Recent
Performance analysis from the horse's recent races, weighted to reflect current form. Sprint and Route FPS (Foot Per Second) measure pace efficiency over the horse's recent sprints and routes respectively. Grading scale: A = elite • B = above average • C = average • D = below average • F = poor • — = no data |
||
| Speed | D | D |
| Early Pace | A | A |
| Mid Pace | A | A |
| Late Pace | D | D |
| Sprint FPS | B | B |
| Route FPS | D | C |
| Trainer Effectiveness | C | B |
| Jockey Effectiveness | C | C |
| 3rd Party Ratings | C | B |
| Predictions
AI-generated projections for the upcoming race, derived from prior AI analysis for speed and pace trends, surface and distance suitability, and current conditions. Grading scale: A = elite • B = above average • C = average • D = below average • F = poor • — = no data |
||
| Speed | A | B |
| Early Pace | A | A |
| Mid Pace | A | B |
| Late Pace | C | C |
Chart Guide (2.0.35)
- Bubbles
- Color = surface: green (turf), brown (dirt), blue (synthetic)
- Top number = finishing position; bottom number in parentheses = starting post position
- Height above line = beaten lengths — closer means a smaller margin
- Border = track conditions: green (FST/GD/FM), yellow (WF/SL/YLD), red (SY/MY/FRZ/SFT/HVY)
- Connecting Line
- Solid = good conditions; dashed = bad conditions
- Line Symbol
- ▲ Triangle = sprint (7f or less); ● Circle = route (more than 7f)
- Days Between Races
- Small number above each bubble (e.g. 19d) = days since the previous race — helps spot freshness, layoffs, and tight scheduling.
- Shaded Band (Bollinger)
- Highlights volatility — a wider band means more variation in recent performance
- Performance Trend
- Straight line showing the overall performance direction — angled up = improving, angled down = declining
- Dashed Reference Line
- AI Opponent = AI analysis class-level par for the race
✓ Positives:(1) Hot trainer - high ITM rate (38%). (2) Hot jockey — high ITM rate (42%). (3) Late pace significantly above field median (LP: 84 vs field 68). (4) Closer/presser in a race with pace pressure — ideal race setup for late runners. (5) Pick Pony Daily Edge Radar pick — value score 4/10 — angles: Closer in Pace Duel, Late Kick Advantage.
⚠ Concerns:(1) Consider there will be likely pace pressure in this race - multiple E types entered. (2) Moving from a sprint to a route today. (3) Poor record at this distance (0 wins from 4 recent starts). (4) Trip note from last race: 3w uppr; passed tired. (5) Consistently breaks behind post position (4 of last 5 starts). (6) Consistently runs wide at the first call (3 of last 5 starts). (7) No workout in last 30 days despite 21 days since last race. (8) 0 wins from 10 starts on dirt in last 10 — repeated failure on today's surface.
Mod1(W): 11 (6/6) Mod2(W): 2 (6/6) Mod3(W): 6 (6/6) Mod1-LS: 66 (4/6) Mod2-LS: 6 (5/6) Mod3-LS: 14 (5/6) Mod4(Form): 8 (6/6) Win Prob: 37.6% Value Score: 5.27 ★ ML: 10.00 (9/1) Overlay %: 3.16 Fair Odds: 8.72 (8/1) O/U: Overlay
Score Definitions
- Mod1(W)
- Winner Model 1 score (0–100) — AI composite rating among field contenders (higher = stronger). The number in parentheses (e.g. 1/9) shows this horse’s rank out of the field size.
- Mod2(W)
- Winner Model 2 score (0–100) — AI rating among field contenders (higher = stronger). The number in parentheses shows rank within the field.
- Mod3(W)
- Winner Model 3 score (0–100) — AI rating among field contenders (higher = stronger). The number in parentheses shows rank within the field.
- Mod1-LS
- Longshot Model 1 score (0–100) — AI model trained to surface high-value longshots. Higher = stronger longshot profile. Rank in parentheses shows position within the field.
- Mod2-LS
- Longshot Model 2 score (0–100) — AI longshot model. Higher = stronger longshot profile.
- Mod3-LS
- Longshot Model 3 score (0–100) — AI longshot model. Higher = stronger longshot profile.
- Mod4(Form)
- Form Model score (0–100) — AI sequence model trained on recent form patterns to capture momentum and trajectory. Higher = stronger recent form profile. Rank in parentheses shows position within the field.
- Win Prob
- LightGBM estimated win probability expressed as a percentage. This is a raw model output, not normalized to sum to 100% across the field — use it for comparison rather than as an absolute probability.
- Value Score
- Win Prob divided by the market-implied probability (derived from morning line). Values above 1.0 mean the model sees more win chance than the odds imply — a ★ star appears when Value Score ≥ 1.3, indicating a 30%+ model edge over the market.
- ML
- Morning line odds set by the track handicapper before wagering opens
- Overlay %
- How much the fair odds exceed the morning line, expressed as a percentage — positive values indicate value
- Fair Odds
- Model-derived fair-value odds based on estimated win probability
- O/U
- Overlay or Underlay — whether the horse offers value (O) or is overbet (U) relative to fair odds
Lane Bias Guide
- Bar Direction
- Bars above the line = more favorable lane • Bars below = less favorable, relative to the average at this track.
- Color
- Green = above-average advantage • Yellow = near-average • Red = below-average • Blue = this horse’s lane.
- Bias Score
- Derived from weighted average finishing positions across historical races at this track. Shown in the tooltip on hover. To use the bias score, calculate your handicap for the horse (e.g. finish position), then add (detrimental bias) or subtract (favorable bias) the bias score.
- Races
- Number of historical races used to compute each lane’s bias score.
Race Pace Bias Guide
- Bar Height & Direction
- Positive (green) = pace favors this horse • Negative (red) = pace works against this horse • Near-zero (amber) = neutral.
- Race Shape
- Projected race shape based on running styles of all horses (e.g. EE = two early horses, EP = one early presser).
- Pace Category
- FAST = contested early pace • LONE EARLY = one speed horse controlling pace • HONEST = moderate early pressure • SLOW = closers’ race.
- Flag (★)
- A star above the bar means this horse’s pace bias figure is ≥ 1.5 — a meaningful pace advantage or disadvantage.
Total Pace Guide
- Bar Segments
- Green = Early Pace (E1) • Amber = Mid Pace (E2) • Red = Late Pace (LP)
- Bar Height
- Total height = sum of E1 + E2 + LP average pace figures. Taller bars indicate a faster-paced horse overall.
- Grades & Rankings
- Hover to see each horse’s letter grade and ranking vs. other horses in this race (e.g. 2/9 = 2nd best of 9).
- Border
- Thicker border = this horse’s post position.
Performance vs. Peers Guide
- Bars (per post)
- Blue = avg career performance • Amber = avg last 3 races • Green = last race (improved vs. avg) • Red = last race (declined vs. avg)
- Trend Line
- Angled line above the bars: rising = improving form • falling = declining form.
- Horizontal Line
- Field average — the mean career performance of all horses in this race.
- Color Circles
- Standard post-position colors below each lane — same as the Total Pace chart.
- Border
- Thicker border = this horse’s post position.
Figure Comparison
- Rating
- The three Pick Pony algorithm ratings (Algo 1, Algo 2, Algo 3) that make up the overall PP AI Rating — higher is a stronger contender rating.
- Speed
- Career average speed, recent 3-race average, and last-race speed figure — spot horses in improving or declining form.
- Pace
- Average Early (E1), Mid (E2), and Stretch (LP) pace figures — reveals pace-setters vs. closers vs. all-the-way types.
- This horse
- The horse whose stats card is open is highlighted with a darker column background.
Winning Profiles
- Axes
- X: Win % from last 10 starts — Y: In-the-money % (top-3 finishes) from last 10 starts.
- Quadrants
- Consistent Winners (top-right): high win & ITM — reliable performers.
Place Threats (top-left): boards often but doesn’t win often — good exacta/trifecta angles.
Streaky (bottom-right): wins occasionally, misses the board often — all-or-nothing.
Developing (bottom-left): still finding form — longshot territory. - Reference Lines
- Dashed lines mark field averages. Dots to the right win more; dots higher board more.
- This horse
- Highlighted with a gold border and larger dot.
AI Model Comparison
- Winner Models (green)
- Mod1(W), Mod2(W), and Mod3(W) trained to predict race winners. Higher score = stronger contender.
- Longshot Models (red)
- Mod1-LS, Mod2-LS, and Mod3-LS trained to find high-value longshots. Higher score = stronger longshot candidate.
- Form Model (blue)
- Mod4 sequence model trained on recent form patterns. Higher score = stronger recent form profile.
- This horse
- Highlighted with a darker column background.
Race Pace Simulation Guide
- Slider
- Drag left→right to advance from gate to finish. Drag all the way back to reset the race.
- Predicted Finish Order
- Factors in contested pace burn, each horse’s effort curve (peaked-early vs. peaked-late), and wide trip cost from outside posts. Updated live when Track Bias changes.
- Pace Scenario
- Lone Speed: single E horse likely rates and holds. Contested: two E horses burn each other — closers benefit. Hot Pace: speed meltdown, deep closers thrive. Soft: no early speed, moderate fractions throughout.
- Track Bias
- Slider below canvas. −2 = strong closer/wet bias; +2 = strong speed/rail bias. Recomputes the predicted finish order.
- Boxed Indicator
- Dashed orange ring = horse is surrounded (rival ahead, rival behind, wall outside). In a real race this horse must find a clear path to run.
- Running Styles
- E/EE = early speed (rushes to rail). P = presser (stalks the pace). S = stalker. SS = slow starter / closer.
| Stat | vs. Current Card | vs. All Horses |
|---|---|---|
| Averages
Career-average metrics across all AI race analysis. Performance and pace averages reflect estimated historical performance; trainer and jockey grades score in-the-money percentages. Grading scale: A = elite • B = above average • C = average • D = below average • F = poor • — = no data |
||
| Pick Pony AI Rating | D | F |
| Pace Trip Longshot | — | — |
| Connections Longshot | — | — |
| Situational Longshot | — | — |
| Speed | A | C |
| Early Pace | F | D |
| Mid Pace | F | D |
| Late Pace | A | A |
| Finish Pos | B | C |
| Dirt Speed | C | C |
| Turf Speed | D | D |
| Distance Speed | D | C |
| Trainer Effectiveness | C | C |
| Jockey Effectiveness | C | C |
| 3rd Party Ratings | F | D |
| Recent
Performance analysis from the horse's recent races, weighted to reflect current form. Sprint and Route FPS (Foot Per Second) measure pace efficiency over the horse's recent sprints and routes respectively. Grading scale: A = elite • B = above average • C = average • D = below average • F = poor • — = no data |
||
| Speed | C | D |
| Early Pace | D | D |
| Mid Pace | F | D |
| Late Pace | A | A |
| Sprint FPS | D | D |
| Route FPS | F | D |
| Trainer Effectiveness | C | C |
| Jockey Effectiveness | C | C |
| 3rd Party Ratings | F | D |
| Predictions
AI-generated projections for the upcoming race, derived from prior AI analysis for speed and pace trends, surface and distance suitability, and current conditions. Grading scale: A = elite • B = above average • C = average • D = below average • F = poor • — = no data |
||
| Speed | A | C |
| Early Pace | F | D |
| Mid Pace | F | D |
| Late Pace | C | C |
Chart Guide (2.0.35)
- Bubbles
- Color = surface: green (turf), brown (dirt), blue (synthetic)
- Top number = finishing position; bottom number in parentheses = starting post position
- Height above line = beaten lengths — closer means a smaller margin
- Border = track conditions: green (FST/GD/FM), yellow (WF/SL/YLD), red (SY/MY/FRZ/SFT/HVY)
- Connecting Line
- Solid = good conditions; dashed = bad conditions
- Line Symbol
- ▲ Triangle = sprint (7f or less); ● Circle = route (more than 7f)
- Days Between Races
- Small number above each bubble (e.g. 19d) = days since the previous race — helps spot freshness, layoffs, and tight scheduling.
- Shaded Band (Bollinger)
- Highlights volatility — a wider band means more variation in recent performance
- Performance Trend
- Straight line showing the overall performance direction — angled up = improving, angled down = declining
- Dashed Reference Line
- AI Opponent = AI analysis class-level par for the race
✓ Positives:(1) Hot trainer - high ITM rate (46%). (2) Career-best speed figure (79) recorded in last 1-2 starts — peaking form. (3) Hot jockey — high ITM rate (52%). (4) Early pace significantly above field median (E1: 85 vs field 81). (5) Had documented trouble last race (codes: ['B', 'D', 'O', 'T', 'U']) yet still finished 4th — a clean trip today sets up a form reversal. (6) Averages 67.0 speed pts in today's distance/surface configuration vs 52.5 in other configs (8 qualifying starts) — returning to ideal setup. (7) Pick Pony Daily Edge Radar pick — value score 8/10 — angles: Career-Best Recent Figure, Troubled Trip Comeback, Hot Trainer, Hot Jockey, Return to Proven Setup, Early Speed Edge.
⚠ Concerns:(1) Consider there will be likely pace pressure in this race - multiple E types entered. (2) Poor record at this distance (0 wins from 9 recent starts). (3) Poor record at this track (0 wins from 12 starts). (4) Trip note from last race: Bmp brk;out;3p;tired. (5) Has not won in last 10 starts despite career wins. (6) Speed figures are highly erratic over last 5 starts (σ = 9.7 pts: [58, 79, 62, 70, 55]) — unpredictable performer. (7) 0 wins from 9 starts on dirt in last 10 — repeated failure on today's surface.
Mod1(W): 88 (2/6) Mod2(W): 94 (2/6) Mod3(W): 75 (2/6) Mod1-LS: 93 (3/6) Mod2-LS: 89 (2/6) Mod3-LS: 100 (1/6) Mod4(Form): 87 (2/6) Win Prob: 67.4% Value Score: 3.01 ★ ML: 2.50 (3/2) Overlay %: -3.58 Fair Odds: 4.31 (7/2) O/U: Fair
Score Definitions
- Mod1(W)
- Winner Model 1 score (0–100) — AI composite rating among field contenders (higher = stronger). The number in parentheses (e.g. 1/9) shows this horse’s rank out of the field size.
- Mod2(W)
- Winner Model 2 score (0–100) — AI rating among field contenders (higher = stronger). The number in parentheses shows rank within the field.
- Mod3(W)
- Winner Model 3 score (0–100) — AI rating among field contenders (higher = stronger). The number in parentheses shows rank within the field.
- Mod1-LS
- Longshot Model 1 score (0–100) — AI model trained to surface high-value longshots. Higher = stronger longshot profile. Rank in parentheses shows position within the field.
- Mod2-LS
- Longshot Model 2 score (0–100) — AI longshot model. Higher = stronger longshot profile.
- Mod3-LS
- Longshot Model 3 score (0–100) — AI longshot model. Higher = stronger longshot profile.
- Mod4(Form)
- Form Model score (0–100) — AI sequence model trained on recent form patterns to capture momentum and trajectory. Higher = stronger recent form profile. Rank in parentheses shows position within the field.
- Win Prob
- LightGBM estimated win probability expressed as a percentage. This is a raw model output, not normalized to sum to 100% across the field — use it for comparison rather than as an absolute probability.
- Value Score
- Win Prob divided by the market-implied probability (derived from morning line). Values above 1.0 mean the model sees more win chance than the odds imply — a ★ star appears when Value Score ≥ 1.3, indicating a 30%+ model edge over the market.
- ML
- Morning line odds set by the track handicapper before wagering opens
- Overlay %
- How much the fair odds exceed the morning line, expressed as a percentage — positive values indicate value
- Fair Odds
- Model-derived fair-value odds based on estimated win probability
- O/U
- Overlay or Underlay — whether the horse offers value (O) or is overbet (U) relative to fair odds
Lane Bias Guide
- Bar Direction
- Bars above the line = more favorable lane • Bars below = less favorable, relative to the average at this track.
- Color
- Green = above-average advantage • Yellow = near-average • Red = below-average • Blue = this horse’s lane.
- Bias Score
- Derived from weighted average finishing positions across historical races at this track. Shown in the tooltip on hover. To use the bias score, calculate your handicap for the horse (e.g. finish position), then add (detrimental bias) or subtract (favorable bias) the bias score.
- Races
- Number of historical races used to compute each lane’s bias score.
Race Pace Bias Guide
- Bar Height & Direction
- Positive (green) = pace favors this horse • Negative (red) = pace works against this horse • Near-zero (amber) = neutral.
- Race Shape
- Projected race shape based on running styles of all horses (e.g. EE = two early horses, EP = one early presser).
- Pace Category
- FAST = contested early pace • LONE EARLY = one speed horse controlling pace • HONEST = moderate early pressure • SLOW = closers’ race.
- Flag (★)
- A star above the bar means this horse’s pace bias figure is ≥ 1.5 — a meaningful pace advantage or disadvantage.
Total Pace Guide
- Bar Segments
- Green = Early Pace (E1) • Amber = Mid Pace (E2) • Red = Late Pace (LP)
- Bar Height
- Total height = sum of E1 + E2 + LP average pace figures. Taller bars indicate a faster-paced horse overall.
- Grades & Rankings
- Hover to see each horse’s letter grade and ranking vs. other horses in this race (e.g. 2/9 = 2nd best of 9).
- Border
- Thicker border = this horse’s post position.
Performance vs. Peers Guide
- Bars (per post)
- Blue = avg career performance • Amber = avg last 3 races • Green = last race (improved vs. avg) • Red = last race (declined vs. avg)
- Trend Line
- Angled line above the bars: rising = improving form • falling = declining form.
- Horizontal Line
- Field average — the mean career performance of all horses in this race.
- Color Circles
- Standard post-position colors below each lane — same as the Total Pace chart.
- Border
- Thicker border = this horse’s post position.
Figure Comparison
- Rating
- The three Pick Pony algorithm ratings (Algo 1, Algo 2, Algo 3) that make up the overall PP AI Rating — higher is a stronger contender rating.
- Speed
- Career average speed, recent 3-race average, and last-race speed figure — spot horses in improving or declining form.
- Pace
- Average Early (E1), Mid (E2), and Stretch (LP) pace figures — reveals pace-setters vs. closers vs. all-the-way types.
- This horse
- The horse whose stats card is open is highlighted with a darker column background.
Winning Profiles
- Axes
- X: Win % from last 10 starts — Y: In-the-money % (top-3 finishes) from last 10 starts.
- Quadrants
- Consistent Winners (top-right): high win & ITM — reliable performers.
Place Threats (top-left): boards often but doesn’t win often — good exacta/trifecta angles.
Streaky (bottom-right): wins occasionally, misses the board often — all-or-nothing.
Developing (bottom-left): still finding form — longshot territory. - Reference Lines
- Dashed lines mark field averages. Dots to the right win more; dots higher board more.
- This horse
- Highlighted with a gold border and larger dot.
AI Model Comparison
- Winner Models (green)
- Mod1(W), Mod2(W), and Mod3(W) trained to predict race winners. Higher score = stronger contender.
- Longshot Models (red)
- Mod1-LS, Mod2-LS, and Mod3-LS trained to find high-value longshots. Higher score = stronger longshot candidate.
- Form Model (blue)
- Mod4 sequence model trained on recent form patterns. Higher score = stronger recent form profile.
- This horse
- Highlighted with a darker column background.
Race Pace Simulation Guide
- Slider
- Drag left→right to advance from gate to finish. Drag all the way back to reset the race.
- Predicted Finish Order
- Factors in contested pace burn, each horse’s effort curve (peaked-early vs. peaked-late), and wide trip cost from outside posts. Updated live when Track Bias changes.
- Pace Scenario
- Lone Speed: single E horse likely rates and holds. Contested: two E horses burn each other — closers benefit. Hot Pace: speed meltdown, deep closers thrive. Soft: no early speed, moderate fractions throughout.
- Track Bias
- Slider below canvas. −2 = strong closer/wet bias; +2 = strong speed/rail bias. Recomputes the predicted finish order.
- Boxed Indicator
- Dashed orange ring = horse is surrounded (rival ahead, rival behind, wall outside). In a real race this horse must find a clear path to run.
- Running Styles
- E/EE = early speed (rushes to rail). P = presser (stalks the pace). S = stalker. SS = slow starter / closer.
| Stat | vs. Current Card | vs. All Horses |
|---|---|---|
| Averages
Career-average metrics across all AI race analysis. Performance and pace averages reflect estimated historical performance; trainer and jockey grades score in-the-money percentages. Grading scale: A = elite • B = above average • C = average • D = below average • F = poor • — = no data |
||
| Pick Pony AI Rating | A | B |
| Pace Trip Longshot | — | — |
| Connections Longshot | — | — |
| Situational Longshot | — | — |
| Speed | C | D |
| Early Pace | A | B |
| Mid Pace | A | B |
| Late Pace | F | D |
| Finish Pos | B | C |
| Dirt Speed | A | B |
| Turf Speed | A | A |
| Distance Speed | A | B |
| Trainer Effectiveness | A | B |
| Jockey Effectiveness | A | A |
| 3rd Party Ratings | A | B |
| Recent
Performance analysis from the horse's recent races, weighted to reflect current form. Sprint and Route FPS (Foot Per Second) measure pace efficiency over the horse's recent sprints and routes respectively. Grading scale: A = elite • B = above average • C = average • D = below average • F = poor • — = no data |
||
| Speed | A | C |
| Early Pace | A | B |
| Mid Pace | A | B |
| Late Pace | D | D |
| Sprint FPS | A | A |
| Route FPS | A | A |
| Trainer Effectiveness | A | B |
| Jockey Effectiveness | A | A |
| 3rd Party Ratings | A | B |
| Predictions
AI-generated projections for the upcoming race, derived from prior AI analysis for speed and pace trends, surface and distance suitability, and current conditions. Grading scale: A = elite • B = above average • C = average • D = below average • F = poor • — = no data |
||
| Speed | C | D |
| Early Pace | A | B |
| Mid Pace | A | B |
| Late Pace | C | C |
Chart Guide (2.0.35)
- Bubbles
- Color = surface: green (turf), brown (dirt), blue (synthetic)
- Top number = finishing position; bottom number in parentheses = starting post position
- Height above line = beaten lengths — closer means a smaller margin
- Border = track conditions: green (FST/GD/FM), yellow (WF/SL/YLD), red (SY/MY/FRZ/SFT/HVY)
- Connecting Line
- Solid = good conditions; dashed = bad conditions
- Line Symbol
- ▲ Triangle = sprint (7f or less); ● Circle = route (more than 7f)
- Days Between Races
- Small number above each bubble (e.g. 19d) = days since the previous race — helps spot freshness, layoffs, and tight scheduling.
- Shaded Band (Bollinger)
- Highlights volatility — a wider band means more variation in recent performance
- Performance Trend
- Straight line showing the overall performance direction — angled up = improving, angled down = declining
- Dashed Reference Line
- AI Opponent = AI analysis class-level par for the race
✓ Positives:(1) Dropping in class today ($40,000 → $12,500). (2) Hot trainer - high ITM rate (48%). (3) Career-best speed figure (71) recorded in last 1-2 starts — peaking form. (4) Big last-race effort (71) — 8 pts above recent average. (5) Hot jockey — high ITM rate (59%). (6) Consistent workout spacing (6, 9 days) — disciplined training regimen. (7) Has won at today's distance (1760 yds) within the last 10 starts — proven ability at this trip. (8) Dropping in class ($12,500 vs last $40,000) after a 68-day freshening — trainer setup-for-win angle. (9) Has won at AQU on dirt in the last 10 starts — proven at today's exact track/surface combo. (10) Carries 6 lbs less than field median (120 lbs vs median 126 lbs). (11) Had documented trouble last race (codes: ['B', 'F', 'O', 'T', 'U']) yet still finished 1st — a clean trip today sets up a form reversal. (12) Pick Pony Daily Edge Radar pick — value score 10/10 — angles: Big Last Effort, Career-Best Recent Figure, Class Drop After Rest, Troubled Trip Comeback, Hot Trainer, Hot Jockey, Won Here Before, Won at This Distance, Class Drop, Weight Advantage.
⚠ Concerns:(1) Has not raced in 68 days. (2) Consider there will be likely pace pressure in this race - multiple E types entered. (3) Unproven on dirt surface (2 starts). (4) Trip note from last race: 2p turn;btwn;fought;up.
Mod1(W): 67 (3/6) Mod2(W): 51 (3/6) Mod3(W): 56 (3/6) Mod1-LS: 9 (6/6) Mod2-LS: 45 (3/6) Mod3-LS: 13 (6/6) Mod4(Form): 58 (3/6) Win Prob: 52.7% Value Score: 3.69 ★ ML: 4.50 (7/2) Overlay %: 1.44 Fair Odds: 5.36 (9/2) O/U: Fair
Score Definitions
- Mod1(W)
- Winner Model 1 score (0–100) — AI composite rating among field contenders (higher = stronger). The number in parentheses (e.g. 1/9) shows this horse’s rank out of the field size.
- Mod2(W)
- Winner Model 2 score (0–100) — AI rating among field contenders (higher = stronger). The number in parentheses shows rank within the field.
- Mod3(W)
- Winner Model 3 score (0–100) — AI rating among field contenders (higher = stronger). The number in parentheses shows rank within the field.
- Mod1-LS
- Longshot Model 1 score (0–100) — AI model trained to surface high-value longshots. Higher = stronger longshot profile. Rank in parentheses shows position within the field.
- Mod2-LS
- Longshot Model 2 score (0–100) — AI longshot model. Higher = stronger longshot profile.
- Mod3-LS
- Longshot Model 3 score (0–100) — AI longshot model. Higher = stronger longshot profile.
- Mod4(Form)
- Form Model score (0–100) — AI sequence model trained on recent form patterns to capture momentum and trajectory. Higher = stronger recent form profile. Rank in parentheses shows position within the field.
- Win Prob
- LightGBM estimated win probability expressed as a percentage. This is a raw model output, not normalized to sum to 100% across the field — use it for comparison rather than as an absolute probability.
- Value Score
- Win Prob divided by the market-implied probability (derived from morning line). Values above 1.0 mean the model sees more win chance than the odds imply — a ★ star appears when Value Score ≥ 1.3, indicating a 30%+ model edge over the market.
- ML
- Morning line odds set by the track handicapper before wagering opens
- Overlay %
- How much the fair odds exceed the morning line, expressed as a percentage — positive values indicate value
- Fair Odds
- Model-derived fair-value odds based on estimated win probability
- O/U
- Overlay or Underlay — whether the horse offers value (O) or is overbet (U) relative to fair odds
Lane Bias Guide
- Bar Direction
- Bars above the line = more favorable lane • Bars below = less favorable, relative to the average at this track.
- Color
- Green = above-average advantage • Yellow = near-average • Red = below-average • Blue = this horse’s lane.
- Bias Score
- Derived from weighted average finishing positions across historical races at this track. Shown in the tooltip on hover. To use the bias score, calculate your handicap for the horse (e.g. finish position), then add (detrimental bias) or subtract (favorable bias) the bias score.
- Races
- Number of historical races used to compute each lane’s bias score.
Race Pace Bias Guide
- Bar Height & Direction
- Positive (green) = pace favors this horse • Negative (red) = pace works against this horse • Near-zero (amber) = neutral.
- Race Shape
- Projected race shape based on running styles of all horses (e.g. EE = two early horses, EP = one early presser).
- Pace Category
- FAST = contested early pace • LONE EARLY = one speed horse controlling pace • HONEST = moderate early pressure • SLOW = closers’ race.
- Flag (★)
- A star above the bar means this horse’s pace bias figure is ≥ 1.5 — a meaningful pace advantage or disadvantage.
Total Pace Guide
- Bar Segments
- Green = Early Pace (E1) • Amber = Mid Pace (E2) • Red = Late Pace (LP)
- Bar Height
- Total height = sum of E1 + E2 + LP average pace figures. Taller bars indicate a faster-paced horse overall.
- Grades & Rankings
- Hover to see each horse’s letter grade and ranking vs. other horses in this race (e.g. 2/9 = 2nd best of 9).
- Border
- Thicker border = this horse’s post position.
Performance vs. Peers Guide
- Bars (per post)
- Blue = avg career performance • Amber = avg last 3 races • Green = last race (improved vs. avg) • Red = last race (declined vs. avg)
- Trend Line
- Angled line above the bars: rising = improving form • falling = declining form.
- Horizontal Line
- Field average — the mean career performance of all horses in this race.
- Color Circles
- Standard post-position colors below each lane — same as the Total Pace chart.
- Border
- Thicker border = this horse’s post position.
Figure Comparison
- Rating
- The three Pick Pony algorithm ratings (Algo 1, Algo 2, Algo 3) that make up the overall PP AI Rating — higher is a stronger contender rating.
- Speed
- Career average speed, recent 3-race average, and last-race speed figure — spot horses in improving or declining form.
- Pace
- Average Early (E1), Mid (E2), and Stretch (LP) pace figures — reveals pace-setters vs. closers vs. all-the-way types.
- This horse
- The horse whose stats card is open is highlighted with a darker column background.
Winning Profiles
- Axes
- X: Win % from last 10 starts — Y: In-the-money % (top-3 finishes) from last 10 starts.
- Quadrants
- Consistent Winners (top-right): high win & ITM — reliable performers.
Place Threats (top-left): boards often but doesn’t win often — good exacta/trifecta angles.
Streaky (bottom-right): wins occasionally, misses the board often — all-or-nothing.
Developing (bottom-left): still finding form — longshot territory. - Reference Lines
- Dashed lines mark field averages. Dots to the right win more; dots higher board more.
- This horse
- Highlighted with a gold border and larger dot.
AI Model Comparison
- Winner Models (green)
- Mod1(W), Mod2(W), and Mod3(W) trained to predict race winners. Higher score = stronger contender.
- Longshot Models (red)
- Mod1-LS, Mod2-LS, and Mod3-LS trained to find high-value longshots. Higher score = stronger longshot candidate.
- Form Model (blue)
- Mod4 sequence model trained on recent form patterns. Higher score = stronger recent form profile.
- This horse
- Highlighted with a darker column background.
Race Pace Simulation Guide
- Slider
- Drag left→right to advance from gate to finish. Drag all the way back to reset the race.
- Predicted Finish Order
- Factors in contested pace burn, each horse’s effort curve (peaked-early vs. peaked-late), and wide trip cost from outside posts. Updated live when Track Bias changes.
- Pace Scenario
- Lone Speed: single E horse likely rates and holds. Contested: two E horses burn each other — closers benefit. Hot Pace: speed meltdown, deep closers thrive. Soft: no early speed, moderate fractions throughout.
- Track Bias
- Slider below canvas. −2 = strong closer/wet bias; +2 = strong speed/rail bias. Recomputes the predicted finish order.
- Boxed Indicator
- Dashed orange ring = horse is surrounded (rival ahead, rival behind, wall outside). In a real race this horse must find a clear path to run.
- Running Styles
- E/EE = early speed (rushes to rail). P = presser (stalks the pace). S = stalker. SS = slow starter / closer.
| Stat | vs. Current Card | vs. All Horses |
|---|---|---|
| Averages
Career-average metrics across all AI race analysis. Performance and pace averages reflect estimated historical performance; trainer and jockey grades score in-the-money percentages. Grading scale: A = elite • B = above average • C = average • D = below average • F = poor • — = no data |
||
| Pick Pony AI Rating | B | C |
| Pace Trip Longshot | — | — |
| Connections Longshot | — | — |
| Situational Longshot | — | — |
| Speed | B | C |
| Early Pace | C | C |
| Mid Pace | D | C |
| Late Pace | C | C |
| Finish Pos | D | D |
| Dirt Speed | D | C |
| Turf Speed | A | B |
| Distance Speed | D | C |
| Trainer Effectiveness | A | B |
| Jockey Effectiveness | A | A |
| 3rd Party Ratings | B | C |
| Recent
Performance analysis from the horse's recent races, weighted to reflect current form. Sprint and Route FPS (Foot Per Second) measure pace efficiency over the horse's recent sprints and routes respectively. Grading scale: A = elite • B = above average • C = average • D = below average • F = poor • — = no data |
||
| Speed | B | D |
| Early Pace | C | D |
| Mid Pace | D | D |
| Late Pace | C | C |
| Sprint FPS | C | B |
| Route FPS | B | B |
| Trainer Effectiveness | A | B |
| Jockey Effectiveness | A | A |
| 3rd Party Ratings | B | C |
| Predictions
AI-generated projections for the upcoming race, derived from prior AI analysis for speed and pace trends, surface and distance suitability, and current conditions. Grading scale: A = elite • B = above average • C = average • D = below average • F = poor • — = no data |
||
| Speed | B | D |
| Early Pace | C | C |
| Mid Pace | D | C |
| Late Pace | C | C |
Chart Guide (2.0.35)
- Bubbles
- Color = surface: green (turf), brown (dirt), blue (synthetic)
- Top number = finishing position; bottom number in parentheses = starting post position
- Height above line = beaten lengths — closer means a smaller margin
- Border = track conditions: green (FST/GD/FM), yellow (WF/SL/YLD), red (SY/MY/FRZ/SFT/HVY)
- Connecting Line
- Solid = good conditions; dashed = bad conditions
- Line Symbol
- ▲ Triangle = sprint (7f or less); ● Circle = route (more than 7f)
- Days Between Races
- Small number above each bubble (e.g. 19d) = days since the previous race — helps spot freshness, layoffs, and tight scheduling.
- Shaded Band (Bollinger)
- Highlights volatility — a wider band means more variation in recent performance
- Performance Trend
- Straight line showing the overall performance direction — angled up = improving, angled down = declining
- Dashed Reference Line
- AI Opponent = AI analysis class-level par for the race
✓ Positives:(1) Significantly better on off tracks (off: 86 vs fast: 65). (2) Hot trainer - high ITM rate (21%). (3) Hot jockey — high ITM rate (31%). (4) Early pace significantly above field median (E1: 83 vs field 76). (5) Has won at today's distance (1760 yds) within the last 10 starts — proven ability at this trip. (6) Has won at AQU on dirt in the last 10 starts — proven at today's exact track/surface combo. (7) Last race E1 pace (89.0) was 6.3 pts above personal avg (82.7) and horse still finished 7th — pace collapse victim; expect bounce if today's fractions are softer. (8) Career-best figure (86) buried in races 4–10 back — 20 pts above race median and 21 pts above recent form — market has forgotten the peak effort. (9) Pick Pony Daily Edge Radar pick — value score 7/10 — angles: Won Here Before, Pace Collapse Victim, Hidden Figure, Off-Track Preference, Won at This Distance.
⚠ Concerns:(1) Consider there will be likely pace pressure in this race - multiple E types entered. (2) Speed average (60) well below field median (66). (3) Moving from a sprint to a route today. (4) Tends to fade in the stretch at similar distances (4 of 6 starts). (5) Trip note from last race: Vied 4w; weakened. (6) Last race was career-best speed (65) — bounce risk after peak effort.
Mod1(W): 0 Mod2(W): 4 (5/6) Mod3(W): 15 (5/6) Mod1-LS: 94 (2/6) Mod2-LS: 4 (6/6) Mod3-LS: 38 (3/6) Mod4(Form): 0 Win Prob: 29.1% Value Score: 4.81 ★ ML: 12.00 (10/1) Overlay %: 4.13 Fair Odds: 8.83 (8/1) O/U: Overlay
Score Definitions
- Mod1(W)
- Winner Model 1 score (0–100) — AI composite rating among field contenders (higher = stronger). The number in parentheses (e.g. 1/9) shows this horse’s rank out of the field size.
- Mod2(W)
- Winner Model 2 score (0–100) — AI rating among field contenders (higher = stronger). The number in parentheses shows rank within the field.
- Mod3(W)
- Winner Model 3 score (0–100) — AI rating among field contenders (higher = stronger). The number in parentheses shows rank within the field.
- Mod1-LS
- Longshot Model 1 score (0–100) — AI model trained to surface high-value longshots. Higher = stronger longshot profile. Rank in parentheses shows position within the field.
- Mod2-LS
- Longshot Model 2 score (0–100) — AI longshot model. Higher = stronger longshot profile.
- Mod3-LS
- Longshot Model 3 score (0–100) — AI longshot model. Higher = stronger longshot profile.
- Mod4(Form)
- Form Model score (0–100) — AI sequence model trained on recent form patterns to capture momentum and trajectory. Higher = stronger recent form profile. Rank in parentheses shows position within the field.
- Win Prob
- LightGBM estimated win probability expressed as a percentage. This is a raw model output, not normalized to sum to 100% across the field — use it for comparison rather than as an absolute probability.
- Value Score
- Win Prob divided by the market-implied probability (derived from morning line). Values above 1.0 mean the model sees more win chance than the odds imply — a ★ star appears when Value Score ≥ 1.3, indicating a 30%+ model edge over the market.
- ML
- Morning line odds set by the track handicapper before wagering opens
- Overlay %
- How much the fair odds exceed the morning line, expressed as a percentage — positive values indicate value
- Fair Odds
- Model-derived fair-value odds based on estimated win probability
- O/U
- Overlay or Underlay — whether the horse offers value (O) or is overbet (U) relative to fair odds
Lane Bias Guide
- Bar Direction
- Bars above the line = more favorable lane • Bars below = less favorable, relative to the average at this track.
- Color
- Green = above-average advantage • Yellow = near-average • Red = below-average • Blue = this horse’s lane.
- Bias Score
- Derived from weighted average finishing positions across historical races at this track. Shown in the tooltip on hover. To use the bias score, calculate your handicap for the horse (e.g. finish position), then add (detrimental bias) or subtract (favorable bias) the bias score.
- Races
- Number of historical races used to compute each lane’s bias score.
Race Pace Bias Guide
- Bar Height & Direction
- Positive (green) = pace favors this horse • Negative (red) = pace works against this horse • Near-zero (amber) = neutral.
- Race Shape
- Projected race shape based on running styles of all horses (e.g. EE = two early horses, EP = one early presser).
- Pace Category
- FAST = contested early pace • LONE EARLY = one speed horse controlling pace • HONEST = moderate early pressure • SLOW = closers’ race.
- Flag (★)
- A star above the bar means this horse’s pace bias figure is ≥ 1.5 — a meaningful pace advantage or disadvantage.
Total Pace Guide
- Bar Segments
- Green = Early Pace (E1) • Amber = Mid Pace (E2) • Red = Late Pace (LP)
- Bar Height
- Total height = sum of E1 + E2 + LP average pace figures. Taller bars indicate a faster-paced horse overall.
- Grades & Rankings
- Hover to see each horse’s letter grade and ranking vs. other horses in this race (e.g. 2/9 = 2nd best of 9).
- Border
- Thicker border = this horse’s post position.
Performance vs. Peers Guide
- Bars (per post)
- Blue = avg career performance • Amber = avg last 3 races • Green = last race (improved vs. avg) • Red = last race (declined vs. avg)
- Trend Line
- Angled line above the bars: rising = improving form • falling = declining form.
- Horizontal Line
- Field average — the mean career performance of all horses in this race.
- Color Circles
- Standard post-position colors below each lane — same as the Total Pace chart.
- Border
- Thicker border = this horse’s post position.
Figure Comparison
- Rating
- The three Pick Pony algorithm ratings (Algo 1, Algo 2, Algo 3) that make up the overall PP AI Rating — higher is a stronger contender rating.
- Speed
- Career average speed, recent 3-race average, and last-race speed figure — spot horses in improving or declining form.
- Pace
- Average Early (E1), Mid (E2), and Stretch (LP) pace figures — reveals pace-setters vs. closers vs. all-the-way types.
- This horse
- The horse whose stats card is open is highlighted with a darker column background.
Winning Profiles
- Axes
- X: Win % from last 10 starts — Y: In-the-money % (top-3 finishes) from last 10 starts.
- Quadrants
- Consistent Winners (top-right): high win & ITM — reliable performers.
Place Threats (top-left): boards often but doesn’t win often — good exacta/trifecta angles.
Streaky (bottom-right): wins occasionally, misses the board often — all-or-nothing.
Developing (bottom-left): still finding form — longshot territory. - Reference Lines
- Dashed lines mark field averages. Dots to the right win more; dots higher board more.
- This horse
- Highlighted with a gold border and larger dot.
AI Model Comparison
- Winner Models (green)
- Mod1(W), Mod2(W), and Mod3(W) trained to predict race winners. Higher score = stronger contender.
- Longshot Models (red)
- Mod1-LS, Mod2-LS, and Mod3-LS trained to find high-value longshots. Higher score = stronger longshot candidate.
- Form Model (blue)
- Mod4 sequence model trained on recent form patterns. Higher score = stronger recent form profile.
- This horse
- Highlighted with a darker column background.
Race Pace Simulation Guide
- Slider
- Drag left→right to advance from gate to finish. Drag all the way back to reset the race.
- Predicted Finish Order
- Factors in contested pace burn, each horse’s effort curve (peaked-early vs. peaked-late), and wide trip cost from outside posts. Updated live when Track Bias changes.
- Pace Scenario
- Lone Speed: single E horse likely rates and holds. Contested: two E horses burn each other — closers benefit. Hot Pace: speed meltdown, deep closers thrive. Soft: no early speed, moderate fractions throughout.
- Track Bias
- Slider below canvas. −2 = strong closer/wet bias; +2 = strong speed/rail bias. Recomputes the predicted finish order.
- Boxed Indicator
- Dashed orange ring = horse is surrounded (rival ahead, rival behind, wall outside). In a real race this horse must find a clear path to run.
- Running Styles
- E/EE = early speed (rushes to rail). P = presser (stalks the pace). S = stalker. SS = slow starter / closer.
| Stat | vs. Current Card | vs. All Horses |
|---|---|---|
| Averages
Career-average metrics across all AI race analysis. Performance and pace averages reflect estimated historical performance; trainer and jockey grades score in-the-money percentages. Grading scale: A = elite • B = above average • C = average • D = below average • F = poor • — = no data |
||
| Pick Pony AI Rating | F | F |
| Pace Trip Longshot | — | — |
| Connections Longshot | — | — |
| Situational Longshot | — | — |
| Speed | F | D |
| Early Pace | A | C |
| Mid Pace | B | C |
| Late Pace | D | D |
| Finish Pos | F | F |
| Dirt Speed | F | C |
| Turf Speed | D | D |
| Distance Speed | F | C |
| Trainer Effectiveness | F | F |
| Jockey Effectiveness | F | D |
| 3rd Party Ratings | C | C |
| Recent
Performance analysis from the horse's recent races, weighted to reflect current form. Sprint and Route FPS (Foot Per Second) measure pace efficiency over the horse's recent sprints and routes respectively. Grading scale: A = elite • B = above average • C = average • D = below average • F = poor • — = no data |
||
| Speed | F | D |
| Early Pace | A | B |
| Mid Pace | A | B |
| Late Pace | F | D |
| Sprint FPS | A | B |
| Route FPS | A | B |
| Trainer Effectiveness | F | F |
| Jockey Effectiveness | F | D |
| 3rd Party Ratings | C | C |
| Predictions
AI-generated projections for the upcoming race, derived from prior AI analysis for speed and pace trends, surface and distance suitability, and current conditions. Grading scale: A = elite • B = above average • C = average • D = below average • F = poor • — = no data |
||
| Speed | F | D |
| Early Pace | A | C |
| Mid Pace | B | C |
| Late Pace | C | C |
Chart Guide (2.0.35)
- Bubbles
- Color = surface: green (turf), brown (dirt), blue (synthetic)
- Top number = finishing position; bottom number in parentheses = starting post position
- Height above line = beaten lengths — closer means a smaller margin
- Border = track conditions: green (FST/GD/FM), yellow (WF/SL/YLD), red (SY/MY/FRZ/SFT/HVY)
- Connecting Line
- Solid = good conditions; dashed = bad conditions
- Line Symbol
- ▲ Triangle = sprint (7f or less); ● Circle = route (more than 7f)
- Days Between Races
- Small number above each bubble (e.g. 19d) = days since the previous race — helps spot freshness, layoffs, and tight scheduling.
- Shaded Band (Bollinger)
- Highlights volatility — a wider band means more variation in recent performance
- Performance Trend
- Straight line showing the overall performance direction — angled up = improving, angled down = declining
- Dashed Reference Line
- AI Opponent = AI analysis class-level par for the race
✓ Positives:(1) Dropping in class today ($20,000 → $12,500). (2) Hot trainer - high ITM rate (32%). (3) Big last-race effort (78) — 13 pts above recent average. (4) Hot jockey — high ITM rate (38%). (5) Late pace significantly above field median (LP: 74 vs field 68). (6) Has won at today's distance (1760 yds) within the last 10 starts — proven ability at this trip. (7) Has won at AQU on dirt in the last 10 starts — proven at today's exact track/surface combo. (8) Had documented trouble last race (codes: ['D', 'S', 'T', 'U', 'V']) yet still finished 1st — a clean trip today sets up a form reversal. (9) Pick Pony Daily Edge Radar pick — value score 8/10 — angles: Big Last Effort, Troubled Trip Comeback, Won Here Before, Class Drop, Late Kick Advantage, Won at This Distance.
⚠ Concerns:(1) Consider there will be likely pace pressure in this race - multiple E types entered. (2) Trip note from last race: 2p turn;drivn past1/16. (3) 0 wins from post 5 in 4 recent starts. (4) Last race was career-best speed (78) — bounce risk after peak effort. (5) Speed figures are highly erratic over last 5 starts (σ = 8.2 pts: [78, 61, 61, 74, 75]) — unpredictable performer.
Mod1(W): 100 (1/6) Mod2(W): 100 (1/6) Mod3(W): 100 (1/6) Mod1-LS: 100 (1/6) Mod2-LS: 100 (1/6) Mod3-LS: 91 (2/6) Mod4(Form): 100 (1/6) Win Prob: 76.6% Value Score: 2.54 ★ ML: 1.60 (3/5) Overlay %: -9.14 Fair Odds: 3.75 (5/2) O/U: Underlay
Score Definitions
- Mod1(W)
- Winner Model 1 score (0–100) — AI composite rating among field contenders (higher = stronger). The number in parentheses (e.g. 1/9) shows this horse’s rank out of the field size.
- Mod2(W)
- Winner Model 2 score (0–100) — AI rating among field contenders (higher = stronger). The number in parentheses shows rank within the field.
- Mod3(W)
- Winner Model 3 score (0–100) — AI rating among field contenders (higher = stronger). The number in parentheses shows rank within the field.
- Mod1-LS
- Longshot Model 1 score (0–100) — AI model trained to surface high-value longshots. Higher = stronger longshot profile. Rank in parentheses shows position within the field.
- Mod2-LS
- Longshot Model 2 score (0–100) — AI longshot model. Higher = stronger longshot profile.
- Mod3-LS
- Longshot Model 3 score (0–100) — AI longshot model. Higher = stronger longshot profile.
- Mod4(Form)
- Form Model score (0–100) — AI sequence model trained on recent form patterns to capture momentum and trajectory. Higher = stronger recent form profile. Rank in parentheses shows position within the field.
- Win Prob
- LightGBM estimated win probability expressed as a percentage. This is a raw model output, not normalized to sum to 100% across the field — use it for comparison rather than as an absolute probability.
- Value Score
- Win Prob divided by the market-implied probability (derived from morning line). Values above 1.0 mean the model sees more win chance than the odds imply — a ★ star appears when Value Score ≥ 1.3, indicating a 30%+ model edge over the market.
- ML
- Morning line odds set by the track handicapper before wagering opens
- Overlay %
- How much the fair odds exceed the morning line, expressed as a percentage — positive values indicate value
- Fair Odds
- Model-derived fair-value odds based on estimated win probability
- O/U
- Overlay or Underlay — whether the horse offers value (O) or is overbet (U) relative to fair odds
Lane Bias Guide
- Bar Direction
- Bars above the line = more favorable lane • Bars below = less favorable, relative to the average at this track.
- Color
- Green = above-average advantage • Yellow = near-average • Red = below-average • Blue = this horse’s lane.
- Bias Score
- Derived from weighted average finishing positions across historical races at this track. Shown in the tooltip on hover. To use the bias score, calculate your handicap for the horse (e.g. finish position), then add (detrimental bias) or subtract (favorable bias) the bias score.
- Races
- Number of historical races used to compute each lane’s bias score.
Race Pace Bias Guide
- Bar Height & Direction
- Positive (green) = pace favors this horse • Negative (red) = pace works against this horse • Near-zero (amber) = neutral.
- Race Shape
- Projected race shape based on running styles of all horses (e.g. EE = two early horses, EP = one early presser).
- Pace Category
- FAST = contested early pace • LONE EARLY = one speed horse controlling pace • HONEST = moderate early pressure • SLOW = closers’ race.
- Flag (★)
- A star above the bar means this horse’s pace bias figure is ≥ 1.5 — a meaningful pace advantage or disadvantage.
Total Pace Guide
- Bar Segments
- Green = Early Pace (E1) • Amber = Mid Pace (E2) • Red = Late Pace (LP)
- Bar Height
- Total height = sum of E1 + E2 + LP average pace figures. Taller bars indicate a faster-paced horse overall.
- Grades & Rankings
- Hover to see each horse’s letter grade and ranking vs. other horses in this race (e.g. 2/9 = 2nd best of 9).
- Border
- Thicker border = this horse’s post position.
Performance vs. Peers Guide
- Bars (per post)
- Blue = avg career performance • Amber = avg last 3 races • Green = last race (improved vs. avg) • Red = last race (declined vs. avg)
- Trend Line
- Angled line above the bars: rising = improving form • falling = declining form.
- Horizontal Line
- Field average — the mean career performance of all horses in this race.
- Color Circles
- Standard post-position colors below each lane — same as the Total Pace chart.
- Border
- Thicker border = this horse’s post position.
Figure Comparison
- Rating
- The three Pick Pony algorithm ratings (Algo 1, Algo 2, Algo 3) that make up the overall PP AI Rating — higher is a stronger contender rating.
- Speed
- Career average speed, recent 3-race average, and last-race speed figure — spot horses in improving or declining form.
- Pace
- Average Early (E1), Mid (E2), and Stretch (LP) pace figures — reveals pace-setters vs. closers vs. all-the-way types.
- This horse
- The horse whose stats card is open is highlighted with a darker column background.
Winning Profiles
- Axes
- X: Win % from last 10 starts — Y: In-the-money % (top-3 finishes) from last 10 starts.
- Quadrants
- Consistent Winners (top-right): high win & ITM — reliable performers.
Place Threats (top-left): boards often but doesn’t win often — good exacta/trifecta angles.
Streaky (bottom-right): wins occasionally, misses the board often — all-or-nothing.
Developing (bottom-left): still finding form — longshot territory. - Reference Lines
- Dashed lines mark field averages. Dots to the right win more; dots higher board more.
- This horse
- Highlighted with a gold border and larger dot.
AI Model Comparison
- Winner Models (green)
- Mod1(W), Mod2(W), and Mod3(W) trained to predict race winners. Higher score = stronger contender.
- Longshot Models (red)
- Mod1-LS, Mod2-LS, and Mod3-LS trained to find high-value longshots. Higher score = stronger longshot candidate.
- Form Model (blue)
- Mod4 sequence model trained on recent form patterns. Higher score = stronger recent form profile.
- This horse
- Highlighted with a darker column background.
Race Pace Simulation Guide
- Slider
- Drag left→right to advance from gate to finish. Drag all the way back to reset the race.
- Predicted Finish Order
- Factors in contested pace burn, each horse’s effort curve (peaked-early vs. peaked-late), and wide trip cost from outside posts. Updated live when Track Bias changes.
- Pace Scenario
- Lone Speed: single E horse likely rates and holds. Contested: two E horses burn each other — closers benefit. Hot Pace: speed meltdown, deep closers thrive. Soft: no early speed, moderate fractions throughout.
- Track Bias
- Slider below canvas. −2 = strong closer/wet bias; +2 = strong speed/rail bias. Recomputes the predicted finish order.
- Boxed Indicator
- Dashed orange ring = horse is surrounded (rival ahead, rival behind, wall outside). In a real race this horse must find a clear path to run.
- Running Styles
- E/EE = early speed (rushes to rail). P = presser (stalks the pace). S = stalker. SS = slow starter / closer.
| Stat | vs. Current Card | vs. All Horses |
|---|---|---|
| Averages
Career-average metrics across all AI race analysis. Performance and pace averages reflect estimated historical performance; trainer and jockey grades score in-the-money percentages. Grading scale: A = elite • B = above average • C = average • D = below average • F = poor • — = no data |
||
| Pick Pony AI Rating | A | A |
| Pace Trip Longshot | — | — |
| Connections Longshot | — | — |
| Situational Longshot | — | — |
| Speed | A | C |
| Early Pace | B | C |
| Mid Pace | A | C |
| Late Pace | A | B |
| Finish Pos | A | C |
| Dirt Speed | A | B |
| Turf Speed | D | D |
| Distance Speed | A | B |
| Trainer Effectiveness | D | D |
| Jockey Effectiveness | C | C |
| 3rd Party Ratings | A | B |
| Recent
Performance analysis from the horse's recent races, weighted to reflect current form. Sprint and Route FPS (Foot Per Second) measure pace efficiency over the horse's recent sprints and routes respectively. Grading scale: A = elite • B = above average • C = average • D = below average • F = poor • — = no data |
||
| Speed | A | C |
| Early Pace | B | C |
| Mid Pace | B | C |
| Late Pace | A | C |
| Sprint FPS | B | B |
| Route FPS | C | C |
| Trainer Effectiveness | D | D |
| Jockey Effectiveness | C | C |
| 3rd Party Ratings | A | B |
| Predictions
AI-generated projections for the upcoming race, derived from prior AI analysis for speed and pace trends, surface and distance suitability, and current conditions. Grading scale: A = elite • B = above average • C = average • D = below average • F = poor • — = no data |
||
| Speed | A | C |
| Early Pace | B | C |
| Mid Pace | A | C |
| Late Pace | C | C |
Chart Guide (2.0.35)
- Bubbles
- Color = surface: green (turf), brown (dirt), blue (synthetic)
- Top number = finishing position; bottom number in parentheses = starting post position
- Height above line = beaten lengths — closer means a smaller margin
- Border = track conditions: green (FST/GD/FM), yellow (WF/SL/YLD), red (SY/MY/FRZ/SFT/HVY)
- Connecting Line
- Solid = good conditions; dashed = bad conditions
- Line Symbol
- ▲ Triangle = sprint (7f or less); ● Circle = route (more than 7f)
- Days Between Races
- Small number above each bubble (e.g. 19d) = days since the previous race — helps spot freshness, layoffs, and tight scheduling.
- Shaded Band (Bollinger)
- Highlights volatility — a wider band means more variation in recent performance
- Performance Trend
- Straight line showing the overall performance direction — angled up = improving, angled down = declining
- Dashed Reference Line
- AI Opponent = AI analysis class-level par for the race
✓ Positives:(1) Dropping in class today ($20,000 → $12,500). (2) Hot trainer - high ITM rate (42%). (3) Equipment change today (code: 2). (4) Hot jockey — high ITM rate (33%). (5) Closer/presser in a race with pace pressure — ideal race setup for late runners. (6) Has won at today's distance (1760 yds) within the last 10 starts — proven ability at this trip. (7) Dropping in class ($12,500 vs last $20,000) after a 56-day freshening — trainer setup-for-win angle. (8) Has won at AQU on dirt in the last 10 starts — proven at today's exact track/surface combo. (9) Pick Pony Daily Edge Radar pick — value score 8/10 — angles: Class Drop After Rest, Closer in Pace Duel, Hot Trainer, Won Here Before, Class Drop, Won at This Distance, Equipment Change.
⚠ Concerns:(1) Has not raced in 56 days. (2) Consider there will be likely pace pressure in this race - multiple E types entered. (3) Trip note from last race: 5w upper; no impact. (4) Consistently runs wide at the first call (5 of last 5 starts). (5) Has not won in last 10 starts despite career wins.
Mod1(W): 21 (5/6) Mod2(W): 0 Mod3(W): 0 Mod1-LS: 62 (5/6) Mod2-LS: 0 Mod3-LS: 17 (4/6) Mod4(Form): 19 (5/6) Win Prob: 23.7% Value Score: 2.71 ★ ML: 8.00 (7/1) Overlay %: 2.18 Fair Odds: 8.17 (7/1) O/U: Overlay
Score Definitions
- Mod1(W)
- Winner Model 1 score (0–100) — AI composite rating among field contenders (higher = stronger). The number in parentheses (e.g. 1/9) shows this horse’s rank out of the field size.
- Mod2(W)
- Winner Model 2 score (0–100) — AI rating among field contenders (higher = stronger). The number in parentheses shows rank within the field.
- Mod3(W)
- Winner Model 3 score (0–100) — AI rating among field contenders (higher = stronger). The number in parentheses shows rank within the field.
- Mod1-LS
- Longshot Model 1 score (0–100) — AI model trained to surface high-value longshots. Higher = stronger longshot profile. Rank in parentheses shows position within the field.
- Mod2-LS
- Longshot Model 2 score (0–100) — AI longshot model. Higher = stronger longshot profile.
- Mod3-LS
- Longshot Model 3 score (0–100) — AI longshot model. Higher = stronger longshot profile.
- Mod4(Form)
- Form Model score (0–100) — AI sequence model trained on recent form patterns to capture momentum and trajectory. Higher = stronger recent form profile. Rank in parentheses shows position within the field.
- Win Prob
- LightGBM estimated win probability expressed as a percentage. This is a raw model output, not normalized to sum to 100% across the field — use it for comparison rather than as an absolute probability.
- Value Score
- Win Prob divided by the market-implied probability (derived from morning line). Values above 1.0 mean the model sees more win chance than the odds imply — a ★ star appears when Value Score ≥ 1.3, indicating a 30%+ model edge over the market.
- ML
- Morning line odds set by the track handicapper before wagering opens
- Overlay %
- How much the fair odds exceed the morning line, expressed as a percentage — positive values indicate value
- Fair Odds
- Model-derived fair-value odds based on estimated win probability
- O/U
- Overlay or Underlay — whether the horse offers value (O) or is overbet (U) relative to fair odds
Lane Bias Guide
- Bar Direction
- Bars above the line = more favorable lane • Bars below = less favorable, relative to the average at this track.
- Color
- Green = above-average advantage • Yellow = near-average • Red = below-average • Blue = this horse’s lane.
- Bias Score
- Derived from weighted average finishing positions across historical races at this track. Shown in the tooltip on hover. To use the bias score, calculate your handicap for the horse (e.g. finish position), then add (detrimental bias) or subtract (favorable bias) the bias score.
- Races
- Number of historical races used to compute each lane’s bias score.
Race Pace Bias Guide
- Bar Height & Direction
- Positive (green) = pace favors this horse • Negative (red) = pace works against this horse • Near-zero (amber) = neutral.
- Race Shape
- Projected race shape based on running styles of all horses (e.g. EE = two early horses, EP = one early presser).
- Pace Category
- FAST = contested early pace • LONE EARLY = one speed horse controlling pace • HONEST = moderate early pressure • SLOW = closers’ race.
- Flag (★)
- A star above the bar means this horse’s pace bias figure is ≥ 1.5 — a meaningful pace advantage or disadvantage.
Total Pace Guide
- Bar Segments
- Green = Early Pace (E1) • Amber = Mid Pace (E2) • Red = Late Pace (LP)
- Bar Height
- Total height = sum of E1 + E2 + LP average pace figures. Taller bars indicate a faster-paced horse overall.
- Grades & Rankings
- Hover to see each horse’s letter grade and ranking vs. other horses in this race (e.g. 2/9 = 2nd best of 9).
- Border
- Thicker border = this horse’s post position.
Performance vs. Peers Guide
- Bars (per post)
- Blue = avg career performance • Amber = avg last 3 races • Green = last race (improved vs. avg) • Red = last race (declined vs. avg)
- Trend Line
- Angled line above the bars: rising = improving form • falling = declining form.
- Horizontal Line
- Field average — the mean career performance of all horses in this race.
- Color Circles
- Standard post-position colors below each lane — same as the Total Pace chart.
- Border
- Thicker border = this horse’s post position.
Figure Comparison
- Rating
- The three Pick Pony algorithm ratings (Algo 1, Algo 2, Algo 3) that make up the overall PP AI Rating — higher is a stronger contender rating.
- Speed
- Career average speed, recent 3-race average, and last-race speed figure — spot horses in improving or declining form.
- Pace
- Average Early (E1), Mid (E2), and Stretch (LP) pace figures — reveals pace-setters vs. closers vs. all-the-way types.
- This horse
- The horse whose stats card is open is highlighted with a darker column background.
Winning Profiles
- Axes
- X: Win % from last 10 starts — Y: In-the-money % (top-3 finishes) from last 10 starts.
- Quadrants
- Consistent Winners (top-right): high win & ITM — reliable performers.
Place Threats (top-left): boards often but doesn’t win often — good exacta/trifecta angles.
Streaky (bottom-right): wins occasionally, misses the board often — all-or-nothing.
Developing (bottom-left): still finding form — longshot territory. - Reference Lines
- Dashed lines mark field averages. Dots to the right win more; dots higher board more.
- This horse
- Highlighted with a gold border and larger dot.
AI Model Comparison
- Winner Models (green)
- Mod1(W), Mod2(W), and Mod3(W) trained to predict race winners. Higher score = stronger contender.
- Longshot Models (red)
- Mod1-LS, Mod2-LS, and Mod3-LS trained to find high-value longshots. Higher score = stronger longshot candidate.
- Form Model (blue)
- Mod4 sequence model trained on recent form patterns. Higher score = stronger recent form profile.
- This horse
- Highlighted with a darker column background.
Race Pace Simulation Guide
- Slider
- Drag left→right to advance from gate to finish. Drag all the way back to reset the race.
- Predicted Finish Order
- Factors in contested pace burn, each horse’s effort curve (peaked-early vs. peaked-late), and wide trip cost from outside posts. Updated live when Track Bias changes.
- Pace Scenario
- Lone Speed: single E horse likely rates and holds. Contested: two E horses burn each other — closers benefit. Hot Pace: speed meltdown, deep closers thrive. Soft: no early speed, moderate fractions throughout.
- Track Bias
- Slider below canvas. −2 = strong closer/wet bias; +2 = strong speed/rail bias. Recomputes the predicted finish order.
- Boxed Indicator
- Dashed orange ring = horse is surrounded (rival ahead, rival behind, wall outside). In a real race this horse must find a clear path to run.
- Running Styles
- E/EE = early speed (rushes to rail). P = presser (stalks the pace). S = stalker. SS = slow starter / closer.
| Stat | vs. Current Card | vs. All Horses |
|---|---|---|
| Averages
Career-average metrics across all AI race analysis. Performance and pace averages reflect estimated historical performance; trainer and jockey grades score in-the-money percentages. Grading scale: A = elite • B = above average • C = average • D = below average • F = poor • — = no data |
||
| Pick Pony AI Rating | C | D |
| Pace Trip Longshot | — | — |
| Connections Longshot | — | — |
| Situational Longshot | — | — |
| Speed | D | D |
| Early Pace | D | D |
| Mid Pace | C | C |
| Late Pace | C | D |
| Finish Pos | C | D |
| Dirt Speed | C | C |
| Turf Speed | D | D |
| Distance Speed | C | C |
| Trainer Effectiveness | B | C |
| Jockey Effectiveness | D | D |
| 3rd Party Ratings | D | D |
| Recent
Performance analysis from the horse's recent races, weighted to reflect current form. Sprint and Route FPS (Foot Per Second) measure pace efficiency over the horse's recent sprints and routes respectively. Grading scale: A = elite • B = above average • C = average • D = below average • F = poor • — = no data |
||
| Speed | C | D |
| Early Pace | F | D |
| Mid Pace | C | D |
| Late Pace | B | C |
| Sprint FPS | F | D |
| Route FPS | D | D |
| Trainer Effectiveness | B | C |
| Jockey Effectiveness | D | D |
| 3rd Party Ratings | D | D |
| Predictions
AI-generated projections for the upcoming race, derived from prior AI analysis for speed and pace trends, surface and distance suitability, and current conditions. Grading scale: A = elite • B = above average • C = average • D = below average • F = poor • — = no data |
||
| Speed | D | D |
| Early Pace | D | D |
| Mid Pace | C | C |
| Late Pace | C | C |
Chart Guide (2.0.35)
- Bubbles
- Color = surface: green (turf), brown (dirt), blue (synthetic)
- Top number = finishing position; bottom number in parentheses = starting post position
- Height above line = beaten lengths — closer means a smaller margin
- Border = track conditions: green (FST/GD/FM), yellow (WF/SL/YLD), red (SY/MY/FRZ/SFT/HVY)
- Connecting Line
- Solid = good conditions; dashed = bad conditions
- Line Symbol
- ▲ Triangle = sprint (7f or less); ● Circle = route (more than 7f)
- Days Between Races
- Small number above each bubble (e.g. 19d) = days since the previous race — helps spot freshness, layoffs, and tight scheduling.
- Shaded Band (Bollinger)
- Highlights volatility — a wider band means more variation in recent performance
- Performance Trend
- Straight line showing the overall performance direction — angled up = improving, angled down = declining
- Dashed Reference Line
- AI Opponent = AI analysis class-level par for the race
✓ Positives:(1) Hot trainer - high ITM rate (32%). (2) Big last-race effort (69) — 9 pts above recent average. (3) Hot jockey — high ITM rate (50%). (4) Early pace significantly above field median (E1: 81 vs field 76). (5) Late pace significantly above field median (LP: 72 vs field 68). (6) Closer/presser in a race with pace pressure — ideal race setup for late runners. (7) Speed improved +11 pts then +5 pts in last 2 starts (53 → 64 → 69) — trainer is progressively building fitness. (8) Career-best figure (76) buried in races 4–10 back — 10 pts above race median and 7 pts above recent form — market has forgotten the peak effort. (9) Had documented trouble last race (codes: ['D', 'O', 'S', 'V']) yet still finished 4th — a clean trip today sets up a form reversal. (10) Pick Pony Daily Edge Radar pick — value score 9/10 — angles: Big Last Effort, Form Surge, Closer in Pace Duel, Troubled Trip Comeback, Hot Jockey, Hidden Figure, Late Kick Advantage.
⚠ Concerns:(1) Consider there will be likely pace pressure in this race - multiple E types entered. (2) Moving from a sprint to a route today. (3) Poor record at this distance (0 wins from 10 recent starts). (4) Trip note from last race: Chased 2p; improved. (5) Consistently runs wide at the first call (3 of last 5 starts). (6) Speed figures are highly erratic over last 5 starts (σ = 8.1 pts: [69, 64, 53, 64, 75]) — unpredictable performer. (7) 0 wins from 10 starts on dirt in last 10 — repeated failure on today's surface.
Mod1(W): 42 (4/6) Mod2(W): 32 (4/6) Mod3(W): 31 (4/6) Mod1-LS: 0 Mod2-LS: 32 (4/6) Mod3-LS: 0 Mod4(Form): 39 (4/6) Win Prob: 41.3% Value Score: 3.68 ★ ML: 6.00 (5/1) Overlay %: 1.80 Fair Odds: 6.68 (6/1) O/U: Fair
Score Definitions
- Mod1(W)
- Winner Model 1 score (0–100) — AI composite rating among field contenders (higher = stronger). The number in parentheses (e.g. 1/9) shows this horse’s rank out of the field size.
- Mod2(W)
- Winner Model 2 score (0–100) — AI rating among field contenders (higher = stronger). The number in parentheses shows rank within the field.
- Mod3(W)
- Winner Model 3 score (0–100) — AI rating among field contenders (higher = stronger). The number in parentheses shows rank within the field.
- Mod1-LS
- Longshot Model 1 score (0–100) — AI model trained to surface high-value longshots. Higher = stronger longshot profile. Rank in parentheses shows position within the field.
- Mod2-LS
- Longshot Model 2 score (0–100) — AI longshot model. Higher = stronger longshot profile.
- Mod3-LS
- Longshot Model 3 score (0–100) — AI longshot model. Higher = stronger longshot profile.
- Mod4(Form)
- Form Model score (0–100) — AI sequence model trained on recent form patterns to capture momentum and trajectory. Higher = stronger recent form profile. Rank in parentheses shows position within the field.
- Win Prob
- LightGBM estimated win probability expressed as a percentage. This is a raw model output, not normalized to sum to 100% across the field — use it for comparison rather than as an absolute probability.
- Value Score
- Win Prob divided by the market-implied probability (derived from morning line). Values above 1.0 mean the model sees more win chance than the odds imply — a ★ star appears when Value Score ≥ 1.3, indicating a 30%+ model edge over the market.
- ML
- Morning line odds set by the track handicapper before wagering opens
- Overlay %
- How much the fair odds exceed the morning line, expressed as a percentage — positive values indicate value
- Fair Odds
- Model-derived fair-value odds based on estimated win probability
- O/U
- Overlay or Underlay — whether the horse offers value (O) or is overbet (U) relative to fair odds
Lane Bias Guide
- Bar Direction
- Bars above the line = more favorable lane • Bars below = less favorable, relative to the average at this track.
- Color
- Green = above-average advantage • Yellow = near-average • Red = below-average • Blue = this horse’s lane.
- Bias Score
- Derived from weighted average finishing positions across historical races at this track. Shown in the tooltip on hover. To use the bias score, calculate your handicap for the horse (e.g. finish position), then add (detrimental bias) or subtract (favorable bias) the bias score.
- Races
- Number of historical races used to compute each lane’s bias score.
Race Pace Bias Guide
- Bar Height & Direction
- Positive (green) = pace favors this horse • Negative (red) = pace works against this horse • Near-zero (amber) = neutral.
- Race Shape
- Projected race shape based on running styles of all horses (e.g. EE = two early horses, EP = one early presser).
- Pace Category
- FAST = contested early pace • LONE EARLY = one speed horse controlling pace • HONEST = moderate early pressure • SLOW = closers’ race.
- Flag (★)
- A star above the bar means this horse’s pace bias figure is ≥ 1.5 — a meaningful pace advantage or disadvantage.
Total Pace Guide
- Bar Segments
- Green = Early Pace (E1) • Amber = Mid Pace (E2) • Red = Late Pace (LP)
- Bar Height
- Total height = sum of E1 + E2 + LP average pace figures. Taller bars indicate a faster-paced horse overall.
- Grades & Rankings
- Hover to see each horse’s letter grade and ranking vs. other horses in this race (e.g. 2/9 = 2nd best of 9).
- Border
- Thicker border = this horse’s post position.
Performance vs. Peers Guide
- Bars (per post)
- Blue = avg career performance • Amber = avg last 3 races • Green = last race (improved vs. avg) • Red = last race (declined vs. avg)
- Trend Line
- Angled line above the bars: rising = improving form • falling = declining form.
- Horizontal Line
- Field average — the mean career performance of all horses in this race.
- Color Circles
- Standard post-position colors below each lane — same as the Total Pace chart.
- Border
- Thicker border = this horse’s post position.
Figure Comparison
- Rating
- The three Pick Pony algorithm ratings (Algo 1, Algo 2, Algo 3) that make up the overall PP AI Rating — higher is a stronger contender rating.
- Speed
- Career average speed, recent 3-race average, and last-race speed figure — spot horses in improving or declining form.
- Pace
- Average Early (E1), Mid (E2), and Stretch (LP) pace figures — reveals pace-setters vs. closers vs. all-the-way types.
- This horse
- The horse whose stats card is open is highlighted with a darker column background.
Winning Profiles
- Axes
- X: Win % from last 10 starts — Y: In-the-money % (top-3 finishes) from last 10 starts.
- Quadrants
- Consistent Winners (top-right): high win & ITM — reliable performers.
Place Threats (top-left): boards often but doesn’t win often — good exacta/trifecta angles.
Streaky (bottom-right): wins occasionally, misses the board often — all-or-nothing.
Developing (bottom-left): still finding form — longshot territory. - Reference Lines
- Dashed lines mark field averages. Dots to the right win more; dots higher board more.
- This horse
- Highlighted with a gold border and larger dot.
AI Model Comparison
- Winner Models (green)
- Mod1(W), Mod2(W), and Mod3(W) trained to predict race winners. Higher score = stronger contender.
- Longshot Models (red)
- Mod1-LS, Mod2-LS, and Mod3-LS trained to find high-value longshots. Higher score = stronger longshot candidate.
- Form Model (blue)
- Mod4 sequence model trained on recent form patterns. Higher score = stronger recent form profile.
- This horse
- Highlighted with a darker column background.
Race Pace Simulation Guide
- Slider
- Drag left→right to advance from gate to finish. Drag all the way back to reset the race.
- Predicted Finish Order
- Factors in contested pace burn, each horse’s effort curve (peaked-early vs. peaked-late), and wide trip cost from outside posts. Updated live when Track Bias changes.
- Pace Scenario
- Lone Speed: single E horse likely rates and holds. Contested: two E horses burn each other — closers benefit. Hot Pace: speed meltdown, deep closers thrive. Soft: no early speed, moderate fractions throughout.
- Track Bias
- Slider below canvas. −2 = strong closer/wet bias; +2 = strong speed/rail bias. Recomputes the predicted finish order.
- Boxed Indicator
- Dashed orange ring = horse is surrounded (rival ahead, rival behind, wall outside). In a real race this horse must find a clear path to run.
- Running Styles
- E/EE = early speed (rushes to rail). P = presser (stalks the pace). S = stalker. SS = slow starter / closer.
| Stat | vs. Current Card | vs. All Horses |
|---|---|---|
| Averages
Career-average metrics across all AI race analysis. Performance and pace averages reflect estimated historical performance; trainer and jockey grades score in-the-money percentages. Grading scale: A = elite • B = above average • C = average • D = below average • F = poor • — = no data |
||
| Pick Pony AI Rating | C | D |
| Pace Trip Longshot | — | — |
| Connections Longshot | — | — |
| Situational Longshot | — | — |
| Speed | C | C |
| Early Pace | C | C |
| Mid Pace | C | C |
| Late Pace | B | C |
| Finish Pos | C | D |
| Dirt Speed | B | B |
| Turf Speed | B | C |
| Distance Speed | B | B |
| Trainer Effectiveness | D | D |
| Jockey Effectiveness | B | A |
| 3rd Party Ratings | C | C |
| Recent
Performance analysis from the horse's recent races, weighted to reflect current form. Sprint and Route FPS (Foot Per Second) measure pace efficiency over the horse's recent sprints and routes respectively. Grading scale: A = elite • B = above average • C = average • D = below average • F = poor • — = no data |
||
| Speed | D | D |
| Early Pace | C | C |
| Mid Pace | C | C |
| Late Pace | C | D |
| Sprint FPS | C | D |
| Route FPS | C | C |
| Trainer Effectiveness | D | D |
| Jockey Effectiveness | B | A |
| 3rd Party Ratings | C | C |
| Predictions
AI-generated projections for the upcoming race, derived from prior AI analysis for speed and pace trends, surface and distance suitability, and current conditions. Grading scale: A = elite • B = above average • C = average • D = below average • F = poor • — = no data |
||
| Speed | C | D |
| Early Pace | C | C |
| Mid Pace | C | C |
| Late Pace | C | C |
Chart Guide (2.0.35)
- Bubbles
- Color = surface: green (turf), brown (dirt), blue (synthetic)
- Top number = finishing position; bottom number in parentheses = starting post position
- Height above line = beaten lengths — closer means a smaller margin
- Border = track conditions: green (FST/GD/FM), yellow (WF/SL/YLD), red (SY/MY/FRZ/SFT/HVY)
- Connecting Line
- Solid = good conditions; dashed = bad conditions
- Line Symbol
- ▲ Triangle = sprint (7f or less); ● Circle = route (more than 7f)
- Days Between Races
- Small number above each bubble (e.g. 19d) = days since the previous race — helps spot freshness, layoffs, and tight scheduling.
- Shaded Band (Bollinger)
- Highlights volatility — a wider band means more variation in recent performance
- Performance Trend
- Straight line showing the overall performance direction — angled up = improving, angled down = declining
- Dashed Reference Line
- AI Opponent = AI analysis class-level par for the race
✓ Positives:(1) Hot trainer - high ITM rate (46%). (2) Big last-race effort (87) — 11 pts above recent average. (3) Hot jockey — high ITM rate (52%). (4) Track specialist — 3 wins from 6 starts here (50%). (5) Has won at today's distance (1320 yds) within the last 10 starts — proven ability at this trip. (6) Has won at AQU on dirt in the last 10 starts — proven at today's exact track/surface combo. (7) Had documented trouble last race (codes: ['O', 'S', 'T', 'U']) yet still finished 1st — a clean trip today sets up a form reversal. (8) Pick Pony Daily Edge Radar pick — value score 8/10 — angles: Big Last Effort, Troubled Trip Comeback, Hot Trainer, Hot Jockey, Won Here Before, Won at This Distance, Track Specialist.
⚠ Concerns:(1) Consider there will be likely pace pressure in this race - multiple E types entered. (2) Trip note from last race: 2p turn;kept to task. (3) Last race was career-best speed (87) — bounce risk after peak effort. (4) Speed figures are highly erratic over last 5 starts (σ = 8.0 pts: [87, 66, 82, 79, 83]) — unpredictable performer.
Mod1(W): 98 (2/7) Mod2(W): 100 (1/7) Mod3(W): 100 (1/7) Mod1-LS: 98 (2/7) Mod2-LS: 91 (2/7) Mod3-LS: 100 (1/7) Mod4(Form): 90 (2/7) Win Prob: 55% Value Score: 2.8 ★ ML: 3.00 (2/1) Overlay %: -4.56 Fair Odds: 5.63 (9/2) O/U: Underlay
Score Definitions
- Mod1(W)
- Winner Model 1 score (0–100) — AI composite rating among field contenders (higher = stronger). The number in parentheses (e.g. 1/9) shows this horse’s rank out of the field size.
- Mod2(W)
- Winner Model 2 score (0–100) — AI rating among field contenders (higher = stronger). The number in parentheses shows rank within the field.
- Mod3(W)
- Winner Model 3 score (0–100) — AI rating among field contenders (higher = stronger). The number in parentheses shows rank within the field.
- Mod1-LS
- Longshot Model 1 score (0–100) — AI model trained to surface high-value longshots. Higher = stronger longshot profile. Rank in parentheses shows position within the field.
- Mod2-LS
- Longshot Model 2 score (0–100) — AI longshot model. Higher = stronger longshot profile.
- Mod3-LS
- Longshot Model 3 score (0–100) — AI longshot model. Higher = stronger longshot profile.
- Mod4(Form)
- Form Model score (0–100) — AI sequence model trained on recent form patterns to capture momentum and trajectory. Higher = stronger recent form profile. Rank in parentheses shows position within the field.
- Win Prob
- LightGBM estimated win probability expressed as a percentage. This is a raw model output, not normalized to sum to 100% across the field — use it for comparison rather than as an absolute probability.
- Value Score
- Win Prob divided by the market-implied probability (derived from morning line). Values above 1.0 mean the model sees more win chance than the odds imply — a ★ star appears when Value Score ≥ 1.3, indicating a 30%+ model edge over the market.
- ML
- Morning line odds set by the track handicapper before wagering opens
- Overlay %
- How much the fair odds exceed the morning line, expressed as a percentage — positive values indicate value
- Fair Odds
- Model-derived fair-value odds based on estimated win probability
- O/U
- Overlay or Underlay — whether the horse offers value (O) or is overbet (U) relative to fair odds
Lane Bias Guide
- Bar Direction
- Bars above the line = more favorable lane • Bars below = less favorable, relative to the average at this track.
- Color
- Green = above-average advantage • Yellow = near-average • Red = below-average • Blue = this horse’s lane.
- Bias Score
- Derived from weighted average finishing positions across historical races at this track. Shown in the tooltip on hover. To use the bias score, calculate your handicap for the horse (e.g. finish position), then add (detrimental bias) or subtract (favorable bias) the bias score.
- Races
- Number of historical races used to compute each lane’s bias score.
Race Pace Bias Guide
- Bar Height & Direction
- Positive (green) = pace favors this horse • Negative (red) = pace works against this horse • Near-zero (amber) = neutral.
- Race Shape
- Projected race shape based on running styles of all horses (e.g. EE = two early horses, EP = one early presser).
- Pace Category
- FAST = contested early pace • LONE EARLY = one speed horse controlling pace • HONEST = moderate early pressure • SLOW = closers’ race.
- Flag (★)
- A star above the bar means this horse’s pace bias figure is ≥ 1.5 — a meaningful pace advantage or disadvantage.
Total Pace Guide
- Bar Segments
- Green = Early Pace (E1) • Amber = Mid Pace (E2) • Red = Late Pace (LP)
- Bar Height
- Total height = sum of E1 + E2 + LP average pace figures. Taller bars indicate a faster-paced horse overall.
- Grades & Rankings
- Hover to see each horse’s letter grade and ranking vs. other horses in this race (e.g. 2/9 = 2nd best of 9).
- Border
- Thicker border = this horse’s post position.
Performance vs. Peers Guide
- Bars (per post)
- Blue = avg career performance • Amber = avg last 3 races • Green = last race (improved vs. avg) • Red = last race (declined vs. avg)
- Trend Line
- Angled line above the bars: rising = improving form • falling = declining form.
- Horizontal Line
- Field average — the mean career performance of all horses in this race.
- Color Circles
- Standard post-position colors below each lane — same as the Total Pace chart.
- Border
- Thicker border = this horse’s post position.
Figure Comparison
- Rating
- The three Pick Pony algorithm ratings (Algo 1, Algo 2, Algo 3) that make up the overall PP AI Rating — higher is a stronger contender rating.
- Speed
- Career average speed, recent 3-race average, and last-race speed figure — spot horses in improving or declining form.
- Pace
- Average Early (E1), Mid (E2), and Stretch (LP) pace figures — reveals pace-setters vs. closers vs. all-the-way types.
- This horse
- The horse whose stats card is open is highlighted with a darker column background.
Winning Profiles
- Axes
- X: Win % from last 10 starts — Y: In-the-money % (top-3 finishes) from last 10 starts.
- Quadrants
- Consistent Winners (top-right): high win & ITM — reliable performers.
Place Threats (top-left): boards often but doesn’t win often — good exacta/trifecta angles.
Streaky (bottom-right): wins occasionally, misses the board often — all-or-nothing.
Developing (bottom-left): still finding form — longshot territory. - Reference Lines
- Dashed lines mark field averages. Dots to the right win more; dots higher board more.
- This horse
- Highlighted with a gold border and larger dot.
AI Model Comparison
- Winner Models (green)
- Mod1(W), Mod2(W), and Mod3(W) trained to predict race winners. Higher score = stronger contender.
- Longshot Models (red)
- Mod1-LS, Mod2-LS, and Mod3-LS trained to find high-value longshots. Higher score = stronger longshot candidate.
- Form Model (blue)
- Mod4 sequence model trained on recent form patterns. Higher score = stronger recent form profile.
- This horse
- Highlighted with a darker column background.
Race Pace Simulation Guide
- Slider
- Drag left→right to advance from gate to finish. Drag all the way back to reset the race.
- Predicted Finish Order
- Factors in contested pace burn, each horse’s effort curve (peaked-early vs. peaked-late), and wide trip cost from outside posts. Updated live when Track Bias changes.
- Pace Scenario
- Lone Speed: single E horse likely rates and holds. Contested: two E horses burn each other — closers benefit. Hot Pace: speed meltdown, deep closers thrive. Soft: no early speed, moderate fractions throughout.
- Track Bias
- Slider below canvas. −2 = strong closer/wet bias; +2 = strong speed/rail bias. Recomputes the predicted finish order.
- Boxed Indicator
- Dashed orange ring = horse is surrounded (rival ahead, rival behind, wall outside). In a real race this horse must find a clear path to run.
- Running Styles
- E/EE = early speed (rushes to rail). P = presser (stalks the pace). S = stalker. SS = slow starter / closer.
| Stat | vs. Current Card | vs. All Horses |
|---|---|---|
| Averages
Career-average metrics across all AI race analysis. Performance and pace averages reflect estimated historical performance; trainer and jockey grades score in-the-money percentages. Grading scale: A = elite • B = above average • C = average • D = below average • F = poor • — = no data |
||
| Pick Pony AI Rating | A | A |
| Pace Trip Longshot | — | — |
| Connections Longshot | — | — |
| Situational Longshot | — | — |
| Speed | A | A |
| Early Pace | A | A |
| Mid Pace | B | A |
| Late Pace | B | B |
| Finish Pos | B | C |
| Dirt Speed | B | A |
| Turf Speed | A | A |
| Distance Speed | B | A |
| Trainer Effectiveness | B | B |
| Jockey Effectiveness | A | A |
| 3rd Party Ratings | A | A |
| Recent
Performance analysis from the horse's recent races, weighted to reflect current form. Sprint and Route FPS (Foot Per Second) measure pace efficiency over the horse's recent sprints and routes respectively. Grading scale: A = elite • B = above average • C = average • D = below average • F = poor • — = no data |
||
| Speed | A | B |
| Early Pace | A | A |
| Mid Pace | A | A |
| Late Pace | B | C |
| Sprint FPS | C | A |
| Route FPS | D | B |
| Trainer Effectiveness | B | B |
| Jockey Effectiveness | A | A |
| 3rd Party Ratings | A | A |
| Predictions
AI-generated projections for the upcoming race, derived from prior AI analysis for speed and pace trends, surface and distance suitability, and current conditions. Grading scale: A = elite • B = above average • C = average • D = below average • F = poor • — = no data |
||
| Speed | A | B |
| Early Pace | A | A |
| Mid Pace | A | A |
| Late Pace | C | C |
Chart Guide (2.0.35)
- Bubbles
- Color = surface: green (turf), brown (dirt), blue (synthetic)
- Top number = finishing position; bottom number in parentheses = starting post position
- Height above line = beaten lengths — closer means a smaller margin
- Border = track conditions: green (FST/GD/FM), yellow (WF/SL/YLD), red (SY/MY/FRZ/SFT/HVY)
- Connecting Line
- Solid = good conditions; dashed = bad conditions
- Line Symbol
- ▲ Triangle = sprint (7f or less); ● Circle = route (more than 7f)
- Days Between Races
- Small number above each bubble (e.g. 19d) = days since the previous race — helps spot freshness, layoffs, and tight scheduling.
- Shaded Band (Bollinger)
- Highlights volatility — a wider band means more variation in recent performance
- Performance Trend
- Straight line showing the overall performance direction — angled up = improving, angled down = declining
- Dashed Reference Line
- AI Opponent = AI analysis class-level par for the race
✓ Positives:(1) Hot trainer - high ITM rate (41%). (2) Career-best speed figure (82) recorded in last 1-2 starts — peaking form. (3) Hot jockey — high ITM rate (41%). (4) Has won at today's distance (1320 yds) within the last 10 starts — proven ability at this trip. (5) Has won at AQU on dirt in the last 10 starts — proven at today's exact track/surface combo. (6) Pick Pony Daily Edge Radar pick — value score 6/10 — angles: Career-Best Recent Figure, Won Here Before, Won at This Distance.
⚠ Concerns:(1) Consider there will be likely pace pressure in this race - multiple E types entered. (2) Trip note from last race: Vied ins pair; wkn lte. (3) Consistently breaks behind post position (3 of last 5 starts).
Mod1(W): 66 (5/7) Mod2(W): 54 (5/7) Mod3(W): 59 (5/7) Mod1-LS: 100 (1/7) Mod2-LS: 53 (5/7) Mod3-LS: 23 (5/7) Mod4(Form): 49 (5/7) Win Prob: 45.9% Value Score: 5.26 ★ ML: 8.00 (7/1) Overlay %: 3.24 Fair Odds: 7.36 (6/1) O/U: Overlay
Score Definitions
- Mod1(W)
- Winner Model 1 score (0–100) — AI composite rating among field contenders (higher = stronger). The number in parentheses (e.g. 1/9) shows this horse’s rank out of the field size.
- Mod2(W)
- Winner Model 2 score (0–100) — AI rating among field contenders (higher = stronger). The number in parentheses shows rank within the field.
- Mod3(W)
- Winner Model 3 score (0–100) — AI rating among field contenders (higher = stronger). The number in parentheses shows rank within the field.
- Mod1-LS
- Longshot Model 1 score (0–100) — AI model trained to surface high-value longshots. Higher = stronger longshot profile. Rank in parentheses shows position within the field.
- Mod2-LS
- Longshot Model 2 score (0–100) — AI longshot model. Higher = stronger longshot profile.
- Mod3-LS
- Longshot Model 3 score (0–100) — AI longshot model. Higher = stronger longshot profile.
- Mod4(Form)
- Form Model score (0–100) — AI sequence model trained on recent form patterns to capture momentum and trajectory. Higher = stronger recent form profile. Rank in parentheses shows position within the field.
- Win Prob
- LightGBM estimated win probability expressed as a percentage. This is a raw model output, not normalized to sum to 100% across the field — use it for comparison rather than as an absolute probability.
- Value Score
- Win Prob divided by the market-implied probability (derived from morning line). Values above 1.0 mean the model sees more win chance than the odds imply — a ★ star appears when Value Score ≥ 1.3, indicating a 30%+ model edge over the market.
- ML
- Morning line odds set by the track handicapper before wagering opens
- Overlay %
- How much the fair odds exceed the morning line, expressed as a percentage — positive values indicate value
- Fair Odds
- Model-derived fair-value odds based on estimated win probability
- O/U
- Overlay or Underlay — whether the horse offers value (O) or is overbet (U) relative to fair odds
Lane Bias Guide
- Bar Direction
- Bars above the line = more favorable lane • Bars below = less favorable, relative to the average at this track.
- Color
- Green = above-average advantage • Yellow = near-average • Red = below-average • Blue = this horse’s lane.
- Bias Score
- Derived from weighted average finishing positions across historical races at this track. Shown in the tooltip on hover. To use the bias score, calculate your handicap for the horse (e.g. finish position), then add (detrimental bias) or subtract (favorable bias) the bias score.
- Races
- Number of historical races used to compute each lane’s bias score.
Race Pace Bias Guide
- Bar Height & Direction
- Positive (green) = pace favors this horse • Negative (red) = pace works against this horse • Near-zero (amber) = neutral.
- Race Shape
- Projected race shape based on running styles of all horses (e.g. EE = two early horses, EP = one early presser).
- Pace Category
- FAST = contested early pace • LONE EARLY = one speed horse controlling pace • HONEST = moderate early pressure • SLOW = closers’ race.
- Flag (★)
- A star above the bar means this horse’s pace bias figure is ≥ 1.5 — a meaningful pace advantage or disadvantage.
Total Pace Guide
- Bar Segments
- Green = Early Pace (E1) • Amber = Mid Pace (E2) • Red = Late Pace (LP)
- Bar Height
- Total height = sum of E1 + E2 + LP average pace figures. Taller bars indicate a faster-paced horse overall.
- Grades & Rankings
- Hover to see each horse’s letter grade and ranking vs. other horses in this race (e.g. 2/9 = 2nd best of 9).
- Border
- Thicker border = this horse’s post position.
Performance vs. Peers Guide
- Bars (per post)
- Blue = avg career performance • Amber = avg last 3 races • Green = last race (improved vs. avg) • Red = last race (declined vs. avg)
- Trend Line
- Angled line above the bars: rising = improving form • falling = declining form.
- Horizontal Line
- Field average — the mean career performance of all horses in this race.
- Color Circles
- Standard post-position colors below each lane — same as the Total Pace chart.
- Border
- Thicker border = this horse’s post position.
Figure Comparison
- Rating
- The three Pick Pony algorithm ratings (Algo 1, Algo 2, Algo 3) that make up the overall PP AI Rating — higher is a stronger contender rating.
- Speed
- Career average speed, recent 3-race average, and last-race speed figure — spot horses in improving or declining form.
- Pace
- Average Early (E1), Mid (E2), and Stretch (LP) pace figures — reveals pace-setters vs. closers vs. all-the-way types.
- This horse
- The horse whose stats card is open is highlighted with a darker column background.
Winning Profiles
- Axes
- X: Win % from last 10 starts — Y: In-the-money % (top-3 finishes) from last 10 starts.
- Quadrants
- Consistent Winners (top-right): high win & ITM — reliable performers.
Place Threats (top-left): boards often but doesn’t win often — good exacta/trifecta angles.
Streaky (bottom-right): wins occasionally, misses the board often — all-or-nothing.
Developing (bottom-left): still finding form — longshot territory. - Reference Lines
- Dashed lines mark field averages. Dots to the right win more; dots higher board more.
- This horse
- Highlighted with a gold border and larger dot.
AI Model Comparison
- Winner Models (green)
- Mod1(W), Mod2(W), and Mod3(W) trained to predict race winners. Higher score = stronger contender.
- Longshot Models (red)
- Mod1-LS, Mod2-LS, and Mod3-LS trained to find high-value longshots. Higher score = stronger longshot candidate.
- Form Model (blue)
- Mod4 sequence model trained on recent form patterns. Higher score = stronger recent form profile.
- This horse
- Highlighted with a darker column background.
Race Pace Simulation Guide
- Slider
- Drag left→right to advance from gate to finish. Drag all the way back to reset the race.
- Predicted Finish Order
- Factors in contested pace burn, each horse’s effort curve (peaked-early vs. peaked-late), and wide trip cost from outside posts. Updated live when Track Bias changes.
- Pace Scenario
- Lone Speed: single E horse likely rates and holds. Contested: two E horses burn each other — closers benefit. Hot Pace: speed meltdown, deep closers thrive. Soft: no early speed, moderate fractions throughout.
- Track Bias
- Slider below canvas. −2 = strong closer/wet bias; +2 = strong speed/rail bias. Recomputes the predicted finish order.
- Boxed Indicator
- Dashed orange ring = horse is surrounded (rival ahead, rival behind, wall outside). In a real race this horse must find a clear path to run.
- Running Styles
- E/EE = early speed (rushes to rail). P = presser (stalks the pace). S = stalker. SS = slow starter / closer.
| Stat | vs. Current Card | vs. All Horses |
|---|---|---|
| Averages
Career-average metrics across all AI race analysis. Performance and pace averages reflect estimated historical performance; trainer and jockey grades score in-the-money percentages. Grading scale: A = elite • B = above average • C = average • D = below average • F = poor • — = no data |
||
| Pick Pony AI Rating | D | C |
| Pace Trip Longshot | — | — |
| Connections Longshot | — | — |
| Situational Longshot | — | — |
| Speed | C | C |
| Early Pace | D | B |
| Mid Pace | D | B |
| Late Pace | B | B |
| Finish Pos | C | C |
| Dirt Speed | D | B |
| Turf Speed | B | B |
| Distance Speed | D | C |
| Trainer Effectiveness | B | C |
| Jockey Effectiveness | C | C |
| 3rd Party Ratings | B | B |
| Recent
Performance analysis from the horse's recent races, weighted to reflect current form. Sprint and Route FPS (Foot Per Second) measure pace efficiency over the horse's recent sprints and routes respectively. Grading scale: A = elite • B = above average • C = average • D = below average • F = poor • — = no data |
||
| Speed | C | B |
| Early Pace | B | A |
| Mid Pace | D | A |
| Late Pace | B | C |
| Sprint FPS | D | B |
| Route FPS | C | B |
| Trainer Effectiveness | B | C |
| Jockey Effectiveness | C | C |
| 3rd Party Ratings | B | B |
| Predictions
AI-generated projections for the upcoming race, derived from prior AI analysis for speed and pace trends, surface and distance suitability, and current conditions. Grading scale: A = elite • B = above average • C = average • D = below average • F = poor • — = no data |
||
| Speed | D | C |
| Early Pace | D | B |
| Mid Pace | D | B |
| Late Pace | C | C |
Chart Guide (2.0.35)
- Bubbles
- Color = surface: green (turf), brown (dirt), blue (synthetic)
- Top number = finishing position; bottom number in parentheses = starting post position
- Height above line = beaten lengths — closer means a smaller margin
- Border = track conditions: green (FST/GD/FM), yellow (WF/SL/YLD), red (SY/MY/FRZ/SFT/HVY)
- Connecting Line
- Solid = good conditions; dashed = bad conditions
- Line Symbol
- ▲ Triangle = sprint (7f or less); ● Circle = route (more than 7f)
- Days Between Races
- Small number above each bubble (e.g. 19d) = days since the previous race — helps spot freshness, layoffs, and tight scheduling.
- Shaded Band (Bollinger)
- Highlights volatility — a wider band means more variation in recent performance
- Performance Trend
- Straight line showing the overall performance direction — angled up = improving, angled down = declining
- Dashed Reference Line
- AI Opponent = AI analysis class-level par for the race
✓ Positives:(1) Returning from 48-day layoff with a recent workout. (2) Hot trainer - high ITM rate (34%). (3) Hot jockey — high ITM rate (38%). (4) Has a bullet work (fastest at track that day) — sharp conditioning signal. (5) Has won at today's distance (1320 yds) within the last 10 starts — proven ability at this trip. (6) Returning from 48-day layoff with a bullet workout — trainer signaling extra readiness for today's spot. (7) Last race E1 pace (99.0) was 7.6 pts above personal avg (91.4) and horse still finished 7th — pace collapse victim; expect bounce if today's fractions are softer. (8) Career-best figure (85) buried in races 4–10 back — 9 pts above race median and 11 pts above recent form — market has forgotten the peak effort. (9) Pick Pony Daily Edge Radar pick — value score 7/10 — angles: Sharp Return Workout, Pace Collapse Victim, Bullet Workout, Hidden Figure, Won at This Distance.
⚠ Concerns:(1) Has not raced in 48 days. (2) Consider there will be likely pace pressure in this race - multiple E types entered. (3) Speed average (68) well below field median (76). (4) 0 wins from 4 career starts on off tracks. (5) Trip note from last race: Out;3p turn;eased;wlkd. (6) 0 wins from post 3 in 4 recent starts. (7) Speed figures are highly erratic over last 5 starts (σ = 23.1 pts: [48, 74, 73, 24, 78]) — unpredictable performer.
Mod1(W): 30 (7/7) Mod2(W): 19 (7/7) Mod3(W): 16 (7/7) Mod1-LS: 76 (5/7) Mod2-LS: 18 (7/7) Mod3-LS: 20 (7/7) Mod4(Form): 20 (7/7) Win Prob: 55.2% Value Score: 14.76 ★ ML: 20.00 (20/1) Overlay %: 7.50 Fair Odds: 7.89 (7/1) O/U: Overlay
Score Definitions
- Mod1(W)
- Winner Model 1 score (0–100) — AI composite rating among field contenders (higher = stronger). The number in parentheses (e.g. 1/9) shows this horse’s rank out of the field size.
- Mod2(W)
- Winner Model 2 score (0–100) — AI rating among field contenders (higher = stronger). The number in parentheses shows rank within the field.
- Mod3(W)
- Winner Model 3 score (0–100) — AI rating among field contenders (higher = stronger). The number in parentheses shows rank within the field.
- Mod1-LS
- Longshot Model 1 score (0–100) — AI model trained to surface high-value longshots. Higher = stronger longshot profile. Rank in parentheses shows position within the field.
- Mod2-LS
- Longshot Model 2 score (0–100) — AI longshot model. Higher = stronger longshot profile.
- Mod3-LS
- Longshot Model 3 score (0–100) — AI longshot model. Higher = stronger longshot profile.
- Mod4(Form)
- Form Model score (0–100) — AI sequence model trained on recent form patterns to capture momentum and trajectory. Higher = stronger recent form profile. Rank in parentheses shows position within the field.
- Win Prob
- LightGBM estimated win probability expressed as a percentage. This is a raw model output, not normalized to sum to 100% across the field — use it for comparison rather than as an absolute probability.
- Value Score
- Win Prob divided by the market-implied probability (derived from morning line). Values above 1.0 mean the model sees more win chance than the odds imply — a ★ star appears when Value Score ≥ 1.3, indicating a 30%+ model edge over the market.
- ML
- Morning line odds set by the track handicapper before wagering opens
- Overlay %
- How much the fair odds exceed the morning line, expressed as a percentage — positive values indicate value
- Fair Odds
- Model-derived fair-value odds based on estimated win probability
- O/U
- Overlay or Underlay — whether the horse offers value (O) or is overbet (U) relative to fair odds
Lane Bias Guide
- Bar Direction
- Bars above the line = more favorable lane • Bars below = less favorable, relative to the average at this track.
- Color
- Green = above-average advantage • Yellow = near-average • Red = below-average • Blue = this horse’s lane.
- Bias Score
- Derived from weighted average finishing positions across historical races at this track. Shown in the tooltip on hover. To use the bias score, calculate your handicap for the horse (e.g. finish position), then add (detrimental bias) or subtract (favorable bias) the bias score.
- Races
- Number of historical races used to compute each lane’s bias score.
Race Pace Bias Guide
- Bar Height & Direction
- Positive (green) = pace favors this horse • Negative (red) = pace works against this horse • Near-zero (amber) = neutral.
- Race Shape
- Projected race shape based on running styles of all horses (e.g. EE = two early horses, EP = one early presser).
- Pace Category
- FAST = contested early pace • LONE EARLY = one speed horse controlling pace • HONEST = moderate early pressure • SLOW = closers’ race.
- Flag (★)
- A star above the bar means this horse’s pace bias figure is ≥ 1.5 — a meaningful pace advantage or disadvantage.
Total Pace Guide
- Bar Segments
- Green = Early Pace (E1) • Amber = Mid Pace (E2) • Red = Late Pace (LP)
- Bar Height
- Total height = sum of E1 + E2 + LP average pace figures. Taller bars indicate a faster-paced horse overall.
- Grades & Rankings
- Hover to see each horse’s letter grade and ranking vs. other horses in this race (e.g. 2/9 = 2nd best of 9).
- Border
- Thicker border = this horse’s post position.
Performance vs. Peers Guide
- Bars (per post)
- Blue = avg career performance • Amber = avg last 3 races • Green = last race (improved vs. avg) • Red = last race (declined vs. avg)
- Trend Line
- Angled line above the bars: rising = improving form • falling = declining form.
- Horizontal Line
- Field average — the mean career performance of all horses in this race.
- Color Circles
- Standard post-position colors below each lane — same as the Total Pace chart.
- Border
- Thicker border = this horse’s post position.
Figure Comparison
- Rating
- The three Pick Pony algorithm ratings (Algo 1, Algo 2, Algo 3) that make up the overall PP AI Rating — higher is a stronger contender rating.
- Speed
- Career average speed, recent 3-race average, and last-race speed figure — spot horses in improving or declining form.
- Pace
- Average Early (E1), Mid (E2), and Stretch (LP) pace figures — reveals pace-setters vs. closers vs. all-the-way types.
- This horse
- The horse whose stats card is open is highlighted with a darker column background.
Winning Profiles
- Axes
- X: Win % from last 10 starts — Y: In-the-money % (top-3 finishes) from last 10 starts.
- Quadrants
- Consistent Winners (top-right): high win & ITM — reliable performers.
Place Threats (top-left): boards often but doesn’t win often — good exacta/trifecta angles.
Streaky (bottom-right): wins occasionally, misses the board often — all-or-nothing.
Developing (bottom-left): still finding form — longshot territory. - Reference Lines
- Dashed lines mark field averages. Dots to the right win more; dots higher board more.
- This horse
- Highlighted with a gold border and larger dot.
AI Model Comparison
- Winner Models (green)
- Mod1(W), Mod2(W), and Mod3(W) trained to predict race winners. Higher score = stronger contender.
- Longshot Models (red)
- Mod1-LS, Mod2-LS, and Mod3-LS trained to find high-value longshots. Higher score = stronger longshot candidate.
- Form Model (blue)
- Mod4 sequence model trained on recent form patterns. Higher score = stronger recent form profile.
- This horse
- Highlighted with a darker column background.
Race Pace Simulation Guide
- Slider
- Drag left→right to advance from gate to finish. Drag all the way back to reset the race.
- Predicted Finish Order
- Factors in contested pace burn, each horse’s effort curve (peaked-early vs. peaked-late), and wide trip cost from outside posts. Updated live when Track Bias changes.
- Pace Scenario
- Lone Speed: single E horse likely rates and holds. Contested: two E horses burn each other — closers benefit. Hot Pace: speed meltdown, deep closers thrive. Soft: no early speed, moderate fractions throughout.
- Track Bias
- Slider below canvas. −2 = strong closer/wet bias; +2 = strong speed/rail bias. Recomputes the predicted finish order.
- Boxed Indicator
- Dashed orange ring = horse is surrounded (rival ahead, rival behind, wall outside). In a real race this horse must find a clear path to run.
- Running Styles
- E/EE = early speed (rushes to rail). P = presser (stalks the pace). S = stalker. SS = slow starter / closer.
| Stat | vs. Current Card | vs. All Horses |
|---|---|---|
| Averages
Career-average metrics across all AI race analysis. Performance and pace averages reflect estimated historical performance; trainer and jockey grades score in-the-money percentages. Grading scale: A = elite • B = above average • C = average • D = below average • F = poor • — = no data |
||
| Pick Pony AI Rating | D | C |
| Pace Trip Longshot | — | — |
| Connections Longshot | — | — |
| Situational Longshot | — | — |
| Speed | F | C |
| Early Pace | B | A |
| Mid Pace | A | A |
| Late Pace | F | D |
| Finish Pos | B | C |
| Dirt Speed | A | A |
| Turf Speed | C | C |
| Distance Speed | A | A |
| Trainer Effectiveness | C | D |
| Jockey Effectiveness | D | C |
| 3rd Party Ratings | D | B |
| Recent
Performance analysis from the horse's recent races, weighted to reflect current form. Sprint and Route FPS (Foot Per Second) measure pace efficiency over the horse's recent sprints and routes respectively. Grading scale: A = elite • B = above average • C = average • D = below average • F = poor • — = no data |
||
| Speed | D | D |
| Early Pace | B | A |
| Mid Pace | B | A |
| Late Pace | F | D |
| Sprint FPS | A | A |
| Route FPS | A | A |
| Trainer Effectiveness | C | D |
| Jockey Effectiveness | D | C |
| 3rd Party Ratings | D | B |
| Predictions
AI-generated projections for the upcoming race, derived from prior AI analysis for speed and pace trends, surface and distance suitability, and current conditions. Grading scale: A = elite • B = above average • C = average • D = below average • F = poor • — = no data |
||
| Speed | F | C |
| Early Pace | B | A |
| Mid Pace | B | A |
| Late Pace | C | C |
Chart Guide (2.0.35)
- Bubbles
- Color = surface: green (turf), brown (dirt), blue (synthetic)
- Top number = finishing position; bottom number in parentheses = starting post position
- Height above line = beaten lengths — closer means a smaller margin
- Border = track conditions: green (FST/GD/FM), yellow (WF/SL/YLD), red (SY/MY/FRZ/SFT/HVY)
- Connecting Line
- Solid = good conditions; dashed = bad conditions
- Line Symbol
- ▲ Triangle = sprint (7f or less); ● Circle = route (more than 7f)
- Days Between Races
- Small number above each bubble (e.g. 19d) = days since the previous race — helps spot freshness, layoffs, and tight scheduling.
- Shaded Band (Bollinger)
- Highlights volatility — a wider band means more variation in recent performance
- Performance Trend
- Straight line showing the overall performance direction — angled up = improving, angled down = declining
- Dashed Reference Line
- AI Opponent = AI analysis class-level par for the race
✓ Positives:(1) Hot trainer - high ITM rate (52%). (2) Equipment change today (code: 2). (3) Hot jockey — high ITM rate (40%). (4) Had documented trouble last race (codes: ['D', 'F', 'L', 'T', 'U']) yet still finished 4th — a clean trip today sets up a form reversal. (5) Averages 73.3 speed pts in today's distance/surface configuration vs 66.3 in other configs (7 qualifying starts) — returning to ideal setup. (6) Pick Pony Daily Edge Radar pick — value score 6/10 — angles: Troubled Trip Comeback, Hot Trainer, Return to Proven Setup, Equipment Change.
⚠ Concerns:(1) Consider there will be likely pace pressure in this race - multiple E types entered. (2) Poor record at this distance (0 wins from 7 recent starts). (3) Trip note from last race: 3-4w uppr; flattened. (4) Has not won in last 10 starts despite career wins. (5) Speed figures are highly erratic over last 5 starts (σ = 15.1 pts: [70, 49, 82, 85, 83]) — unpredictable performer. (6) 0 wins from 10 starts on dirt in last 10 — repeated failure on today's surface.
Mod1(W): 57 (6/7) Mod2(W): 39 (6/7) Mod3(W): 37 (6/7) Mod1-LS: 94 (4/7) Mod2-LS: 36 (6/7) Mod3-LS: 22 (6/7) Mod4(Form): 35 (6/7) Win Prob: 36.8% Value Score: 6.09 ★ ML: 12.00 (10/1) Overlay %: 5.40 Fair Odds: 7.74 (7/1) O/U: Overlay
Score Definitions
- Mod1(W)
- Winner Model 1 score (0–100) — AI composite rating among field contenders (higher = stronger). The number in parentheses (e.g. 1/9) shows this horse’s rank out of the field size.
- Mod2(W)
- Winner Model 2 score (0–100) — AI rating among field contenders (higher = stronger). The number in parentheses shows rank within the field.
- Mod3(W)
- Winner Model 3 score (0–100) — AI rating among field contenders (higher = stronger). The number in parentheses shows rank within the field.
- Mod1-LS
- Longshot Model 1 score (0–100) — AI model trained to surface high-value longshots. Higher = stronger longshot profile. Rank in parentheses shows position within the field.
- Mod2-LS
- Longshot Model 2 score (0–100) — AI longshot model. Higher = stronger longshot profile.
- Mod3-LS
- Longshot Model 3 score (0–100) — AI longshot model. Higher = stronger longshot profile.
- Mod4(Form)
- Form Model score (0–100) — AI sequence model trained on recent form patterns to capture momentum and trajectory. Higher = stronger recent form profile. Rank in parentheses shows position within the field.
- Win Prob
- LightGBM estimated win probability expressed as a percentage. This is a raw model output, not normalized to sum to 100% across the field — use it for comparison rather than as an absolute probability.
- Value Score
- Win Prob divided by the market-implied probability (derived from morning line). Values above 1.0 mean the model sees more win chance than the odds imply — a ★ star appears when Value Score ≥ 1.3, indicating a 30%+ model edge over the market.
- ML
- Morning line odds set by the track handicapper before wagering opens
- Overlay %
- How much the fair odds exceed the morning line, expressed as a percentage — positive values indicate value
- Fair Odds
- Model-derived fair-value odds based on estimated win probability
- O/U
- Overlay or Underlay — whether the horse offers value (O) or is overbet (U) relative to fair odds
Lane Bias Guide
- Bar Direction
- Bars above the line = more favorable lane • Bars below = less favorable, relative to the average at this track.
- Color
- Green = above-average advantage • Yellow = near-average • Red = below-average • Blue = this horse’s lane.
- Bias Score
- Derived from weighted average finishing positions across historical races at this track. Shown in the tooltip on hover. To use the bias score, calculate your handicap for the horse (e.g. finish position), then add (detrimental bias) or subtract (favorable bias) the bias score.
- Races
- Number of historical races used to compute each lane’s bias score.
Race Pace Bias Guide
- Bar Height & Direction
- Positive (green) = pace favors this horse • Negative (red) = pace works against this horse • Near-zero (amber) = neutral.
- Race Shape
- Projected race shape based on running styles of all horses (e.g. EE = two early horses, EP = one early presser).
- Pace Category
- FAST = contested early pace • LONE EARLY = one speed horse controlling pace • HONEST = moderate early pressure • SLOW = closers’ race.
- Flag (★)
- A star above the bar means this horse’s pace bias figure is ≥ 1.5 — a meaningful pace advantage or disadvantage.
Total Pace Guide
- Bar Segments
- Green = Early Pace (E1) • Amber = Mid Pace (E2) • Red = Late Pace (LP)
- Bar Height
- Total height = sum of E1 + E2 + LP average pace figures. Taller bars indicate a faster-paced horse overall.
- Grades & Rankings
- Hover to see each horse’s letter grade and ranking vs. other horses in this race (e.g. 2/9 = 2nd best of 9).
- Border
- Thicker border = this horse’s post position.
Performance vs. Peers Guide
- Bars (per post)
- Blue = avg career performance • Amber = avg last 3 races • Green = last race (improved vs. avg) • Red = last race (declined vs. avg)
- Trend Line
- Angled line above the bars: rising = improving form • falling = declining form.
- Horizontal Line
- Field average — the mean career performance of all horses in this race.
- Color Circles
- Standard post-position colors below each lane — same as the Total Pace chart.
- Border
- Thicker border = this horse’s post position.
Figure Comparison
- Rating
- The three Pick Pony algorithm ratings (Algo 1, Algo 2, Algo 3) that make up the overall PP AI Rating — higher is a stronger contender rating.
- Speed
- Career average speed, recent 3-race average, and last-race speed figure — spot horses in improving or declining form.
- Pace
- Average Early (E1), Mid (E2), and Stretch (LP) pace figures — reveals pace-setters vs. closers vs. all-the-way types.
- This horse
- The horse whose stats card is open is highlighted with a darker column background.
Winning Profiles
- Axes
- X: Win % from last 10 starts — Y: In-the-money % (top-3 finishes) from last 10 starts.
- Quadrants
- Consistent Winners (top-right): high win & ITM — reliable performers.
Place Threats (top-left): boards often but doesn’t win often — good exacta/trifecta angles.
Streaky (bottom-right): wins occasionally, misses the board often — all-or-nothing.
Developing (bottom-left): still finding form — longshot territory. - Reference Lines
- Dashed lines mark field averages. Dots to the right win more; dots higher board more.
- This horse
- Highlighted with a gold border and larger dot.
AI Model Comparison
- Winner Models (green)
- Mod1(W), Mod2(W), and Mod3(W) trained to predict race winners. Higher score = stronger contender.
- Longshot Models (red)
- Mod1-LS, Mod2-LS, and Mod3-LS trained to find high-value longshots. Higher score = stronger longshot candidate.
- Form Model (blue)
- Mod4 sequence model trained on recent form patterns. Higher score = stronger recent form profile.
- This horse
- Highlighted with a darker column background.
Race Pace Simulation Guide
- Slider
- Drag left→right to advance from gate to finish. Drag all the way back to reset the race.
- Predicted Finish Order
- Factors in contested pace burn, each horse’s effort curve (peaked-early vs. peaked-late), and wide trip cost from outside posts. Updated live when Track Bias changes.
- Pace Scenario
- Lone Speed: single E horse likely rates and holds. Contested: two E horses burn each other — closers benefit. Hot Pace: speed meltdown, deep closers thrive. Soft: no early speed, moderate fractions throughout.
- Track Bias
- Slider below canvas. −2 = strong closer/wet bias; +2 = strong speed/rail bias. Recomputes the predicted finish order.
- Boxed Indicator
- Dashed orange ring = horse is surrounded (rival ahead, rival behind, wall outside). In a real race this horse must find a clear path to run.
- Running Styles
- E/EE = early speed (rushes to rail). P = presser (stalks the pace). S = stalker. SS = slow starter / closer.
| Stat | vs. Current Card | vs. All Horses |
|---|---|---|
| Averages
Career-average metrics across all AI race analysis. Performance and pace averages reflect estimated historical performance; trainer and jockey grades score in-the-money percentages. Grading scale: A = elite • B = above average • C = average • D = below average • F = poor • — = no data |
||
| Pick Pony AI Rating | C | C |
| Pace Trip Longshot | — | — |
| Connections Longshot | — | — |
| Situational Longshot | — | — |
| Speed | D | C |
| Early Pace | D | B |
| Mid Pace | D | A |
| Late Pace | C | C |
| Finish Pos | D | D |
| Dirt Speed | D | B |
| Turf Speed | D | D |
| Distance Speed | C | B |
| Trainer Effectiveness | A | A |
| Jockey Effectiveness | D | C |
| 3rd Party Ratings | D | B |
| Recent
Performance analysis from the horse's recent races, weighted to reflect current form. Sprint and Route FPS (Foot Per Second) measure pace efficiency over the horse's recent sprints and routes respectively. Grading scale: A = elite • B = above average • C = average • D = below average • F = poor • — = no data |
||
| Speed | D | C |
| Early Pace | C | A |
| Mid Pace | C | A |
| Late Pace | D | D |
| Sprint FPS | C | A |
| Route FPS | D | C |
| Trainer Effectiveness | A | A |
| Jockey Effectiveness | D | C |
| 3rd Party Ratings | D | B |
| Predictions
AI-generated projections for the upcoming race, derived from prior AI analysis for speed and pace trends, surface and distance suitability, and current conditions. Grading scale: A = elite • B = above average • C = average • D = below average • F = poor • — = no data |
||
| Speed | D | C |
| Early Pace | D | B |
| Mid Pace | D | B |
| Late Pace | C | C |
Chart Guide (2.0.35)
- Bubbles
- Color = surface: green (turf), brown (dirt), blue (synthetic)
- Top number = finishing position; bottom number in parentheses = starting post position
- Height above line = beaten lengths — closer means a smaller margin
- Border = track conditions: green (FST/GD/FM), yellow (WF/SL/YLD), red (SY/MY/FRZ/SFT/HVY)
- Connecting Line
- Solid = good conditions; dashed = bad conditions
- Line Symbol
- ▲ Triangle = sprint (7f or less); ● Circle = route (more than 7f)
- Days Between Races
- Small number above each bubble (e.g. 19d) = days since the previous race — helps spot freshness, layoffs, and tight scheduling.
- Shaded Band (Bollinger)
- Highlights volatility — a wider band means more variation in recent performance
- Performance Trend
- Straight line showing the overall performance direction — angled up = improving, angled down = declining
- Dashed Reference Line
- AI Opponent = AI analysis class-level par for the race
✓ Positives:(1) Hot trainer - high ITM rate (34%). (2) Hot jockey — high ITM rate (31%). (3) Has a bullet work (fastest at track that day) — sharp conditioning signal. (4) Has won at today's distance (1320 yds) within the last 10 starts — proven ability at this trip. (5) Carries 7 lbs less than field median (116 lbs vs median 123 lbs). (6) Pick Pony Daily Edge Radar pick — value score 5/10 — angles: Bullet Workout, Won at This Distance, Weight Advantage.
⚠ Concerns:(1) Consider there will be likely pace pressure in this race - multiple E types entered. (2) Speed average (68) well below field median (76). (3) Poor record at this track (0 wins from 5 starts). (4) Trip note from last race: Stumble st; tired. (5) 0 wins from 5 starts on dirt in last 10 — repeated failure on today's surface.
Mod1(W): 0 Mod2(W): 0 Mod3(W): 0 Mod1-LS: 63 (6/7) Mod2-LS: 0 Mod3-LS: 0 Mod4(Form): 0 Win Prob: 20.5% Value Score: 8.1 ★ ML: 30.00 (30/1) Overlay %: 6.23 Fair Odds: 10.41 (9/1) O/U: Overlay
Score Definitions
- Mod1(W)
- Winner Model 1 score (0–100) — AI composite rating among field contenders (higher = stronger). The number in parentheses (e.g. 1/9) shows this horse’s rank out of the field size.
- Mod2(W)
- Winner Model 2 score (0–100) — AI rating among field contenders (higher = stronger). The number in parentheses shows rank within the field.
- Mod3(W)
- Winner Model 3 score (0–100) — AI rating among field contenders (higher = stronger). The number in parentheses shows rank within the field.
- Mod1-LS
- Longshot Model 1 score (0–100) — AI model trained to surface high-value longshots. Higher = stronger longshot profile. Rank in parentheses shows position within the field.
- Mod2-LS
- Longshot Model 2 score (0–100) — AI longshot model. Higher = stronger longshot profile.
- Mod3-LS
- Longshot Model 3 score (0–100) — AI longshot model. Higher = stronger longshot profile.
- Mod4(Form)
- Form Model score (0–100) — AI sequence model trained on recent form patterns to capture momentum and trajectory. Higher = stronger recent form profile. Rank in parentheses shows position within the field.
- Win Prob
- LightGBM estimated win probability expressed as a percentage. This is a raw model output, not normalized to sum to 100% across the field — use it for comparison rather than as an absolute probability.
- Value Score
- Win Prob divided by the market-implied probability (derived from morning line). Values above 1.0 mean the model sees more win chance than the odds imply — a ★ star appears when Value Score ≥ 1.3, indicating a 30%+ model edge over the market.
- ML
- Morning line odds set by the track handicapper before wagering opens
- Overlay %
- How much the fair odds exceed the morning line, expressed as a percentage — positive values indicate value
- Fair Odds
- Model-derived fair-value odds based on estimated win probability
- O/U
- Overlay or Underlay — whether the horse offers value (O) or is overbet (U) relative to fair odds
Lane Bias Guide
- Bar Direction
- Bars above the line = more favorable lane • Bars below = less favorable, relative to the average at this track.
- Color
- Green = above-average advantage • Yellow = near-average • Red = below-average • Blue = this horse’s lane.
- Bias Score
- Derived from weighted average finishing positions across historical races at this track. Shown in the tooltip on hover. To use the bias score, calculate your handicap for the horse (e.g. finish position), then add (detrimental bias) or subtract (favorable bias) the bias score.
- Races
- Number of historical races used to compute each lane’s bias score.
Race Pace Bias Guide
- Bar Height & Direction
- Positive (green) = pace favors this horse • Negative (red) = pace works against this horse • Near-zero (amber) = neutral.
- Race Shape
- Projected race shape based on running styles of all horses (e.g. EE = two early horses, EP = one early presser).
- Pace Category
- FAST = contested early pace • LONE EARLY = one speed horse controlling pace • HONEST = moderate early pressure • SLOW = closers’ race.
- Flag (★)
- A star above the bar means this horse’s pace bias figure is ≥ 1.5 — a meaningful pace advantage or disadvantage.
Total Pace Guide
- Bar Segments
- Green = Early Pace (E1) • Amber = Mid Pace (E2) • Red = Late Pace (LP)
- Bar Height
- Total height = sum of E1 + E2 + LP average pace figures. Taller bars indicate a faster-paced horse overall.
- Grades & Rankings
- Hover to see each horse’s letter grade and ranking vs. other horses in this race (e.g. 2/9 = 2nd best of 9).
- Border
- Thicker border = this horse’s post position.
Performance vs. Peers Guide
- Bars (per post)
- Blue = avg career performance • Amber = avg last 3 races • Green = last race (improved vs. avg) • Red = last race (declined vs. avg)
- Trend Line
- Angled line above the bars: rising = improving form • falling = declining form.
- Horizontal Line
- Field average — the mean career performance of all horses in this race.
- Color Circles
- Standard post-position colors below each lane — same as the Total Pace chart.
- Border
- Thicker border = this horse’s post position.
Figure Comparison
- Rating
- The three Pick Pony algorithm ratings (Algo 1, Algo 2, Algo 3) that make up the overall PP AI Rating — higher is a stronger contender rating.
- Speed
- Career average speed, recent 3-race average, and last-race speed figure — spot horses in improving or declining form.
- Pace
- Average Early (E1), Mid (E2), and Stretch (LP) pace figures — reveals pace-setters vs. closers vs. all-the-way types.
- This horse
- The horse whose stats card is open is highlighted with a darker column background.
Winning Profiles
- Axes
- X: Win % from last 10 starts — Y: In-the-money % (top-3 finishes) from last 10 starts.
- Quadrants
- Consistent Winners (top-right): high win & ITM — reliable performers.
Place Threats (top-left): boards often but doesn’t win often — good exacta/trifecta angles.
Streaky (bottom-right): wins occasionally, misses the board often — all-or-nothing.
Developing (bottom-left): still finding form — longshot territory. - Reference Lines
- Dashed lines mark field averages. Dots to the right win more; dots higher board more.
- This horse
- Highlighted with a gold border and larger dot.
AI Model Comparison
- Winner Models (green)
- Mod1(W), Mod2(W), and Mod3(W) trained to predict race winners. Higher score = stronger contender.
- Longshot Models (red)
- Mod1-LS, Mod2-LS, and Mod3-LS trained to find high-value longshots. Higher score = stronger longshot candidate.
- Form Model (blue)
- Mod4 sequence model trained on recent form patterns. Higher score = stronger recent form profile.
- This horse
- Highlighted with a darker column background.
Race Pace Simulation Guide
- Slider
- Drag left→right to advance from gate to finish. Drag all the way back to reset the race.
- Predicted Finish Order
- Factors in contested pace burn, each horse’s effort curve (peaked-early vs. peaked-late), and wide trip cost from outside posts. Updated live when Track Bias changes.
- Pace Scenario
- Lone Speed: single E horse likely rates and holds. Contested: two E horses burn each other — closers benefit. Hot Pace: speed meltdown, deep closers thrive. Soft: no early speed, moderate fractions throughout.
- Track Bias
- Slider below canvas. −2 = strong closer/wet bias; +2 = strong speed/rail bias. Recomputes the predicted finish order.
- Boxed Indicator
- Dashed orange ring = horse is surrounded (rival ahead, rival behind, wall outside). In a real race this horse must find a clear path to run.
- Running Styles
- E/EE = early speed (rushes to rail). P = presser (stalks the pace). S = stalker. SS = slow starter / closer.
| Stat | vs. Current Card | vs. All Horses |
|---|---|---|
| Averages
Career-average metrics across all AI race analysis. Performance and pace averages reflect estimated historical performance; trainer and jockey grades score in-the-money percentages. Grading scale: A = elite • B = above average • C = average • D = below average • F = poor • — = no data |
||
| Pick Pony AI Rating | F | D |
| Pace Trip Longshot | — | — |
| Connections Longshot | — | — |
| Situational Longshot | — | — |
| Speed | F | C |
| Early Pace | A | A |
| Mid Pace | B | A |
| Late Pace | D | D |
| Finish Pos | F | F |
| Dirt Speed | F | C |
| Turf Speed | A | A |
| Distance Speed | C | B |
| Trainer Effectiveness | D | D |
| Jockey Effectiveness | F | D |
| 3rd Party Ratings | F | C |
| Recent
Performance analysis from the horse's recent races, weighted to reflect current form. Sprint and Route FPS (Foot Per Second) measure pace efficiency over the horse's recent sprints and routes respectively. Grading scale: A = elite • B = above average • C = average • D = below average • F = poor • — = no data |
||
| Speed | F | D |
| Early Pace | D | A |
| Mid Pace | D | A |
| Late Pace | D | D |
| Sprint FPS | B | A |
| Route FPS | B | A |
| Trainer Effectiveness | D | D |
| Jockey Effectiveness | F | D |
| 3rd Party Ratings | F | C |
| Predictions
AI-generated projections for the upcoming race, derived from prior AI analysis for speed and pace trends, surface and distance suitability, and current conditions. Grading scale: A = elite • B = above average • C = average • D = below average • F = poor • — = no data |
||
| Speed | C | B |
| Early Pace | A | A |
| Mid Pace | B | A |
| Late Pace | C | C |
Chart Guide (2.0.35)
- Bubbles
- Color = surface: green (turf), brown (dirt), blue (synthetic)
- Top number = finishing position; bottom number in parentheses = starting post position
- Height above line = beaten lengths — closer means a smaller margin
- Border = track conditions: green (FST/GD/FM), yellow (WF/SL/YLD), red (SY/MY/FRZ/SFT/HVY)
- Connecting Line
- Solid = good conditions; dashed = bad conditions
- Line Symbol
- ▲ Triangle = sprint (7f or less); ● Circle = route (more than 7f)
- Days Between Races
- Small number above each bubble (e.g. 19d) = days since the previous race — helps spot freshness, layoffs, and tight scheduling.
- Shaded Band (Bollinger)
- Highlights volatility — a wider band means more variation in recent performance
- Performance Trend
- Straight line showing the overall performance direction — angled up = improving, angled down = declining
- Dashed Reference Line
- AI Opponent = AI analysis class-level par for the race
✓ Positives:(1) Hot trainer - high ITM rate (32%). (2) Hot jockey — high ITM rate (42%). (3) In the money in last 7 consecutive starts. (4) Late pace significantly above field median (LP: 78 vs field 74). (5) Has won at today's distance (1320 yds) within the last 10 starts — proven ability at this trip. (6) Has won at AQU on dirt in the last 10 starts — proven at today's exact track/surface combo. (7) Had documented trouble last race (codes: ['D', 'U']) yet still finished 2nd — a clean trip today sets up a form reversal. (8) Pick Pony Daily Edge Radar pick — value score 7/10 — angles: Consistent In-The-Money, Troubled Trip Comeback, Won Here Before, Late Kick Advantage, Won at This Distance.
⚠ Concerns:(1) Consider there will be likely pace pressure in this race - multiple E types entered. (2) Trip note from last race: 8-9w upper; denied. (3) Stepping up to $35,000 — highest class level in last 10 starts (previous high: $25,000).
Mod1(W): 84 (3/7) Mod2(W): 91 (3/7) Mod3(W): 81 (3/7) Mod1-LS: 6 (7/7) Mod2-LS: 83 (3/7) Mod3-LS: 54 (4/7) Mod4(Form): 85 (3/7) Win Prob: 45.4% Value Score: 2.6 ★ ML: 3.50 (5/2) Overlay %: -2.85 Fair Odds: 5.85 (5/1) O/U: Fair
Score Definitions
- Mod1(W)
- Winner Model 1 score (0–100) — AI composite rating among field contenders (higher = stronger). The number in parentheses (e.g. 1/9) shows this horse’s rank out of the field size.
- Mod2(W)
- Winner Model 2 score (0–100) — AI rating among field contenders (higher = stronger). The number in parentheses shows rank within the field.
- Mod3(W)
- Winner Model 3 score (0–100) — AI rating among field contenders (higher = stronger). The number in parentheses shows rank within the field.
- Mod1-LS
- Longshot Model 1 score (0–100) — AI model trained to surface high-value longshots. Higher = stronger longshot profile. Rank in parentheses shows position within the field.
- Mod2-LS
- Longshot Model 2 score (0–100) — AI longshot model. Higher = stronger longshot profile.
- Mod3-LS
- Longshot Model 3 score (0–100) — AI longshot model. Higher = stronger longshot profile.
- Mod4(Form)
- Form Model score (0–100) — AI sequence model trained on recent form patterns to capture momentum and trajectory. Higher = stronger recent form profile. Rank in parentheses shows position within the field.
- Win Prob
- LightGBM estimated win probability expressed as a percentage. This is a raw model output, not normalized to sum to 100% across the field — use it for comparison rather than as an absolute probability.
- Value Score
- Win Prob divided by the market-implied probability (derived from morning line). Values above 1.0 mean the model sees more win chance than the odds imply — a ★ star appears when Value Score ≥ 1.3, indicating a 30%+ model edge over the market.
- ML
- Morning line odds set by the track handicapper before wagering opens
- Overlay %
- How much the fair odds exceed the morning line, expressed as a percentage — positive values indicate value
- Fair Odds
- Model-derived fair-value odds based on estimated win probability
- O/U
- Overlay or Underlay — whether the horse offers value (O) or is overbet (U) relative to fair odds
Lane Bias Guide
- Bar Direction
- Bars above the line = more favorable lane • Bars below = less favorable, relative to the average at this track.
- Color
- Green = above-average advantage • Yellow = near-average • Red = below-average • Blue = this horse’s lane.
- Bias Score
- Derived from weighted average finishing positions across historical races at this track. Shown in the tooltip on hover. To use the bias score, calculate your handicap for the horse (e.g. finish position), then add (detrimental bias) or subtract (favorable bias) the bias score.
- Races
- Number of historical races used to compute each lane’s bias score.
Race Pace Bias Guide
- Bar Height & Direction
- Positive (green) = pace favors this horse • Negative (red) = pace works against this horse • Near-zero (amber) = neutral.
- Race Shape
- Projected race shape based on running styles of all horses (e.g. EE = two early horses, EP = one early presser).
- Pace Category
- FAST = contested early pace • LONE EARLY = one speed horse controlling pace • HONEST = moderate early pressure • SLOW = closers’ race.
- Flag (★)
- A star above the bar means this horse’s pace bias figure is ≥ 1.5 — a meaningful pace advantage or disadvantage.
Total Pace Guide
- Bar Segments
- Green = Early Pace (E1) • Amber = Mid Pace (E2) • Red = Late Pace (LP)
- Bar Height
- Total height = sum of E1 + E2 + LP average pace figures. Taller bars indicate a faster-paced horse overall.
- Grades & Rankings
- Hover to see each horse’s letter grade and ranking vs. other horses in this race (e.g. 2/9 = 2nd best of 9).
- Border
- Thicker border = this horse’s post position.
Performance vs. Peers Guide
- Bars (per post)
- Blue = avg career performance • Amber = avg last 3 races • Green = last race (improved vs. avg) • Red = last race (declined vs. avg)
- Trend Line
- Angled line above the bars: rising = improving form • falling = declining form.
- Horizontal Line
- Field average — the mean career performance of all horses in this race.
- Color Circles
- Standard post-position colors below each lane — same as the Total Pace chart.
- Border
- Thicker border = this horse’s post position.
Figure Comparison
- Rating
- The three Pick Pony algorithm ratings (Algo 1, Algo 2, Algo 3) that make up the overall PP AI Rating — higher is a stronger contender rating.
- Speed
- Career average speed, recent 3-race average, and last-race speed figure — spot horses in improving or declining form.
- Pace
- Average Early (E1), Mid (E2), and Stretch (LP) pace figures — reveals pace-setters vs. closers vs. all-the-way types.
- This horse
- The horse whose stats card is open is highlighted with a darker column background.
Winning Profiles
- Axes
- X: Win % from last 10 starts — Y: In-the-money % (top-3 finishes) from last 10 starts.
- Quadrants
- Consistent Winners (top-right): high win & ITM — reliable performers.
Place Threats (top-left): boards often but doesn’t win often — good exacta/trifecta angles.
Streaky (bottom-right): wins occasionally, misses the board often — all-or-nothing.
Developing (bottom-left): still finding form — longshot territory. - Reference Lines
- Dashed lines mark field averages. Dots to the right win more; dots higher board more.
- This horse
- Highlighted with a gold border and larger dot.
AI Model Comparison
- Winner Models (green)
- Mod1(W), Mod2(W), and Mod3(W) trained to predict race winners. Higher score = stronger contender.
- Longshot Models (red)
- Mod1-LS, Mod2-LS, and Mod3-LS trained to find high-value longshots. Higher score = stronger longshot candidate.
- Form Model (blue)
- Mod4 sequence model trained on recent form patterns. Higher score = stronger recent form profile.
- This horse
- Highlighted with a darker column background.
Race Pace Simulation Guide
- Slider
- Drag left→right to advance from gate to finish. Drag all the way back to reset the race.
- Predicted Finish Order
- Factors in contested pace burn, each horse’s effort curve (peaked-early vs. peaked-late), and wide trip cost from outside posts. Updated live when Track Bias changes.
- Pace Scenario
- Lone Speed: single E horse likely rates and holds. Contested: two E horses burn each other — closers benefit. Hot Pace: speed meltdown, deep closers thrive. Soft: no early speed, moderate fractions throughout.
- Track Bias
- Slider below canvas. −2 = strong closer/wet bias; +2 = strong speed/rail bias. Recomputes the predicted finish order.
- Boxed Indicator
- Dashed orange ring = horse is surrounded (rival ahead, rival behind, wall outside). In a real race this horse must find a clear path to run.
- Running Styles
- E/EE = early speed (rushes to rail). P = presser (stalks the pace). S = stalker. SS = slow starter / closer.
| Stat | vs. Current Card | vs. All Horses |
|---|---|---|
| Averages
Career-average metrics across all AI race analysis. Performance and pace averages reflect estimated historical performance; trainer and jockey grades score in-the-money percentages. Grading scale: A = elite • B = above average • C = average • D = below average • F = poor • — = no data |
||
| Pick Pony AI Rating | A | A |
| Pace Trip Longshot | — | — |
| Connections Longshot | — | — |
| Situational Longshot | — | — |
| Speed | A | A |
| Early Pace | B | A |
| Mid Pace | A | A |
| Late Pace | A | B |
| Finish Pos | A | B |
| Dirt Speed | A | A |
| Turf Speed | D | D |
| Distance Speed | A | A |
| Trainer Effectiveness | D | D |
| Jockey Effectiveness | B | B |
| 3rd Party Ratings | B | A |
| Recent
Performance analysis from the horse's recent races, weighted to reflect current form. Sprint and Route FPS (Foot Per Second) measure pace efficiency over the horse's recent sprints and routes respectively. Grading scale: A = elite • B = above average • C = average • D = below average • F = poor • — = no data |
||
| Speed | A | A |
| Early Pace | A | A |
| Mid Pace | A | A |
| Late Pace | A | B |
| Sprint FPS | B | A |
| Route FPS | B | A |
| Trainer Effectiveness | D | D |
| Jockey Effectiveness | B | B |
| 3rd Party Ratings | B | A |
| Predictions
AI-generated projections for the upcoming race, derived from prior AI analysis for speed and pace trends, surface and distance suitability, and current conditions. Grading scale: A = elite • B = above average • C = average • D = below average • F = poor • — = no data |
||
| Speed | A | A |
| Early Pace | B | A |
| Mid Pace | A | A |
| Late Pace | C | C |
Chart Guide (2.0.35)
- Bubbles
- Color = surface: green (turf), brown (dirt), blue (synthetic)
- Top number = finishing position; bottom number in parentheses = starting post position
- Height above line = beaten lengths — closer means a smaller margin
- Border = track conditions: green (FST/GD/FM), yellow (WF/SL/YLD), red (SY/MY/FRZ/SFT/HVY)
- Connecting Line
- Solid = good conditions; dashed = bad conditions
- Line Symbol
- ▲ Triangle = sprint (7f or less); ● Circle = route (more than 7f)
- Days Between Races
- Small number above each bubble (e.g. 19d) = days since the previous race — helps spot freshness, layoffs, and tight scheduling.
- Shaded Band (Bollinger)
- Highlights volatility — a wider band means more variation in recent performance
- Performance Trend
- Straight line showing the overall performance direction — angled up = improving, angled down = declining
- Dashed Reference Line
- AI Opponent = AI analysis class-level par for the race
✓ Positives:(1) Returning from 56-day layoff with a recent workout. (2) Hot trainer - high ITM rate (49%). (3) Hot jockey — high ITM rate (59%). (4) Has won at today's distance (1320 yds) within the last 10 starts — proven ability at this trip. (5) Has won at AQU on dirt in the last 10 starts — proven at today's exact track/surface combo. (6) Had documented trouble last race (codes: ['B', 'D', 'S', 'T', 'U']) yet still finished 2nd — a clean trip today sets up a form reversal. (7) Pick Pony Daily Edge Radar pick — value score 6/10 — angles: Troubled Trip Comeback, Hot Trainer, Hot Jockey, Won Here Before, Won at This Distance.
⚠ Concerns:(1) Has not raced in 56 days. (2) Consider there will be likely pace pressure in this race - multiple E types entered. (3) Moving from a route to a sprint today. (4) Trip note from last race: Bid7/16;5-2p turn;chsd. (5) Stepping up to $35,000 — highest class level in last 10 starts (previous high: $30,000). (6) Post 7 in a 8-horse dirt sprint — wide draw forces extra ground and a difficult first-turn path. (7) Speed figures are highly erratic over last 5 starts (σ = 9.2 pts: [82, 84, 63, 85, 83]) — unpredictable performer.
Mod1(W): 100 (1/7) Mod2(W): 95 (2/7) Mod3(W): 85 (2/7) Mod1-LS: 96 (3/7) Mod2-LS: 100 (1/7) Mod3-LS: 74 (3/7) Mod4(Form): 100 (1/7) Win Prob: 74.3% Value Score: 2.84 ★ ML: 2.00 (1/1) Overlay %: -12.06 Fair Odds: 6.08 (5/1) O/U: Underlay
Score Definitions
- Mod1(W)
- Winner Model 1 score (0–100) — AI composite rating among field contenders (higher = stronger). The number in parentheses (e.g. 1/9) shows this horse’s rank out of the field size.
- Mod2(W)
- Winner Model 2 score (0–100) — AI rating among field contenders (higher = stronger). The number in parentheses shows rank within the field.
- Mod3(W)
- Winner Model 3 score (0–100) — AI rating among field contenders (higher = stronger). The number in parentheses shows rank within the field.
- Mod1-LS
- Longshot Model 1 score (0–100) — AI model trained to surface high-value longshots. Higher = stronger longshot profile. Rank in parentheses shows position within the field.
- Mod2-LS
- Longshot Model 2 score (0–100) — AI longshot model. Higher = stronger longshot profile.
- Mod3-LS
- Longshot Model 3 score (0–100) — AI longshot model. Higher = stronger longshot profile.
- Mod4(Form)
- Form Model score (0–100) — AI sequence model trained on recent form patterns to capture momentum and trajectory. Higher = stronger recent form profile. Rank in parentheses shows position within the field.
- Win Prob
- LightGBM estimated win probability expressed as a percentage. This is a raw model output, not normalized to sum to 100% across the field — use it for comparison rather than as an absolute probability.
- Value Score
- Win Prob divided by the market-implied probability (derived from morning line). Values above 1.0 mean the model sees more win chance than the odds imply — a ★ star appears when Value Score ≥ 1.3, indicating a 30%+ model edge over the market.
- ML
- Morning line odds set by the track handicapper before wagering opens
- Overlay %
- How much the fair odds exceed the morning line, expressed as a percentage — positive values indicate value
- Fair Odds
- Model-derived fair-value odds based on estimated win probability
- O/U
- Overlay or Underlay — whether the horse offers value (O) or is overbet (U) relative to fair odds
Lane Bias Guide
- Bar Direction
- Bars above the line = more favorable lane • Bars below = less favorable, relative to the average at this track.
- Color
- Green = above-average advantage • Yellow = near-average • Red = below-average • Blue = this horse’s lane.
- Bias Score
- Derived from weighted average finishing positions across historical races at this track. Shown in the tooltip on hover. To use the bias score, calculate your handicap for the horse (e.g. finish position), then add (detrimental bias) or subtract (favorable bias) the bias score.
- Races
- Number of historical races used to compute each lane’s bias score.
Race Pace Bias Guide
- Bar Height & Direction
- Positive (green) = pace favors this horse • Negative (red) = pace works against this horse • Near-zero (amber) = neutral.
- Race Shape
- Projected race shape based on running styles of all horses (e.g. EE = two early horses, EP = one early presser).
- Pace Category
- FAST = contested early pace • LONE EARLY = one speed horse controlling pace • HONEST = moderate early pressure • SLOW = closers’ race.
- Flag (★)
- A star above the bar means this horse’s pace bias figure is ≥ 1.5 — a meaningful pace advantage or disadvantage.
Total Pace Guide
- Bar Segments
- Green = Early Pace (E1) • Amber = Mid Pace (E2) • Red = Late Pace (LP)
- Bar Height
- Total height = sum of E1 + E2 + LP average pace figures. Taller bars indicate a faster-paced horse overall.
- Grades & Rankings
- Hover to see each horse’s letter grade and ranking vs. other horses in this race (e.g. 2/9 = 2nd best of 9).
- Border
- Thicker border = this horse’s post position.
Performance vs. Peers Guide
- Bars (per post)
- Blue = avg career performance • Amber = avg last 3 races • Green = last race (improved vs. avg) • Red = last race (declined vs. avg)
- Trend Line
- Angled line above the bars: rising = improving form • falling = declining form.
- Horizontal Line
- Field average — the mean career performance of all horses in this race.
- Color Circles
- Standard post-position colors below each lane — same as the Total Pace chart.
- Border
- Thicker border = this horse’s post position.
Figure Comparison
- Rating
- The three Pick Pony algorithm ratings (Algo 1, Algo 2, Algo 3) that make up the overall PP AI Rating — higher is a stronger contender rating.
- Speed
- Career average speed, recent 3-race average, and last-race speed figure — spot horses in improving or declining form.
- Pace
- Average Early (E1), Mid (E2), and Stretch (LP) pace figures — reveals pace-setters vs. closers vs. all-the-way types.
- This horse
- The horse whose stats card is open is highlighted with a darker column background.
Winning Profiles
- Axes
- X: Win % from last 10 starts — Y: In-the-money % (top-3 finishes) from last 10 starts.
- Quadrants
- Consistent Winners (top-right): high win & ITM — reliable performers.
Place Threats (top-left): boards often but doesn’t win often — good exacta/trifecta angles.
Streaky (bottom-right): wins occasionally, misses the board often — all-or-nothing.
Developing (bottom-left): still finding form — longshot territory. - Reference Lines
- Dashed lines mark field averages. Dots to the right win more; dots higher board more.
- This horse
- Highlighted with a gold border and larger dot.
AI Model Comparison
- Winner Models (green)
- Mod1(W), Mod2(W), and Mod3(W) trained to predict race winners. Higher score = stronger contender.
- Longshot Models (red)
- Mod1-LS, Mod2-LS, and Mod3-LS trained to find high-value longshots. Higher score = stronger longshot candidate.
- Form Model (blue)
- Mod4 sequence model trained on recent form patterns. Higher score = stronger recent form profile.
- This horse
- Highlighted with a darker column background.
Race Pace Simulation Guide
- Slider
- Drag left→right to advance from gate to finish. Drag all the way back to reset the race.
- Predicted Finish Order
- Factors in contested pace burn, each horse’s effort curve (peaked-early vs. peaked-late), and wide trip cost from outside posts. Updated live when Track Bias changes.
- Pace Scenario
- Lone Speed: single E horse likely rates and holds. Contested: two E horses burn each other — closers benefit. Hot Pace: speed meltdown, deep closers thrive. Soft: no early speed, moderate fractions throughout.
- Track Bias
- Slider below canvas. −2 = strong closer/wet bias; +2 = strong speed/rail bias. Recomputes the predicted finish order.
- Boxed Indicator
- Dashed orange ring = horse is surrounded (rival ahead, rival behind, wall outside). In a real race this horse must find a clear path to run.
- Running Styles
- E/EE = early speed (rushes to rail). P = presser (stalks the pace). S = stalker. SS = slow starter / closer.
| Stat | vs. Current Card | vs. All Horses |
|---|---|---|
| Averages
Career-average metrics across all AI race analysis. Performance and pace averages reflect estimated historical performance; trainer and jockey grades score in-the-money percentages. Grading scale: A = elite • B = above average • C = average • D = below average • F = poor • — = no data |
||
| Pick Pony AI Rating | B | B |
| Pace Trip Longshot | — | — |
| Connections Longshot | — | — |
| Situational Longshot | — | — |
| Speed | B | B |
| Early Pace | C | A |
| Mid Pace | C | A |
| Late Pace | D | C |
| Finish Pos | D | D |
| Dirt Speed | C | A |
| Turf Speed | B | B |
| Distance Speed | F | F |
| Trainer Effectiveness | A | B |
| Jockey Effectiveness | A | A |
| 3rd Party Ratings | A | A |
| Recent
Performance analysis from the horse's recent races, weighted to reflect current form. Sprint and Route FPS (Foot Per Second) measure pace efficiency over the horse's recent sprints and routes respectively. Grading scale: A = elite • B = above average • C = average • D = below average • F = poor • — = no data |
||
| Speed | B | B |
| Early Pace | D | A |
| Mid Pace | C | A |
| Late Pace | C | C |
| Sprint FPS | A | A |
| Route FPS | A | A |
| Trainer Effectiveness | A | B |
| Jockey Effectiveness | A | A |
| 3rd Party Ratings | A | A |
| Predictions
AI-generated projections for the upcoming race, derived from prior AI analysis for speed and pace trends, surface and distance suitability, and current conditions. Grading scale: A = elite • B = above average • C = average • D = below average • F = poor • — = no data |
||
| Speed | C | B |
| Early Pace | C | A |
| Mid Pace | C | A |
| Late Pace | C | C |
Chart Guide (2.0.35)
- Bubbles
- Color = surface: green (turf), brown (dirt), blue (synthetic)
- Top number = finishing position; bottom number in parentheses = starting post position
- Height above line = beaten lengths — closer means a smaller margin
- Border = track conditions: green (FST/GD/FM), yellow (WF/SL/YLD), red (SY/MY/FRZ/SFT/HVY)
- Connecting Line
- Solid = good conditions; dashed = bad conditions
- Line Symbol
- ▲ Triangle = sprint (7f or less); ● Circle = route (more than 7f)
- Days Between Races
- Small number above each bubble (e.g. 19d) = days since the previous race — helps spot freshness, layoffs, and tight scheduling.
- Shaded Band (Bollinger)
- Highlights volatility — a wider band means more variation in recent performance
- Performance Trend
- Straight line showing the overall performance direction — angled up = improving, angled down = declining
- Dashed Reference Line
- AI Opponent = AI analysis class-level par for the race
✓ Positives:(1) Hot trainer - high ITM rate (31%). (2) Hot jockey — high ITM rate (50%). (3) Late pace significantly above field median (LP: 84 vs field 74). (4) Closer/presser in a race with pace pressure — ideal race setup for late runners. (5) Strong speed 2 back (79), modest dip last out (74) — form reversal angle, ready to bounce back to top form. (6) Has won at today's distance (1320 yds) within the last 10 starts — proven ability at this trip. (7) Has won at AQU on dirt in the last 10 starts — proven at today's exact track/surface combo. (8) Career-best figure (87) buried in races 4–10 back — 11 pts above race median and 8 pts above recent form — market has forgotten the peak effort. (9) Had documented trouble last race (codes: ['D', 'L', 'S', 'T', 'U']) yet still finished 3rd — a clean trip today sets up a form reversal. (10) Pick Pony Daily Edge Radar pick — value score 7/10 — angles: Closer in Pace Duel, Won Here Before, Hot Jockey, Hidden Figure, Troubled Trip Comeback, Form Reversal, Late Kick Advantage, Won at This Distance.
⚠ Concerns:(1) Consider there will be likely pace pressure in this race - multiple E types entered. (2) Trip note from last race: Lunge st; missed. (3) Stepping up to $35,000 — highest class level in last 10 starts (previous high: $30,000). (4) Post 8 in a 8-horse dirt sprint — wide draw forces extra ground and a difficult first-turn path.
Mod1(W): 81 (4/7) Mod2(W): 65 (4/7) Mod3(W): 60 (4/7) Mod1-LS: 0 Mod2-LS: 62 (4/7) Mod3-LS: 79 (2/7) Mod4(Form): 80 (4/7) Win Prob: 58.1% Value Score: 3.7 ★ ML: 4.00 (3/1) Overlay %: -2.91 Fair Odds: 6.82 (6/1) O/U: Fair
Score Definitions
- Mod1(W)
- Winner Model 1 score (0–100) — AI composite rating among field contenders (higher = stronger). The number in parentheses (e.g. 1/9) shows this horse’s rank out of the field size.
- Mod2(W)
- Winner Model 2 score (0–100) — AI rating among field contenders (higher = stronger). The number in parentheses shows rank within the field.
- Mod3(W)
- Winner Model 3 score (0–100) — AI rating among field contenders (higher = stronger). The number in parentheses shows rank within the field.
- Mod1-LS
- Longshot Model 1 score (0–100) — AI model trained to surface high-value longshots. Higher = stronger longshot profile. Rank in parentheses shows position within the field.
- Mod2-LS
- Longshot Model 2 score (0–100) — AI longshot model. Higher = stronger longshot profile.
- Mod3-LS
- Longshot Model 3 score (0–100) — AI longshot model. Higher = stronger longshot profile.
- Mod4(Form)
- Form Model score (0–100) — AI sequence model trained on recent form patterns to capture momentum and trajectory. Higher = stronger recent form profile. Rank in parentheses shows position within the field.
- Win Prob
- LightGBM estimated win probability expressed as a percentage. This is a raw model output, not normalized to sum to 100% across the field — use it for comparison rather than as an absolute probability.
- Value Score
- Win Prob divided by the market-implied probability (derived from morning line). Values above 1.0 mean the model sees more win chance than the odds imply — a ★ star appears when Value Score ≥ 1.3, indicating a 30%+ model edge over the market.
- ML
- Morning line odds set by the track handicapper before wagering opens
- Overlay %
- How much the fair odds exceed the morning line, expressed as a percentage — positive values indicate value
- Fair Odds
- Model-derived fair-value odds based on estimated win probability
- O/U
- Overlay or Underlay — whether the horse offers value (O) or is overbet (U) relative to fair odds
Lane Bias Guide
- Bar Direction
- Bars above the line = more favorable lane • Bars below = less favorable, relative to the average at this track.
- Color
- Green = above-average advantage • Yellow = near-average • Red = below-average • Blue = this horse’s lane.
- Bias Score
- Derived from weighted average finishing positions across historical races at this track. Shown in the tooltip on hover. To use the bias score, calculate your handicap for the horse (e.g. finish position), then add (detrimental bias) or subtract (favorable bias) the bias score.
- Races
- Number of historical races used to compute each lane’s bias score.
Race Pace Bias Guide
- Bar Height & Direction
- Positive (green) = pace favors this horse • Negative (red) = pace works against this horse • Near-zero (amber) = neutral.
- Race Shape
- Projected race shape based on running styles of all horses (e.g. EE = two early horses, EP = one early presser).
- Pace Category
- FAST = contested early pace • LONE EARLY = one speed horse controlling pace • HONEST = moderate early pressure • SLOW = closers’ race.
- Flag (★)
- A star above the bar means this horse’s pace bias figure is ≥ 1.5 — a meaningful pace advantage or disadvantage.
Total Pace Guide
- Bar Segments
- Green = Early Pace (E1) • Amber = Mid Pace (E2) • Red = Late Pace (LP)
- Bar Height
- Total height = sum of E1 + E2 + LP average pace figures. Taller bars indicate a faster-paced horse overall.
- Grades & Rankings
- Hover to see each horse’s letter grade and ranking vs. other horses in this race (e.g. 2/9 = 2nd best of 9).
- Border
- Thicker border = this horse’s post position.
Performance vs. Peers Guide
- Bars (per post)
- Blue = avg career performance • Amber = avg last 3 races • Green = last race (improved vs. avg) • Red = last race (declined vs. avg)
- Trend Line
- Angled line above the bars: rising = improving form • falling = declining form.
- Horizontal Line
- Field average — the mean career performance of all horses in this race.
- Color Circles
- Standard post-position colors below each lane — same as the Total Pace chart.
- Border
- Thicker border = this horse’s post position.
Figure Comparison
- Rating
- The three Pick Pony algorithm ratings (Algo 1, Algo 2, Algo 3) that make up the overall PP AI Rating — higher is a stronger contender rating.
- Speed
- Career average speed, recent 3-race average, and last-race speed figure — spot horses in improving or declining form.
- Pace
- Average Early (E1), Mid (E2), and Stretch (LP) pace figures — reveals pace-setters vs. closers vs. all-the-way types.
- This horse
- The horse whose stats card is open is highlighted with a darker column background.
Winning Profiles
- Axes
- X: Win % from last 10 starts — Y: In-the-money % (top-3 finishes) from last 10 starts.
- Quadrants
- Consistent Winners (top-right): high win & ITM — reliable performers.
Place Threats (top-left): boards often but doesn’t win often — good exacta/trifecta angles.
Streaky (bottom-right): wins occasionally, misses the board often — all-or-nothing.
Developing (bottom-left): still finding form — longshot territory. - Reference Lines
- Dashed lines mark field averages. Dots to the right win more; dots higher board more.
- This horse
- Highlighted with a gold border and larger dot.
AI Model Comparison
- Winner Models (green)
- Mod1(W), Mod2(W), and Mod3(W) trained to predict race winners. Higher score = stronger contender.
- Longshot Models (red)
- Mod1-LS, Mod2-LS, and Mod3-LS trained to find high-value longshots. Higher score = stronger longshot candidate.
- Form Model (blue)
- Mod4 sequence model trained on recent form patterns. Higher score = stronger recent form profile.
- This horse
- Highlighted with a darker column background.
Race Pace Simulation Guide
- Slider
- Drag left→right to advance from gate to finish. Drag all the way back to reset the race.
- Predicted Finish Order
- Factors in contested pace burn, each horse’s effort curve (peaked-early vs. peaked-late), and wide trip cost from outside posts. Updated live when Track Bias changes.
- Pace Scenario
- Lone Speed: single E horse likely rates and holds. Contested: two E horses burn each other — closers benefit. Hot Pace: speed meltdown, deep closers thrive. Soft: no early speed, moderate fractions throughout.
- Track Bias
- Slider below canvas. −2 = strong closer/wet bias; +2 = strong speed/rail bias. Recomputes the predicted finish order.
- Boxed Indicator
- Dashed orange ring = horse is surrounded (rival ahead, rival behind, wall outside). In a real race this horse must find a clear path to run.
- Running Styles
- E/EE = early speed (rushes to rail). P = presser (stalks the pace). S = stalker. SS = slow starter / closer.
| Stat | vs. Current Card | vs. All Horses |
|---|---|---|
| Averages
Career-average metrics across all AI race analysis. Performance and pace averages reflect estimated historical performance; trainer and jockey grades score in-the-money percentages. Grading scale: A = elite • B = above average • C = average • D = below average • F = poor • — = no data |
||
| Pick Pony AI Rating | B | B |
| Pace Trip Longshot | — | — |
| Connections Longshot | — | — |
| Situational Longshot | — | — |
| Speed | B | B |
| Early Pace | F | D |
| Mid Pace | F | B |
| Late Pace | A | A |
| Finish Pos | A | B |
| Dirt Speed | B | A |
| Turf Speed | D | D |
| Distance Speed | B | A |
| Trainer Effectiveness | F | D |
| Jockey Effectiveness | B | A |
| 3rd Party Ratings | C | B |
| Recent
Performance analysis from the horse's recent races, weighted to reflect current form. Sprint and Route FPS (Foot Per Second) measure pace efficiency over the horse's recent sprints and routes respectively. Grading scale: A = elite • B = above average • C = average • D = below average • F = poor • — = no data |
||
| Speed | B | B |
| Early Pace | F | D |
| Mid Pace | F | B |
| Late Pace | A | A |
| Sprint FPS | F | D |
| Route FPS | F | D |
| Trainer Effectiveness | F | D |
| Jockey Effectiveness | B | A |
| 3rd Party Ratings | C | B |
| Predictions
AI-generated projections for the upcoming race, derived from prior AI analysis for speed and pace trends, surface and distance suitability, and current conditions. Grading scale: A = elite • B = above average • C = average • D = below average • F = poor • — = no data |
||
| Speed | B | B |
| Early Pace | F | D |
| Mid Pace | F | B |
| Late Pace | C | C |
Chart Guide (2.0.35)
- Bubbles
- Color = surface: green (turf), brown (dirt), blue (synthetic)
- Top number = finishing position; bottom number in parentheses = starting post position
- Height above line = beaten lengths — closer means a smaller margin
- Border = track conditions: green (FST/GD/FM), yellow (WF/SL/YLD), red (SY/MY/FRZ/SFT/HVY)
- Connecting Line
- Solid = good conditions; dashed = bad conditions
- Line Symbol
- ▲ Triangle = sprint (7f or less); ● Circle = route (more than 7f)
- Days Between Races
- Small number above each bubble (e.g. 19d) = days since the previous race — helps spot freshness, layoffs, and tight scheduling.
- Shaded Band (Bollinger)
- Highlights volatility — a wider band means more variation in recent performance
- Performance Trend
- Straight line showing the overall performance direction — angled up = improving, angled down = declining
- Dashed Reference Line
- AI Opponent = AI analysis class-level par for the race
✓ Positives:(1) Hot trainer - high ITM rate. (2) Hot jockey — high ITM rate (21.49%). (3) Strong speed 2 back (84), modest dip last out (77) — form reversal angle, ready to bounce back to top form. (4) Has won at today's distance (1760 yds) within the last 10 starts — proven ability at this trip. (5) Has won at AQU on dirt in the last 10 starts — proven at today's exact track/surface combo. (6) Had documented trouble last race (codes: ['D', 'O', 'T', 'U']) yet still finished 2nd — a clean trip today sets up a form reversal. (7) Pick Pony Daily Edge Radar pick — value score 7/10 — angles: Troubled Trip Comeback, Won Here Before, Form Reversal, Won at This Distance.
⚠ Concerns:(1) Rising in class today ($10,000 → $16,000). (2) Was claimed from its most recent race - new connections. (3) Consider there will be likely pace pressure in this race - multiple E types entered. (4) Trip note from last race: 4-3p;6p1/4;carried out.
Mod1(W): 1 (9/9) Mod2(W): 0 Mod3(W): 2 (8/9) Mod1-LS: 93 (2/9) Mod2-LS: 0 Mod3-LS: 0 Mod4(Form): 14 (9/9) Win Prob: 18.2% Value Score: 3.73 ★ ML: 15.00 (15/1) Overlay %: 2.47 Fair Odds: 12.62 (12/1) O/U: Overlay
Score Definitions
- Mod1(W)
- Winner Model 1 score (0–100) — AI composite rating among field contenders (higher = stronger). The number in parentheses (e.g. 1/9) shows this horse’s rank out of the field size.
- Mod2(W)
- Winner Model 2 score (0–100) — AI rating among field contenders (higher = stronger). The number in parentheses shows rank within the field.
- Mod3(W)
- Winner Model 3 score (0–100) — AI rating among field contenders (higher = stronger). The number in parentheses shows rank within the field.
- Mod1-LS
- Longshot Model 1 score (0–100) — AI model trained to surface high-value longshots. Higher = stronger longshot profile. Rank in parentheses shows position within the field.
- Mod2-LS
- Longshot Model 2 score (0–100) — AI longshot model. Higher = stronger longshot profile.
- Mod3-LS
- Longshot Model 3 score (0–100) — AI longshot model. Higher = stronger longshot profile.
- Mod4(Form)
- Form Model score (0–100) — AI sequence model trained on recent form patterns to capture momentum and trajectory. Higher = stronger recent form profile. Rank in parentheses shows position within the field.
- Win Prob
- LightGBM estimated win probability expressed as a percentage. This is a raw model output, not normalized to sum to 100% across the field — use it for comparison rather than as an absolute probability.
- Value Score
- Win Prob divided by the market-implied probability (derived from morning line). Values above 1.0 mean the model sees more win chance than the odds imply — a ★ star appears when Value Score ≥ 1.3, indicating a 30%+ model edge over the market.
- ML
- Morning line odds set by the track handicapper before wagering opens
- Overlay %
- How much the fair odds exceed the morning line, expressed as a percentage — positive values indicate value
- Fair Odds
- Model-derived fair-value odds based on estimated win probability
- O/U
- Overlay or Underlay — whether the horse offers value (O) or is overbet (U) relative to fair odds
Lane Bias Guide
- Bar Direction
- Bars above the line = more favorable lane • Bars below = less favorable, relative to the average at this track.
- Color
- Green = above-average advantage • Yellow = near-average • Red = below-average • Blue = this horse’s lane.
- Bias Score
- Derived from weighted average finishing positions across historical races at this track. Shown in the tooltip on hover. To use the bias score, calculate your handicap for the horse (e.g. finish position), then add (detrimental bias) or subtract (favorable bias) the bias score.
- Races
- Number of historical races used to compute each lane’s bias score.
Race Pace Bias Guide
- Bar Height & Direction
- Positive (green) = pace favors this horse • Negative (red) = pace works against this horse • Near-zero (amber) = neutral.
- Race Shape
- Projected race shape based on running styles of all horses (e.g. EE = two early horses, EP = one early presser).
- Pace Category
- FAST = contested early pace • LONE EARLY = one speed horse controlling pace • HONEST = moderate early pressure • SLOW = closers’ race.
- Flag (★)
- A star above the bar means this horse’s pace bias figure is ≥ 1.5 — a meaningful pace advantage or disadvantage.
Total Pace Guide
- Bar Segments
- Green = Early Pace (E1) • Amber = Mid Pace (E2) • Red = Late Pace (LP)
- Bar Height
- Total height = sum of E1 + E2 + LP average pace figures. Taller bars indicate a faster-paced horse overall.
- Grades & Rankings
- Hover to see each horse’s letter grade and ranking vs. other horses in this race (e.g. 2/9 = 2nd best of 9).
- Border
- Thicker border = this horse’s post position.
Performance vs. Peers Guide
- Bars (per post)
- Blue = avg career performance • Amber = avg last 3 races • Green = last race (improved vs. avg) • Red = last race (declined vs. avg)
- Trend Line
- Angled line above the bars: rising = improving form • falling = declining form.
- Horizontal Line
- Field average — the mean career performance of all horses in this race.
- Color Circles
- Standard post-position colors below each lane — same as the Total Pace chart.
- Border
- Thicker border = this horse’s post position.
Figure Comparison
- Rating
- The three Pick Pony algorithm ratings (Algo 1, Algo 2, Algo 3) that make up the overall PP AI Rating — higher is a stronger contender rating.
- Speed
- Career average speed, recent 3-race average, and last-race speed figure — spot horses in improving or declining form.
- Pace
- Average Early (E1), Mid (E2), and Stretch (LP) pace figures — reveals pace-setters vs. closers vs. all-the-way types.
- This horse
- The horse whose stats card is open is highlighted with a darker column background.
Winning Profiles
- Axes
- X: Win % from last 10 starts — Y: In-the-money % (top-3 finishes) from last 10 starts.
- Quadrants
- Consistent Winners (top-right): high win & ITM — reliable performers.
Place Threats (top-left): boards often but doesn’t win often — good exacta/trifecta angles.
Streaky (bottom-right): wins occasionally, misses the board often — all-or-nothing.
Developing (bottom-left): still finding form — longshot territory. - Reference Lines
- Dashed lines mark field averages. Dots to the right win more; dots higher board more.
- This horse
- Highlighted with a gold border and larger dot.
AI Model Comparison
- Winner Models (green)
- Mod1(W), Mod2(W), and Mod3(W) trained to predict race winners. Higher score = stronger contender.
- Longshot Models (red)
- Mod1-LS, Mod2-LS, and Mod3-LS trained to find high-value longshots. Higher score = stronger longshot candidate.
- Form Model (blue)
- Mod4 sequence model trained on recent form patterns. Higher score = stronger recent form profile.
- This horse
- Highlighted with a darker column background.
Race Pace Simulation Guide
- Slider
- Drag left→right to advance from gate to finish. Drag all the way back to reset the race.
- Predicted Finish Order
- Factors in contested pace burn, each horse’s effort curve (peaked-early vs. peaked-late), and wide trip cost from outside posts. Updated live when Track Bias changes.
- Pace Scenario
- Lone Speed: single E horse likely rates and holds. Contested: two E horses burn each other — closers benefit. Hot Pace: speed meltdown, deep closers thrive. Soft: no early speed, moderate fractions throughout.
- Track Bias
- Slider below canvas. −2 = strong closer/wet bias; +2 = strong speed/rail bias. Recomputes the predicted finish order.
- Boxed Indicator
- Dashed orange ring = horse is surrounded (rival ahead, rival behind, wall outside). In a real race this horse must find a clear path to run.
- Running Styles
- E/EE = early speed (rushes to rail). P = presser (stalks the pace). S = stalker. SS = slow starter / closer.
| Stat | vs. Current Card | vs. All Horses |
|---|---|---|
| Averages
Career-average metrics across all AI race analysis. Performance and pace averages reflect estimated historical performance; trainer and jockey grades score in-the-money percentages. Grading scale: A = elite • B = above average • C = average • D = below average • F = poor • — = no data |
||
| Pick Pony AI Rating | D | D |
| Pace Trip Longshot | — | — |
| Connections Longshot | — | — |
| Situational Longshot | — | — |
| Speed | B | A |
| Early Pace | A | B |
| Mid Pace | A | A |
| Late Pace | D | B |
| Finish Pos | C | C |
| Dirt Speed | A | A |
| Turf Speed | A | A |
| Distance Speed | B | A |
| Trainer Effectiveness | D | F |
| Jockey Effectiveness | F | F |
| 3rd Party Ratings | D | B |
| Recent
Performance analysis from the horse's recent races, weighted to reflect current form. Sprint and Route FPS (Foot Per Second) measure pace efficiency over the horse's recent sprints and routes respectively. Grading scale: A = elite • B = above average • C = average • D = below average • F = poor • — = no data |
||
| Speed | B | A |
| Early Pace | C | C |
| Mid Pace | B | B |
| Late Pace | B | B |
| Sprint FPS | C | C |
| Route FPS | B | B |
| Trainer Effectiveness | D | F |
| Jockey Effectiveness | F | F |
| 3rd Party Ratings | D | B |
| Predictions
AI-generated projections for the upcoming race, derived from prior AI analysis for speed and pace trends, surface and distance suitability, and current conditions. Grading scale: A = elite • B = above average • C = average • D = below average • F = poor • — = no data |
||
| Speed | B | A |
| Early Pace | A | A |
| Mid Pace | A | A |
| Late Pace | C | C |
Chart Guide (2.0.35)
- Bubbles
- Color = surface: green (turf), brown (dirt), blue (synthetic)
- Top number = finishing position; bottom number in parentheses = starting post position
- Height above line = beaten lengths — closer means a smaller margin
- Border = track conditions: green (FST/GD/FM), yellow (WF/SL/YLD), red (SY/MY/FRZ/SFT/HVY)
- Connecting Line
- Solid = good conditions; dashed = bad conditions
- Line Symbol
- ▲ Triangle = sprint (7f or less); ● Circle = route (more than 7f)
- Days Between Races
- Small number above each bubble (e.g. 19d) = days since the previous race — helps spot freshness, layoffs, and tight scheduling.
- Shaded Band (Bollinger)
- Highlights volatility — a wider band means more variation in recent performance
- Performance Trend
- Straight line showing the overall performance direction — angled up = improving, angled down = declining
- Dashed Reference Line
- AI Opponent = AI analysis class-level par for the race
✓ Positives:(1) Hot trainer - high ITM rate (54%). (2) Strong trainer/jockey combo - 35 wins from 128 starts (27%). (3) Career-best speed figure (87) recorded in last 1-2 starts — peaking form. (4) Hot jockey — high ITM rate (48%). (5) In the money in last 3 consecutive starts. (6) Track specialist — 3 wins from 8 starts here (38%). (7) Closer/presser in a race with pace pressure — ideal race setup for late runners. (8) Fourth race back from a 137-day layoff — often the peak fitness race. (9) Strong speed 2 back (87), modest dip last out (76) — form reversal angle, ready to bounce back to top form. (10) Has won at today's distance (1760 yds) within the last 10 starts — proven ability at this trip. (11) Has won at AQU on dirt in the last 10 starts — proven at today's exact track/surface combo. (12) Had documented trouble last race (codes: ['D', 'O', 'U', 'V']) yet still finished 3rd — a clean trip today sets up a form reversal. (13) Pick Pony Daily Edge Radar pick — value score 10/10 — angles: Career-Best Recent Figure, Hot Trainer-Jockey Pairing, Consistent In-The-Money, Closer in Pace Duel, Hot Trainer, Won Here Before, Troubled Trip Comeback, Won at This Distance, Form Reversal, Track Specialist, Classic Fourth Race Pattern.
⚠ Concerns:(1) Consider there will be likely pace pressure in this race - multiple E types entered. (2) Trip note from last race: 5-6w uppr; improved. (3) No workout in last 30 days despite 19 days since last race.
Mod1(W): 85 (4/9) Mod2(W): 94 (3/9) Mod3(W): 74 (3/9) Mod1-LS: 11 (7/9) Mod2-LS: 80 (3/9) Mod3-LS: 19 (8/9) Mod4(Form): 92 (2/9) Win Prob: 56.5% Value Score: 3.62 ★ ML: 4.00 (3/1) Overlay %: -3.55 Fair Odds: 7.30 (6/1) O/U: Underlay
Score Definitions
- Mod1(W)
- Winner Model 1 score (0–100) — AI composite rating among field contenders (higher = stronger). The number in parentheses (e.g. 1/9) shows this horse’s rank out of the field size.
- Mod2(W)
- Winner Model 2 score (0–100) — AI rating among field contenders (higher = stronger). The number in parentheses shows rank within the field.
- Mod3(W)
- Winner Model 3 score (0–100) — AI rating among field contenders (higher = stronger). The number in parentheses shows rank within the field.
- Mod1-LS
- Longshot Model 1 score (0–100) — AI model trained to surface high-value longshots. Higher = stronger longshot profile. Rank in parentheses shows position within the field.
- Mod2-LS
- Longshot Model 2 score (0–100) — AI longshot model. Higher = stronger longshot profile.
- Mod3-LS
- Longshot Model 3 score (0–100) — AI longshot model. Higher = stronger longshot profile.
- Mod4(Form)
- Form Model score (0–100) — AI sequence model trained on recent form patterns to capture momentum and trajectory. Higher = stronger recent form profile. Rank in parentheses shows position within the field.
- Win Prob
- LightGBM estimated win probability expressed as a percentage. This is a raw model output, not normalized to sum to 100% across the field — use it for comparison rather than as an absolute probability.
- Value Score
- Win Prob divided by the market-implied probability (derived from morning line). Values above 1.0 mean the model sees more win chance than the odds imply — a ★ star appears when Value Score ≥ 1.3, indicating a 30%+ model edge over the market.
- ML
- Morning line odds set by the track handicapper before wagering opens
- Overlay %
- How much the fair odds exceed the morning line, expressed as a percentage — positive values indicate value
- Fair Odds
- Model-derived fair-value odds based on estimated win probability
- O/U
- Overlay or Underlay — whether the horse offers value (O) or is overbet (U) relative to fair odds
Lane Bias Guide
- Bar Direction
- Bars above the line = more favorable lane • Bars below = less favorable, relative to the average at this track.
- Color
- Green = above-average advantage • Yellow = near-average • Red = below-average • Blue = this horse’s lane.
- Bias Score
- Derived from weighted average finishing positions across historical races at this track. Shown in the tooltip on hover. To use the bias score, calculate your handicap for the horse (e.g. finish position), then add (detrimental bias) or subtract (favorable bias) the bias score.
- Races
- Number of historical races used to compute each lane’s bias score.
Race Pace Bias Guide
- Bar Height & Direction
- Positive (green) = pace favors this horse • Negative (red) = pace works against this horse • Near-zero (amber) = neutral.
- Race Shape
- Projected race shape based on running styles of all horses (e.g. EE = two early horses, EP = one early presser).
- Pace Category
- FAST = contested early pace • LONE EARLY = one speed horse controlling pace • HONEST = moderate early pressure • SLOW = closers’ race.
- Flag (★)
- A star above the bar means this horse’s pace bias figure is ≥ 1.5 — a meaningful pace advantage or disadvantage.
Total Pace Guide
- Bar Segments
- Green = Early Pace (E1) • Amber = Mid Pace (E2) • Red = Late Pace (LP)
- Bar Height
- Total height = sum of E1 + E2 + LP average pace figures. Taller bars indicate a faster-paced horse overall.
- Grades & Rankings
- Hover to see each horse’s letter grade and ranking vs. other horses in this race (e.g. 2/9 = 2nd best of 9).
- Border
- Thicker border = this horse’s post position.
Performance vs. Peers Guide
- Bars (per post)
- Blue = avg career performance • Amber = avg last 3 races • Green = last race (improved vs. avg) • Red = last race (declined vs. avg)
- Trend Line
- Angled line above the bars: rising = improving form • falling = declining form.
- Horizontal Line
- Field average — the mean career performance of all horses in this race.
- Color Circles
- Standard post-position colors below each lane — same as the Total Pace chart.
- Border
- Thicker border = this horse’s post position.
Figure Comparison
- Rating
- The three Pick Pony algorithm ratings (Algo 1, Algo 2, Algo 3) that make up the overall PP AI Rating — higher is a stronger contender rating.
- Speed
- Career average speed, recent 3-race average, and last-race speed figure — spot horses in improving or declining form.
- Pace
- Average Early (E1), Mid (E2), and Stretch (LP) pace figures — reveals pace-setters vs. closers vs. all-the-way types.
- This horse
- The horse whose stats card is open is highlighted with a darker column background.
Winning Profiles
- Axes
- X: Win % from last 10 starts — Y: In-the-money % (top-3 finishes) from last 10 starts.
- Quadrants
- Consistent Winners (top-right): high win & ITM — reliable performers.
Place Threats (top-left): boards often but doesn’t win often — good exacta/trifecta angles.
Streaky (bottom-right): wins occasionally, misses the board often — all-or-nothing.
Developing (bottom-left): still finding form — longshot territory. - Reference Lines
- Dashed lines mark field averages. Dots to the right win more; dots higher board more.
- This horse
- Highlighted with a gold border and larger dot.
AI Model Comparison
- Winner Models (green)
- Mod1(W), Mod2(W), and Mod3(W) trained to predict race winners. Higher score = stronger contender.
- Longshot Models (red)
- Mod1-LS, Mod2-LS, and Mod3-LS trained to find high-value longshots. Higher score = stronger longshot candidate.
- Form Model (blue)
- Mod4 sequence model trained on recent form patterns. Higher score = stronger recent form profile.
- This horse
- Highlighted with a darker column background.
Race Pace Simulation Guide
- Slider
- Drag left→right to advance from gate to finish. Drag all the way back to reset the race.
- Predicted Finish Order
- Factors in contested pace burn, each horse’s effort curve (peaked-early vs. peaked-late), and wide trip cost from outside posts. Updated live when Track Bias changes.
- Pace Scenario
- Lone Speed: single E horse likely rates and holds. Contested: two E horses burn each other — closers benefit. Hot Pace: speed meltdown, deep closers thrive. Soft: no early speed, moderate fractions throughout.
- Track Bias
- Slider below canvas. −2 = strong closer/wet bias; +2 = strong speed/rail bias. Recomputes the predicted finish order.
- Boxed Indicator
- Dashed orange ring = horse is surrounded (rival ahead, rival behind, wall outside). In a real race this horse must find a clear path to run.
- Running Styles
- E/EE = early speed (rushes to rail). P = presser (stalks the pace). S = stalker. SS = slow starter / closer.
| Stat | vs. Current Card | vs. All Horses |
|---|---|---|
| Averages
Career-average metrics across all AI race analysis. Performance and pace averages reflect estimated historical performance; trainer and jockey grades score in-the-money percentages. Grading scale: A = elite • B = above average • C = average • D = below average • F = poor • — = no data |
||
| Pick Pony AI Rating | B | B |
| Pace Trip Longshot | — | — |
| Connections Longshot | — | — |
| Situational Longshot | — | — |
| Speed | F | B |
| Early Pace | D | D |
| Mid Pace | D | C |
| Late Pace | B | A |
| Finish Pos | A | B |
| Dirt Speed | D | A |
| Turf Speed | D | C |
| Distance Speed | D | A |
| Trainer Effectiveness | A | A |
| Jockey Effectiveness | C | A |
| 3rd Party Ratings | A | A |
| Recent
Performance analysis from the horse's recent races, weighted to reflect current form. Sprint and Route FPS (Foot Per Second) measure pace efficiency over the horse's recent sprints and routes respectively. Grading scale: A = elite • B = above average • C = average • D = below average • F = poor • — = no data |
||
| Speed | A | A |
| Early Pace | B | C |
| Mid Pace | B | B |
| Late Pace | C | B |
| Sprint FPS | D | D |
| Route FPS | D | C |
| Trainer Effectiveness | A | A |
| Jockey Effectiveness | C | A |
| 3rd Party Ratings | A | A |
| Predictions
AI-generated projections for the upcoming race, derived from prior AI analysis for speed and pace trends, surface and distance suitability, and current conditions. Grading scale: A = elite • B = above average • C = average • D = below average • F = poor • — = no data |
||
| Speed | F | B |
| Early Pace | D | C |
| Mid Pace | C | B |
| Late Pace | C | C |
Chart Guide (2.0.35)
- Bubbles
- Color = surface: green (turf), brown (dirt), blue (synthetic)
- Top number = finishing position; bottom number in parentheses = starting post position
- Height above line = beaten lengths — closer means a smaller margin
- Border = track conditions: green (FST/GD/FM), yellow (WF/SL/YLD), red (SY/MY/FRZ/SFT/HVY)
- Connecting Line
- Solid = good conditions; dashed = bad conditions
- Line Symbol
- ▲ Triangle = sprint (7f or less); ● Circle = route (more than 7f)
- Days Between Races
- Small number above each bubble (e.g. 19d) = days since the previous race — helps spot freshness, layoffs, and tight scheduling.
- Shaded Band (Bollinger)
- Highlights volatility — a wider band means more variation in recent performance
- Performance Trend
- Straight line showing the overall performance direction — angled up = improving, angled down = declining
- Dashed Reference Line
- AI Opponent = AI analysis class-level par for the race
✓ Positives:(1) Hot trainer - high ITM rate (58%). (2) Strong trainer/jockey combo - 8 wins from 18 starts (44%). (3) Big last-race effort (87) — 15 pts above recent average. (4) Hot jockey — high ITM rate (59%). (5) Fourth race back from a 152-day layoff — often the peak fitness race. (6) Has won at today's distance (1760 yds) within the last 10 starts — proven ability at this trip. (7) Career-best figure (92) buried in races 4–10 back — 13 pts above race median and 5 pts above recent form — market has forgotten the peak effort. (8) Had documented trouble last race (codes: ['B', 'D', 'O', 'T']) yet still finished 3rd — a clean trip today sets up a form reversal. (9) Pick Pony Daily Edge Radar pick — value score 9/10 — angles: Big Last Effort, Hot Trainer-Jockey Pairing, Troubled Trip Comeback, Hot Trainer, Hot Jockey, Hidden Figure, Won at This Distance, Classic Fourth Race Pattern.
⚠ Concerns:(1) Consider there will be likely pace pressure in this race - multiple E types entered. (2) Moving from a sprint to a route today. (3) 0 wins from 5 career starts on off tracks. (4) Trip note from last race: 3p trn;bmpd1/4;kept on. (5) Dropping in class in consecutive starts ($50,000 → $40,000 → $16,000). (6) Speed figures are highly erratic over last 5 starts (σ = 11.8 pts: [87, 63, 70, 83, 91]) — unpredictable performer.
Mod1(W): 93 (3/9) Mod2(W): 99 (2/9) Mod3(W): 100 (1/9) Mod1-LS: 11 (6/9) Mod2-LS: 100 (1/9) Mod3-LS: 65 (2/9) Mod4(Form): 100 (1/9) Win Prob: 67.7% Value Score: 3.91 ★ ML: 3.50 (5/2) Overlay %: -4.43 Fair Odds: 6.75 (6/1) O/U: Underlay
Score Definitions
- Mod1(W)
- Winner Model 1 score (0–100) — AI composite rating among field contenders (higher = stronger). The number in parentheses (e.g. 1/9) shows this horse’s rank out of the field size.
- Mod2(W)
- Winner Model 2 score (0–100) — AI rating among field contenders (higher = stronger). The number in parentheses shows rank within the field.
- Mod3(W)
- Winner Model 3 score (0–100) — AI rating among field contenders (higher = stronger). The number in parentheses shows rank within the field.
- Mod1-LS
- Longshot Model 1 score (0–100) — AI model trained to surface high-value longshots. Higher = stronger longshot profile. Rank in parentheses shows position within the field.
- Mod2-LS
- Longshot Model 2 score (0–100) — AI longshot model. Higher = stronger longshot profile.
- Mod3-LS
- Longshot Model 3 score (0–100) — AI longshot model. Higher = stronger longshot profile.
- Mod4(Form)
- Form Model score (0–100) — AI sequence model trained on recent form patterns to capture momentum and trajectory. Higher = stronger recent form profile. Rank in parentheses shows position within the field.
- Win Prob
- LightGBM estimated win probability expressed as a percentage. This is a raw model output, not normalized to sum to 100% across the field — use it for comparison rather than as an absolute probability.
- Value Score
- Win Prob divided by the market-implied probability (derived from morning line). Values above 1.0 mean the model sees more win chance than the odds imply — a ★ star appears when Value Score ≥ 1.3, indicating a 30%+ model edge over the market.
- ML
- Morning line odds set by the track handicapper before wagering opens
- Overlay %
- How much the fair odds exceed the morning line, expressed as a percentage — positive values indicate value
- Fair Odds
- Model-derived fair-value odds based on estimated win probability
- O/U
- Overlay or Underlay — whether the horse offers value (O) or is overbet (U) relative to fair odds
Lane Bias Guide
- Bar Direction
- Bars above the line = more favorable lane • Bars below = less favorable, relative to the average at this track.
- Color
- Green = above-average advantage • Yellow = near-average • Red = below-average • Blue = this horse’s lane.
- Bias Score
- Derived from weighted average finishing positions across historical races at this track. Shown in the tooltip on hover. To use the bias score, calculate your handicap for the horse (e.g. finish position), then add (detrimental bias) or subtract (favorable bias) the bias score.
- Races
- Number of historical races used to compute each lane’s bias score.
Race Pace Bias Guide
- Bar Height & Direction
- Positive (green) = pace favors this horse • Negative (red) = pace works against this horse • Near-zero (amber) = neutral.
- Race Shape
- Projected race shape based on running styles of all horses (e.g. EE = two early horses, EP = one early presser).
- Pace Category
- FAST = contested early pace • LONE EARLY = one speed horse controlling pace • HONEST = moderate early pressure • SLOW = closers’ race.
- Flag (★)
- A star above the bar means this horse’s pace bias figure is ≥ 1.5 — a meaningful pace advantage or disadvantage.
Total Pace Guide
- Bar Segments
- Green = Early Pace (E1) • Amber = Mid Pace (E2) • Red = Late Pace (LP)
- Bar Height
- Total height = sum of E1 + E2 + LP average pace figures. Taller bars indicate a faster-paced horse overall.
- Grades & Rankings
- Hover to see each horse’s letter grade and ranking vs. other horses in this race (e.g. 2/9 = 2nd best of 9).
- Border
- Thicker border = this horse’s post position.
Performance vs. Peers Guide
- Bars (per post)
- Blue = avg career performance • Amber = avg last 3 races • Green = last race (improved vs. avg) • Red = last race (declined vs. avg)
- Trend Line
- Angled line above the bars: rising = improving form • falling = declining form.
- Horizontal Line
- Field average — the mean career performance of all horses in this race.
- Color Circles
- Standard post-position colors below each lane — same as the Total Pace chart.
- Border
- Thicker border = this horse’s post position.
Figure Comparison
- Rating
- The three Pick Pony algorithm ratings (Algo 1, Algo 2, Algo 3) that make up the overall PP AI Rating — higher is a stronger contender rating.
- Speed
- Career average speed, recent 3-race average, and last-race speed figure — spot horses in improving or declining form.
- Pace
- Average Early (E1), Mid (E2), and Stretch (LP) pace figures — reveals pace-setters vs. closers vs. all-the-way types.
- This horse
- The horse whose stats card is open is highlighted with a darker column background.
Winning Profiles
- Axes
- X: Win % from last 10 starts — Y: In-the-money % (top-3 finishes) from last 10 starts.
- Quadrants
- Consistent Winners (top-right): high win & ITM — reliable performers.
Place Threats (top-left): boards often but doesn’t win often — good exacta/trifecta angles.
Streaky (bottom-right): wins occasionally, misses the board often — all-or-nothing.
Developing (bottom-left): still finding form — longshot territory. - Reference Lines
- Dashed lines mark field averages. Dots to the right win more; dots higher board more.
- This horse
- Highlighted with a gold border and larger dot.
AI Model Comparison
- Winner Models (green)
- Mod1(W), Mod2(W), and Mod3(W) trained to predict race winners. Higher score = stronger contender.
- Longshot Models (red)
- Mod1-LS, Mod2-LS, and Mod3-LS trained to find high-value longshots. Higher score = stronger longshot candidate.
- Form Model (blue)
- Mod4 sequence model trained on recent form patterns. Higher score = stronger recent form profile.
- This horse
- Highlighted with a darker column background.
Race Pace Simulation Guide
- Slider
- Drag left→right to advance from gate to finish. Drag all the way back to reset the race.
- Predicted Finish Order
- Factors in contested pace burn, each horse’s effort curve (peaked-early vs. peaked-late), and wide trip cost from outside posts. Updated live when Track Bias changes.
- Pace Scenario
- Lone Speed: single E horse likely rates and holds. Contested: two E horses burn each other — closers benefit. Hot Pace: speed meltdown, deep closers thrive. Soft: no early speed, moderate fractions throughout.
- Track Bias
- Slider below canvas. −2 = strong closer/wet bias; +2 = strong speed/rail bias. Recomputes the predicted finish order.
- Boxed Indicator
- Dashed orange ring = horse is surrounded (rival ahead, rival behind, wall outside). In a real race this horse must find a clear path to run.
- Running Styles
- E/EE = early speed (rushes to rail). P = presser (stalks the pace). S = stalker. SS = slow starter / closer.
| Stat | vs. Current Card | vs. All Horses |
|---|---|---|
| Averages
Career-average metrics across all AI race analysis. Performance and pace averages reflect estimated historical performance; trainer and jockey grades score in-the-money percentages. Grading scale: A = elite • B = above average • C = average • D = below average • F = poor • — = no data |
||
| Pick Pony AI Rating | B | B |
| Pace Trip Longshot | — | — |
| Connections Longshot | — | — |
| Situational Longshot | — | — |
| Speed | C | A |
| Early Pace | A | B |
| Mid Pace | A | A |
| Late Pace | D | C |
| Finish Pos | D | D |
| Dirt Speed | A | A |
| Turf Speed | A | A |
| Distance Speed | C | A |
| Trainer Effectiveness | A | A |
| Jockey Effectiveness | A | A |
| 3rd Party Ratings | A | A |
| Recent
Performance analysis from the horse's recent races, weighted to reflect current form. Sprint and Route FPS (Foot Per Second) measure pace efficiency over the horse's recent sprints and routes respectively. Grading scale: A = elite • B = above average • C = average • D = below average • F = poor • — = no data |
||
| Speed | F | B |
| Early Pace | A | B |
| Mid Pace | A | A |
| Late Pace | F | D |
| Sprint FPS | B | B |
| Route FPS | A | A |
| Trainer Effectiveness | A | A |
| Jockey Effectiveness | A | A |
| 3rd Party Ratings | A | A |
| Predictions
AI-generated projections for the upcoming race, derived from prior AI analysis for speed and pace trends, surface and distance suitability, and current conditions. Grading scale: A = elite • B = above average • C = average • D = below average • F = poor • — = no data |
||
| Speed | C | B |
| Early Pace | A | B |
| Mid Pace | A | A |
| Late Pace | C | C |
Chart Guide (2.0.35)
- Bubbles
- Color = surface: green (turf), brown (dirt), blue (synthetic)
- Top number = finishing position; bottom number in parentheses = starting post position
- Height above line = beaten lengths — closer means a smaller margin
- Border = track conditions: green (FST/GD/FM), yellow (WF/SL/YLD), red (SY/MY/FRZ/SFT/HVY)
- Connecting Line
- Solid = good conditions; dashed = bad conditions
- Line Symbol
- ▲ Triangle = sprint (7f or less); ● Circle = route (more than 7f)
- Days Between Races
- Small number above each bubble (e.g. 19d) = days since the previous race — helps spot freshness, layoffs, and tight scheduling.
- Shaded Band (Bollinger)
- Highlights volatility — a wider band means more variation in recent performance
- Performance Trend
- Straight line showing the overall performance direction — angled up = improving, angled down = declining
- Dashed Reference Line
- AI Opponent = AI analysis class-level par for the race
✓ Positives:(1) Dropping in class today ($30,000 → $16,000). (2) Hot trainer - high ITM rate (47%). (3) Hot jockey — high ITM rate (50%). (4) 3 workouts in last 30 days — horse appears sharp and fit. (5) Late pace significantly above field median (LP: 84 vs field 80). (6) Has won at today's distance (1760 yds) within the last 10 starts — proven ability at this trip. (7) Career-best figure (95) buried in races 4–10 back — 16 pts above race median and 16 pts above recent form — market has forgotten the peak effort. (8) Pick Pony Daily Edge Radar pick — value score 6/10 — angles: Hidden Figure, Class Drop, Late Kick Advantage, Won at This Distance, Sharp Workout Pattern.
⚠ Concerns:(1) Consider there will be likely pace pressure in this race - multiple E types entered. (2) 0 wins from 7 career starts on off tracks. (3) Trip note from last race: Bmp brk;3-4p;6p3/16. (4) Speed figures are highly erratic over last 5 starts (σ = 9.8 pts: [70, 78, 79, 89, 95]) — unpredictable performer.
Mod1(W): 74 (5/9) Mod2(W): 66 (5/9) Mod3(W): 54 (5/9) Mod1-LS: 4 (9/9) Mod2-LS: 60 (5/9) Mod3-LS: 64 (4/9) Mod4(Form): 64 (5/9) Win Prob: 47.9% Value Score: 4.3 ★ ML: 6.00 (5/1) Overlay %: 0.34 Fair Odds: 7.71 (7/1) O/U: Fair
Score Definitions
- Mod1(W)
- Winner Model 1 score (0–100) — AI composite rating among field contenders (higher = stronger). The number in parentheses (e.g. 1/9) shows this horse’s rank out of the field size.
- Mod2(W)
- Winner Model 2 score (0–100) — AI rating among field contenders (higher = stronger). The number in parentheses shows rank within the field.
- Mod3(W)
- Winner Model 3 score (0–100) — AI rating among field contenders (higher = stronger). The number in parentheses shows rank within the field.
- Mod1-LS
- Longshot Model 1 score (0–100) — AI model trained to surface high-value longshots. Higher = stronger longshot profile. Rank in parentheses shows position within the field.
- Mod2-LS
- Longshot Model 2 score (0–100) — AI longshot model. Higher = stronger longshot profile.
- Mod3-LS
- Longshot Model 3 score (0–100) — AI longshot model. Higher = stronger longshot profile.
- Mod4(Form)
- Form Model score (0–100) — AI sequence model trained on recent form patterns to capture momentum and trajectory. Higher = stronger recent form profile. Rank in parentheses shows position within the field.
- Win Prob
- LightGBM estimated win probability expressed as a percentage. This is a raw model output, not normalized to sum to 100% across the field — use it for comparison rather than as an absolute probability.
- Value Score
- Win Prob divided by the market-implied probability (derived from morning line). Values above 1.0 mean the model sees more win chance than the odds imply — a ★ star appears when Value Score ≥ 1.3, indicating a 30%+ model edge over the market.
- ML
- Morning line odds set by the track handicapper before wagering opens
- Overlay %
- How much the fair odds exceed the morning line, expressed as a percentage — positive values indicate value
- Fair Odds
- Model-derived fair-value odds based on estimated win probability
- O/U
- Overlay or Underlay — whether the horse offers value (O) or is overbet (U) relative to fair odds
Lane Bias Guide
- Bar Direction
- Bars above the line = more favorable lane • Bars below = less favorable, relative to the average at this track.
- Color
- Green = above-average advantage • Yellow = near-average • Red = below-average • Blue = this horse’s lane.
- Bias Score
- Derived from weighted average finishing positions across historical races at this track. Shown in the tooltip on hover. To use the bias score, calculate your handicap for the horse (e.g. finish position), then add (detrimental bias) or subtract (favorable bias) the bias score.
- Races
- Number of historical races used to compute each lane’s bias score.
Race Pace Bias Guide
- Bar Height & Direction
- Positive (green) = pace favors this horse • Negative (red) = pace works against this horse • Near-zero (amber) = neutral.
- Race Shape
- Projected race shape based on running styles of all horses (e.g. EE = two early horses, EP = one early presser).
- Pace Category
- FAST = contested early pace • LONE EARLY = one speed horse controlling pace • HONEST = moderate early pressure • SLOW = closers’ race.
- Flag (★)
- A star above the bar means this horse’s pace bias figure is ≥ 1.5 — a meaningful pace advantage or disadvantage.
Total Pace Guide
- Bar Segments
- Green = Early Pace (E1) • Amber = Mid Pace (E2) • Red = Late Pace (LP)
- Bar Height
- Total height = sum of E1 + E2 + LP average pace figures. Taller bars indicate a faster-paced horse overall.
- Grades & Rankings
- Hover to see each horse’s letter grade and ranking vs. other horses in this race (e.g. 2/9 = 2nd best of 9).
- Border
- Thicker border = this horse’s post position.
Performance vs. Peers Guide
- Bars (per post)
- Blue = avg career performance • Amber = avg last 3 races • Green = last race (improved vs. avg) • Red = last race (declined vs. avg)
- Trend Line
- Angled line above the bars: rising = improving form • falling = declining form.
- Horizontal Line
- Field average — the mean career performance of all horses in this race.
- Color Circles
- Standard post-position colors below each lane — same as the Total Pace chart.
- Border
- Thicker border = this horse’s post position.
Figure Comparison
- Rating
- The three Pick Pony algorithm ratings (Algo 1, Algo 2, Algo 3) that make up the overall PP AI Rating — higher is a stronger contender rating.
- Speed
- Career average speed, recent 3-race average, and last-race speed figure — spot horses in improving or declining form.
- Pace
- Average Early (E1), Mid (E2), and Stretch (LP) pace figures — reveals pace-setters vs. closers vs. all-the-way types.
- This horse
- The horse whose stats card is open is highlighted with a darker column background.
Winning Profiles
- Axes
- X: Win % from last 10 starts — Y: In-the-money % (top-3 finishes) from last 10 starts.
- Quadrants
- Consistent Winners (top-right): high win & ITM — reliable performers.
Place Threats (top-left): boards often but doesn’t win often — good exacta/trifecta angles.
Streaky (bottom-right): wins occasionally, misses the board often — all-or-nothing.
Developing (bottom-left): still finding form — longshot territory. - Reference Lines
- Dashed lines mark field averages. Dots to the right win more; dots higher board more.
- This horse
- Highlighted with a gold border and larger dot.
AI Model Comparison
- Winner Models (green)
- Mod1(W), Mod2(W), and Mod3(W) trained to predict race winners. Higher score = stronger contender.
- Longshot Models (red)
- Mod1-LS, Mod2-LS, and Mod3-LS trained to find high-value longshots. Higher score = stronger longshot candidate.
- Form Model (blue)
- Mod4 sequence model trained on recent form patterns. Higher score = stronger recent form profile.
- This horse
- Highlighted with a darker column background.
Race Pace Simulation Guide
- Slider
- Drag left→right to advance from gate to finish. Drag all the way back to reset the race.
- Predicted Finish Order
- Factors in contested pace burn, each horse’s effort curve (peaked-early vs. peaked-late), and wide trip cost from outside posts. Updated live when Track Bias changes.
- Pace Scenario
- Lone Speed: single E horse likely rates and holds. Contested: two E horses burn each other — closers benefit. Hot Pace: speed meltdown, deep closers thrive. Soft: no early speed, moderate fractions throughout.
- Track Bias
- Slider below canvas. −2 = strong closer/wet bias; +2 = strong speed/rail bias. Recomputes the predicted finish order.
- Boxed Indicator
- Dashed orange ring = horse is surrounded (rival ahead, rival behind, wall outside). In a real race this horse must find a clear path to run.
- Running Styles
- E/EE = early speed (rushes to rail). P = presser (stalks the pace). S = stalker. SS = slow starter / closer.
| Stat | vs. Current Card | vs. All Horses |
|---|---|---|
| Averages
Career-average metrics across all AI race analysis. Performance and pace averages reflect estimated historical performance; trainer and jockey grades score in-the-money percentages. Grading scale: A = elite • B = above average • C = average • D = below average • F = poor • — = no data |
||
| Pick Pony AI Rating | A | B |
| Pace Trip Longshot | — | — |
| Connections Longshot | — | — |
| Situational Longshot | — | — |
| Speed | A | A |
| Early Pace | B | B |
| Mid Pace | B | B |
| Late Pace | A | A |
| Finish Pos | B | C |
| Dirt Speed | B | A |
| Turf Speed | C | B |
| Distance Speed | A | A |
| Trainer Effectiveness | B | B |
| Jockey Effectiveness | B | A |
| 3rd Party Ratings | B | A |
| Recent
Performance analysis from the horse's recent races, weighted to reflect current form. Sprint and Route FPS (Foot Per Second) measure pace efficiency over the horse's recent sprints and routes respectively. Grading scale: A = elite • B = above average • C = average • D = below average • F = poor • — = no data |
||
| Speed | D | B |
| Early Pace | B | C |
| Mid Pace | C | B |
| Late Pace | D | C |
| Sprint FPS | A | A |
| Route FPS | C | B |
| Trainer Effectiveness | B | B |
| Jockey Effectiveness | B | A |
| 3rd Party Ratings | B | A |
| Predictions
AI-generated projections for the upcoming race, derived from prior AI analysis for speed and pace trends, surface and distance suitability, and current conditions. Grading scale: A = elite • B = above average • C = average • D = below average • F = poor • — = no data |
||
| Speed | A | A |
| Early Pace | B | B |
| Mid Pace | C | B |
| Late Pace | C | C |
Chart Guide (2.0.35)
- Bubbles
- Color = surface: green (turf), brown (dirt), blue (synthetic)
- Top number = finishing position; bottom number in parentheses = starting post position
- Height above line = beaten lengths — closer means a smaller margin
- Border = track conditions: green (FST/GD/FM), yellow (WF/SL/YLD), red (SY/MY/FRZ/SFT/HVY)
- Connecting Line
- Solid = good conditions; dashed = bad conditions
- Line Symbol
- ▲ Triangle = sprint (7f or less); ● Circle = route (more than 7f)
- Days Between Races
- Small number above each bubble (e.g. 19d) = days since the previous race — helps spot freshness, layoffs, and tight scheduling.
- Shaded Band (Bollinger)
- Highlights volatility — a wider band means more variation in recent performance
- Performance Trend
- Straight line showing the overall performance direction — angled up = improving, angled down = declining
- Dashed Reference Line
- AI Opponent = AI analysis class-level par for the race
✓ Positives:(1) Big last-race effort (93) — 14 pts above recent average. (2) Hot jockey — high ITM rate (50%). (3) In the money in last 3 consecutive starts. (4) Has won at today's distance (1760 yds) within the last 10 starts — proven ability at this trip. (5) Had documented trouble last race (codes: ['D', 'L', 'S', 'T']) yet still finished 1st — a clean trip today sets up a form reversal. (6) Pick Pony Daily Edge Radar pick — value score 8/10 — angles: Big Last Effort, Consistent In-The-Money, Troubled Trip Comeback, Hot Jockey, Won at This Distance.
⚠ Concerns:(1) Consider there will be likely pace pressure in this race - multiple E types entered. (2) Trip note from last race: Set pace; held edge. (3) Last race was career-best speed (93) — bounce risk after peak effort.
Mod1(W): 96 (2/9) Mod2(W): 100 (1/9) Mod3(W): 76 (2/9) Mod1-LS: 5 (8/9) Mod2-LS: 90 (2/9) Mod3-LS: 100 (1/9) Mod4(Form): 84 (3/9) Win Prob: 46% Value Score: 3.25 ★ ML: 4.50 (7/2) Overlay %: -1.39 Fair Odds: 6.82 (6/1) O/U: Fair
Score Definitions
- Mod1(W)
- Winner Model 1 score (0–100) — AI composite rating among field contenders (higher = stronger). The number in parentheses (e.g. 1/9) shows this horse’s rank out of the field size.
- Mod2(W)
- Winner Model 2 score (0–100) — AI rating among field contenders (higher = stronger). The number in parentheses shows rank within the field.
- Mod3(W)
- Winner Model 3 score (0–100) — AI rating among field contenders (higher = stronger). The number in parentheses shows rank within the field.
- Mod1-LS
- Longshot Model 1 score (0–100) — AI model trained to surface high-value longshots. Higher = stronger longshot profile. Rank in parentheses shows position within the field.
- Mod2-LS
- Longshot Model 2 score (0–100) — AI longshot model. Higher = stronger longshot profile.
- Mod3-LS
- Longshot Model 3 score (0–100) — AI longshot model. Higher = stronger longshot profile.
- Mod4(Form)
- Form Model score (0–100) — AI sequence model trained on recent form patterns to capture momentum and trajectory. Higher = stronger recent form profile. Rank in parentheses shows position within the field.
- Win Prob
- LightGBM estimated win probability expressed as a percentage. This is a raw model output, not normalized to sum to 100% across the field — use it for comparison rather than as an absolute probability.
- Value Score
- Win Prob divided by the market-implied probability (derived from morning line). Values above 1.0 mean the model sees more win chance than the odds imply — a ★ star appears when Value Score ≥ 1.3, indicating a 30%+ model edge over the market.
- ML
- Morning line odds set by the track handicapper before wagering opens
- Overlay %
- How much the fair odds exceed the morning line, expressed as a percentage — positive values indicate value
- Fair Odds
- Model-derived fair-value odds based on estimated win probability
- O/U
- Overlay or Underlay — whether the horse offers value (O) or is overbet (U) relative to fair odds
Lane Bias Guide
- Bar Direction
- Bars above the line = more favorable lane • Bars below = less favorable, relative to the average at this track.
- Color
- Green = above-average advantage • Yellow = near-average • Red = below-average • Blue = this horse’s lane.
- Bias Score
- Derived from weighted average finishing positions across historical races at this track. Shown in the tooltip on hover. To use the bias score, calculate your handicap for the horse (e.g. finish position), then add (detrimental bias) or subtract (favorable bias) the bias score.
- Races
- Number of historical races used to compute each lane’s bias score.
Race Pace Bias Guide
- Bar Height & Direction
- Positive (green) = pace favors this horse • Negative (red) = pace works against this horse • Near-zero (amber) = neutral.
- Race Shape
- Projected race shape based on running styles of all horses (e.g. EE = two early horses, EP = one early presser).
- Pace Category
- FAST = contested early pace • LONE EARLY = one speed horse controlling pace • HONEST = moderate early pressure • SLOW = closers’ race.
- Flag (★)
- A star above the bar means this horse’s pace bias figure is ≥ 1.5 — a meaningful pace advantage or disadvantage.
Total Pace Guide
- Bar Segments
- Green = Early Pace (E1) • Amber = Mid Pace (E2) • Red = Late Pace (LP)
- Bar Height
- Total height = sum of E1 + E2 + LP average pace figures. Taller bars indicate a faster-paced horse overall.
- Grades & Rankings
- Hover to see each horse’s letter grade and ranking vs. other horses in this race (e.g. 2/9 = 2nd best of 9).
- Border
- Thicker border = this horse’s post position.
Performance vs. Peers Guide
- Bars (per post)
- Blue = avg career performance • Amber = avg last 3 races • Green = last race (improved vs. avg) • Red = last race (declined vs. avg)
- Trend Line
- Angled line above the bars: rising = improving form • falling = declining form.
- Horizontal Line
- Field average — the mean career performance of all horses in this race.
- Color Circles
- Standard post-position colors below each lane — same as the Total Pace chart.
- Border
- Thicker border = this horse’s post position.
Figure Comparison
- Rating
- The three Pick Pony algorithm ratings (Algo 1, Algo 2, Algo 3) that make up the overall PP AI Rating — higher is a stronger contender rating.
- Speed
- Career average speed, recent 3-race average, and last-race speed figure — spot horses in improving or declining form.
- Pace
- Average Early (E1), Mid (E2), and Stretch (LP) pace figures — reveals pace-setters vs. closers vs. all-the-way types.
- This horse
- The horse whose stats card is open is highlighted with a darker column background.
Winning Profiles
- Axes
- X: Win % from last 10 starts — Y: In-the-money % (top-3 finishes) from last 10 starts.
- Quadrants
- Consistent Winners (top-right): high win & ITM — reliable performers.
Place Threats (top-left): boards often but doesn’t win often — good exacta/trifecta angles.
Streaky (bottom-right): wins occasionally, misses the board often — all-or-nothing.
Developing (bottom-left): still finding form — longshot territory. - Reference Lines
- Dashed lines mark field averages. Dots to the right win more; dots higher board more.
- This horse
- Highlighted with a gold border and larger dot.
AI Model Comparison
- Winner Models (green)
- Mod1(W), Mod2(W), and Mod3(W) trained to predict race winners. Higher score = stronger contender.
- Longshot Models (red)
- Mod1-LS, Mod2-LS, and Mod3-LS trained to find high-value longshots. Higher score = stronger longshot candidate.
- Form Model (blue)
- Mod4 sequence model trained on recent form patterns. Higher score = stronger recent form profile.
- This horse
- Highlighted with a darker column background.
Race Pace Simulation Guide
- Slider
- Drag left→right to advance from gate to finish. Drag all the way back to reset the race.
- Predicted Finish Order
- Factors in contested pace burn, each horse’s effort curve (peaked-early vs. peaked-late), and wide trip cost from outside posts. Updated live when Track Bias changes.
- Pace Scenario
- Lone Speed: single E horse likely rates and holds. Contested: two E horses burn each other — closers benefit. Hot Pace: speed meltdown, deep closers thrive. Soft: no early speed, moderate fractions throughout.
- Track Bias
- Slider below canvas. −2 = strong closer/wet bias; +2 = strong speed/rail bias. Recomputes the predicted finish order.
- Boxed Indicator
- Dashed orange ring = horse is surrounded (rival ahead, rival behind, wall outside). In a real race this horse must find a clear path to run.
- Running Styles
- E/EE = early speed (rushes to rail). P = presser (stalks the pace). S = stalker. SS = slow starter / closer.
| Stat | vs. Current Card | vs. All Horses |
|---|---|---|
| Averages
Career-average metrics across all AI race analysis. Performance and pace averages reflect estimated historical performance; trainer and jockey grades score in-the-money percentages. Grading scale: A = elite • B = above average • C = average • D = below average • F = poor • — = no data |
||
| Pick Pony AI Rating | A | A |
| Pace Trip Longshot | — | — |
| Connections Longshot | — | — |
| Situational Longshot | — | — |
| Speed | B | A |
| Early Pace | C | C |
| Mid Pace | C | B |
| Late Pace | B | A |
| Finish Pos | A | B |
| Dirt Speed | D | A |
| Turf Speed | C | B |
| Distance Speed | A | A |
| Trainer Effectiveness | F | F |
| Jockey Effectiveness | A | A |
| 3rd Party Ratings | A | A |
| Recent
Performance analysis from the horse's recent races, weighted to reflect current form. Sprint and Route FPS (Foot Per Second) measure pace efficiency over the horse's recent sprints and routes respectively. Grading scale: A = elite • B = above average • C = average • D = below average • F = poor • — = no data |
||
| Speed | A | A |
| Early Pace | C | C |
| Mid Pace | D | C |
| Late Pace | A | A |
| Sprint FPS | B | B |
| Route FPS | C | B |
| Trainer Effectiveness | F | F |
| Jockey Effectiveness | A | A |
| 3rd Party Ratings | A | A |
| Predictions
AI-generated projections for the upcoming race, derived from prior AI analysis for speed and pace trends, surface and distance suitability, and current conditions. Grading scale: A = elite • B = above average • C = average • D = below average • F = poor • — = no data |
||
| Speed | C | B |
| Early Pace | C | C |
| Mid Pace | B | B |
| Late Pace | C | C |
Chart Guide (2.0.35)
- Bubbles
- Color = surface: green (turf), brown (dirt), blue (synthetic)
- Top number = finishing position; bottom number in parentheses = starting post position
- Height above line = beaten lengths — closer means a smaller margin
- Border = track conditions: green (FST/GD/FM), yellow (WF/SL/YLD), red (SY/MY/FRZ/SFT/HVY)
- Connecting Line
- Solid = good conditions; dashed = bad conditions
- Line Symbol
- ▲ Triangle = sprint (7f or less); ● Circle = route (more than 7f)
- Days Between Races
- Small number above each bubble (e.g. 19d) = days since the previous race — helps spot freshness, layoffs, and tight scheduling.
- Shaded Band (Bollinger)
- Highlights volatility — a wider band means more variation in recent performance
- Performance Trend
- Straight line showing the overall performance direction — angled up = improving, angled down = declining
- Dashed Reference Line
- AI Opponent = AI analysis class-level par for the race
✓ Positives:(1) Dropping in class today ($25,000 → $16,000). (2) Hot trainer - high ITM rate (48%). (3) Hot jockey — high ITM rate (41%). (4) Track specialist — 4 wins from 11 starts here (36%). (5) Late pace significantly above field median (LP: 88 vs field 80). (6) Closer/presser in a race with pace pressure — ideal race setup for late runners. (7) Strong speed 2 back (83), modest dip last out (73) — form reversal angle, ready to bounce back to top form. (8) Has won at today's distance (1760 yds) within the last 10 starts — proven ability at this trip. (9) Has won at AQU on dirt in the last 10 starts — proven at today's exact track/surface combo. (10) Career-best figure (95) buried in races 4–10 back — 16 pts above race median and 11 pts above recent form — market has forgotten the peak effort. (11) Pick Pony Daily Edge Radar pick — value score 8/10 — angles: Closer in Pace Duel, Hot Trainer, Won Here Before, Hidden Figure, Class Drop, Form Reversal, Late Kick Advantage, Won at This Distance, Track Specialist.
⚠ Concerns:(1) Consider there will be likely pace pressure in this race - multiple E types entered. (2) Trip note from last race: 3-4p trn;7p into lane. (3) Consistently runs wide at the first call (3 of last 5 starts).
Mod1(W): 100 (1/9) Mod2(W): 73 (4/9) Mod3(W): 56 (4/9) Mod1-LS: 0 Mod2-LS: 72 (4/9) Mod3-LS: 56 (5/9) Mod4(Form): 77 (4/9) Win Prob: 52.9% Value Score: 4.07 ★ ML: 5.00 (4/1) Overlay %: -1.40 Fair Odds: 7.62 (7/1) O/U: Fair
Score Definitions
- Mod1(W)
- Winner Model 1 score (0–100) — AI composite rating among field contenders (higher = stronger). The number in parentheses (e.g. 1/9) shows this horse’s rank out of the field size.
- Mod2(W)
- Winner Model 2 score (0–100) — AI rating among field contenders (higher = stronger). The number in parentheses shows rank within the field.
- Mod3(W)
- Winner Model 3 score (0–100) — AI rating among field contenders (higher = stronger). The number in parentheses shows rank within the field.
- Mod1-LS
- Longshot Model 1 score (0–100) — AI model trained to surface high-value longshots. Higher = stronger longshot profile. Rank in parentheses shows position within the field.
- Mod2-LS
- Longshot Model 2 score (0–100) — AI longshot model. Higher = stronger longshot profile.
- Mod3-LS
- Longshot Model 3 score (0–100) — AI longshot model. Higher = stronger longshot profile.
- Mod4(Form)
- Form Model score (0–100) — AI sequence model trained on recent form patterns to capture momentum and trajectory. Higher = stronger recent form profile. Rank in parentheses shows position within the field.
- Win Prob
- LightGBM estimated win probability expressed as a percentage. This is a raw model output, not normalized to sum to 100% across the field — use it for comparison rather than as an absolute probability.
- Value Score
- Win Prob divided by the market-implied probability (derived from morning line). Values above 1.0 mean the model sees more win chance than the odds imply — a ★ star appears when Value Score ≥ 1.3, indicating a 30%+ model edge over the market.
- ML
- Morning line odds set by the track handicapper before wagering opens
- Overlay %
- How much the fair odds exceed the morning line, expressed as a percentage — positive values indicate value
- Fair Odds
- Model-derived fair-value odds based on estimated win probability
- O/U
- Overlay or Underlay — whether the horse offers value (O) or is overbet (U) relative to fair odds
Lane Bias Guide
- Bar Direction
- Bars above the line = more favorable lane • Bars below = less favorable, relative to the average at this track.
- Color
- Green = above-average advantage • Yellow = near-average • Red = below-average • Blue = this horse’s lane.
- Bias Score
- Derived from weighted average finishing positions across historical races at this track. Shown in the tooltip on hover. To use the bias score, calculate your handicap for the horse (e.g. finish position), then add (detrimental bias) or subtract (favorable bias) the bias score.
- Races
- Number of historical races used to compute each lane’s bias score.
Race Pace Bias Guide
- Bar Height & Direction
- Positive (green) = pace favors this horse • Negative (red) = pace works against this horse • Near-zero (amber) = neutral.
- Race Shape
- Projected race shape based on running styles of all horses (e.g. EE = two early horses, EP = one early presser).
- Pace Category
- FAST = contested early pace • LONE EARLY = one speed horse controlling pace • HONEST = moderate early pressure • SLOW = closers’ race.
- Flag (★)
- A star above the bar means this horse’s pace bias figure is ≥ 1.5 — a meaningful pace advantage or disadvantage.
Total Pace Guide
- Bar Segments
- Green = Early Pace (E1) • Amber = Mid Pace (E2) • Red = Late Pace (LP)
- Bar Height
- Total height = sum of E1 + E2 + LP average pace figures. Taller bars indicate a faster-paced horse overall.
- Grades & Rankings
- Hover to see each horse’s letter grade and ranking vs. other horses in this race (e.g. 2/9 = 2nd best of 9).
- Border
- Thicker border = this horse’s post position.
Performance vs. Peers Guide
- Bars (per post)
- Blue = avg career performance • Amber = avg last 3 races • Green = last race (improved vs. avg) • Red = last race (declined vs. avg)
- Trend Line
- Angled line above the bars: rising = improving form • falling = declining form.
- Horizontal Line
- Field average — the mean career performance of all horses in this race.
- Color Circles
- Standard post-position colors below each lane — same as the Total Pace chart.
- Border
- Thicker border = this horse’s post position.
Figure Comparison
- Rating
- The three Pick Pony algorithm ratings (Algo 1, Algo 2, Algo 3) that make up the overall PP AI Rating — higher is a stronger contender rating.
- Speed
- Career average speed, recent 3-race average, and last-race speed figure — spot horses in improving or declining form.
- Pace
- Average Early (E1), Mid (E2), and Stretch (LP) pace figures — reveals pace-setters vs. closers vs. all-the-way types.
- This horse
- The horse whose stats card is open is highlighted with a darker column background.
Winning Profiles
- Axes
- X: Win % from last 10 starts — Y: In-the-money % (top-3 finishes) from last 10 starts.
- Quadrants
- Consistent Winners (top-right): high win & ITM — reliable performers.
Place Threats (top-left): boards often but doesn’t win often — good exacta/trifecta angles.
Streaky (bottom-right): wins occasionally, misses the board often — all-or-nothing.
Developing (bottom-left): still finding form — longshot territory. - Reference Lines
- Dashed lines mark field averages. Dots to the right win more; dots higher board more.
- This horse
- Highlighted with a gold border and larger dot.
AI Model Comparison
- Winner Models (green)
- Mod1(W), Mod2(W), and Mod3(W) trained to predict race winners. Higher score = stronger contender.
- Longshot Models (red)
- Mod1-LS, Mod2-LS, and Mod3-LS trained to find high-value longshots. Higher score = stronger longshot candidate.
- Form Model (blue)
- Mod4 sequence model trained on recent form patterns. Higher score = stronger recent form profile.
- This horse
- Highlighted with a darker column background.
Race Pace Simulation Guide
- Slider
- Drag left→right to advance from gate to finish. Drag all the way back to reset the race.
- Predicted Finish Order
- Factors in contested pace burn, each horse’s effort curve (peaked-early vs. peaked-late), and wide trip cost from outside posts. Updated live when Track Bias changes.
- Pace Scenario
- Lone Speed: single E horse likely rates and holds. Contested: two E horses burn each other — closers benefit. Hot Pace: speed meltdown, deep closers thrive. Soft: no early speed, moderate fractions throughout.
- Track Bias
- Slider below canvas. −2 = strong closer/wet bias; +2 = strong speed/rail bias. Recomputes the predicted finish order.
- Boxed Indicator
- Dashed orange ring = horse is surrounded (rival ahead, rival behind, wall outside). In a real race this horse must find a clear path to run.
- Running Styles
- E/EE = early speed (rushes to rail). P = presser (stalks the pace). S = stalker. SS = slow starter / closer.
| Stat | vs. Current Card | vs. All Horses |
|---|---|---|
| Averages
Career-average metrics across all AI race analysis. Performance and pace averages reflect estimated historical performance; trainer and jockey grades score in-the-money percentages. Grading scale: A = elite • B = above average • C = average • D = below average • F = poor • — = no data |
||
| Pick Pony AI Rating | A | B |
| Pace Trip Longshot | — | — |
| Connections Longshot | — | — |
| Situational Longshot | — | — |
| Speed | A | A |
| Early Pace | C | C |
| Mid Pace | C | B |
| Late Pace | A | A |
| Finish Pos | D | D |
| Dirt Speed | B | A |
| Turf Speed | B | A |
| Distance Speed | C | A |
| Trainer Effectiveness | A | B |
| Jockey Effectiveness | D | C |
| 3rd Party Ratings | C | A |
| Recent
Performance analysis from the horse's recent races, weighted to reflect current form. Sprint and Route FPS (Foot Per Second) measure pace efficiency over the horse's recent sprints and routes respectively. Grading scale: A = elite • B = above average • C = average • D = below average • F = poor • — = no data |
||
| Speed | B | A |
| Early Pace | D | D |
| Mid Pace | D | C |
| Late Pace | A | A |
| Sprint FPS | F | D |
| Route FPS | F | D |
| Trainer Effectiveness | A | B |
| Jockey Effectiveness | D | C |
| 3rd Party Ratings | C | A |
| Predictions
AI-generated projections for the upcoming race, derived from prior AI analysis for speed and pace trends, surface and distance suitability, and current conditions. Grading scale: A = elite • B = above average • C = average • D = below average • F = poor • — = no data |
||
| Speed | A | A |
| Early Pace | C | C |
| Mid Pace | D | B |
| Late Pace | C | C |
Chart Guide (2.0.35)
- Bubbles
- Color = surface: green (turf), brown (dirt), blue (synthetic)
- Top number = finishing position; bottom number in parentheses = starting post position
- Height above line = beaten lengths — closer means a smaller margin
- Border = track conditions: green (FST/GD/FM), yellow (WF/SL/YLD), red (SY/MY/FRZ/SFT/HVY)
- Connecting Line
- Solid = good conditions; dashed = bad conditions
- Line Symbol
- ▲ Triangle = sprint (7f or less); ● Circle = route (more than 7f)
- Days Between Races
- Small number above each bubble (e.g. 19d) = days since the previous race — helps spot freshness, layoffs, and tight scheduling.
- Shaded Band (Bollinger)
- Highlights volatility — a wider band means more variation in recent performance
- Performance Trend
- Straight line showing the overall performance direction — angled up = improving, angled down = declining
- Dashed Reference Line
- AI Opponent = AI analysis class-level par for the race
✓ Positives:(1) Hot trainer - high ITM rate (43%). (2) Hot jockey — high ITM rate (42%). (3) In the money in last 3 consecutive starts. (4) Track specialist — 3 wins from 7 starts here (43%). (5) Has won at today's distance (1760 yds) within the last 10 starts — proven ability at this trip. (6) Outstanding wet-track record: 2W from 5 starts (40%) — thrives when the going is off. (7) Has won at AQU on dirt in the last 10 starts — proven at today's exact track/surface combo. (8) Had documented trouble last race (codes: ['D', 'L', 'O', 'T', 'U']) yet still finished 1st — a clean trip today sets up a form reversal. (9) Pick Pony Daily Edge Radar pick — value score 9/10 — angles: Consistent In-The-Money, Troubled Trip Comeback, Won Here Before, Off-Track Ace, Won at This Distance, Track Specialist.
⚠ Concerns:(1) Rising in class today ($12,500 → $16,000). (2) Was claimed from its most recent race - new connections. (3) Consider there will be likely pace pressure in this race - multiple E types entered. (4) Moving from a sprint to a route today. (5) Trip note from last race: Out;2p turn;lead3/16. (6) Post 7 in a 10-horse dirt sprint — wide draw forces extra ground and a difficult first-turn path.
Mod1(W): 0 Mod2(W): 13 (8/9) Mod3(W): 0 Mod1-LS: 87 (4/9) Mod2-LS: 10 (8/9) Mod3-LS: 30 (6/9) Mod4(Form): 0 Win Prob: 17% Value Score: 4.58 ★ ML: 20.00 (20/1) Overlay %: 2.03 Fair Odds: 16.41 (15/1) O/U: Overlay
Score Definitions
- Mod1(W)
- Winner Model 1 score (0–100) — AI composite rating among field contenders (higher = stronger). The number in parentheses (e.g. 1/9) shows this horse’s rank out of the field size.
- Mod2(W)
- Winner Model 2 score (0–100) — AI rating among field contenders (higher = stronger). The number in parentheses shows rank within the field.
- Mod3(W)
- Winner Model 3 score (0–100) — AI rating among field contenders (higher = stronger). The number in parentheses shows rank within the field.
- Mod1-LS
- Longshot Model 1 score (0–100) — AI model trained to surface high-value longshots. Higher = stronger longshot profile. Rank in parentheses shows position within the field.
- Mod2-LS
- Longshot Model 2 score (0–100) — AI longshot model. Higher = stronger longshot profile.
- Mod3-LS
- Longshot Model 3 score (0–100) — AI longshot model. Higher = stronger longshot profile.
- Mod4(Form)
- Form Model score (0–100) — AI sequence model trained on recent form patterns to capture momentum and trajectory. Higher = stronger recent form profile. Rank in parentheses shows position within the field.
- Win Prob
- LightGBM estimated win probability expressed as a percentage. This is a raw model output, not normalized to sum to 100% across the field — use it for comparison rather than as an absolute probability.
- Value Score
- Win Prob divided by the market-implied probability (derived from morning line). Values above 1.0 mean the model sees more win chance than the odds imply — a ★ star appears when Value Score ≥ 1.3, indicating a 30%+ model edge over the market.
- ML
- Morning line odds set by the track handicapper before wagering opens
- Overlay %
- How much the fair odds exceed the morning line, expressed as a percentage — positive values indicate value
- Fair Odds
- Model-derived fair-value odds based on estimated win probability
- O/U
- Overlay or Underlay — whether the horse offers value (O) or is overbet (U) relative to fair odds
Lane Bias Guide
- Bar Direction
- Bars above the line = more favorable lane • Bars below = less favorable, relative to the average at this track.
- Color
- Green = above-average advantage • Yellow = near-average • Red = below-average • Blue = this horse’s lane.
- Bias Score
- Derived from weighted average finishing positions across historical races at this track. Shown in the tooltip on hover. To use the bias score, calculate your handicap for the horse (e.g. finish position), then add (detrimental bias) or subtract (favorable bias) the bias score.
- Races
- Number of historical races used to compute each lane’s bias score.
Race Pace Bias Guide
- Bar Height & Direction
- Positive (green) = pace favors this horse • Negative (red) = pace works against this horse • Near-zero (amber) = neutral.
- Race Shape
- Projected race shape based on running styles of all horses (e.g. EE = two early horses, EP = one early presser).
- Pace Category
- FAST = contested early pace • LONE EARLY = one speed horse controlling pace • HONEST = moderate early pressure • SLOW = closers’ race.
- Flag (★)
- A star above the bar means this horse’s pace bias figure is ≥ 1.5 — a meaningful pace advantage or disadvantage.
Total Pace Guide
- Bar Segments
- Green = Early Pace (E1) • Amber = Mid Pace (E2) • Red = Late Pace (LP)
- Bar Height
- Total height = sum of E1 + E2 + LP average pace figures. Taller bars indicate a faster-paced horse overall.
- Grades & Rankings
- Hover to see each horse’s letter grade and ranking vs. other horses in this race (e.g. 2/9 = 2nd best of 9).
- Border
- Thicker border = this horse’s post position.
Performance vs. Peers Guide
- Bars (per post)
- Blue = avg career performance • Amber = avg last 3 races • Green = last race (improved vs. avg) • Red = last race (declined vs. avg)
- Trend Line
- Angled line above the bars: rising = improving form • falling = declining form.
- Horizontal Line
- Field average — the mean career performance of all horses in this race.
- Color Circles
- Standard post-position colors below each lane — same as the Total Pace chart.
- Border
- Thicker border = this horse’s post position.
Figure Comparison
- Rating
- The three Pick Pony algorithm ratings (Algo 1, Algo 2, Algo 3) that make up the overall PP AI Rating — higher is a stronger contender rating.
- Speed
- Career average speed, recent 3-race average, and last-race speed figure — spot horses in improving or declining form.
- Pace
- Average Early (E1), Mid (E2), and Stretch (LP) pace figures — reveals pace-setters vs. closers vs. all-the-way types.
- This horse
- The horse whose stats card is open is highlighted with a darker column background.
Winning Profiles
- Axes
- X: Win % from last 10 starts — Y: In-the-money % (top-3 finishes) from last 10 starts.
- Quadrants
- Consistent Winners (top-right): high win & ITM — reliable performers.
Place Threats (top-left): boards often but doesn’t win often — good exacta/trifecta angles.
Streaky (bottom-right): wins occasionally, misses the board often — all-or-nothing.
Developing (bottom-left): still finding form — longshot territory. - Reference Lines
- Dashed lines mark field averages. Dots to the right win more; dots higher board more.
- This horse
- Highlighted with a gold border and larger dot.
AI Model Comparison
- Winner Models (green)
- Mod1(W), Mod2(W), and Mod3(W) trained to predict race winners. Higher score = stronger contender.
- Longshot Models (red)
- Mod1-LS, Mod2-LS, and Mod3-LS trained to find high-value longshots. Higher score = stronger longshot candidate.
- Form Model (blue)
- Mod4 sequence model trained on recent form patterns. Higher score = stronger recent form profile.
- This horse
- Highlighted with a darker column background.
Race Pace Simulation Guide
- Slider
- Drag left→right to advance from gate to finish. Drag all the way back to reset the race.
- Predicted Finish Order
- Factors in contested pace burn, each horse’s effort curve (peaked-early vs. peaked-late), and wide trip cost from outside posts. Updated live when Track Bias changes.
- Pace Scenario
- Lone Speed: single E horse likely rates and holds. Contested: two E horses burn each other — closers benefit. Hot Pace: speed meltdown, deep closers thrive. Soft: no early speed, moderate fractions throughout.
- Track Bias
- Slider below canvas. −2 = strong closer/wet bias; +2 = strong speed/rail bias. Recomputes the predicted finish order.
- Boxed Indicator
- Dashed orange ring = horse is surrounded (rival ahead, rival behind, wall outside). In a real race this horse must find a clear path to run.
- Running Styles
- E/EE = early speed (rushes to rail). P = presser (stalks the pace). S = stalker. SS = slow starter / closer.
| Stat | vs. Current Card | vs. All Horses |
|---|---|---|
| Averages
Career-average metrics across all AI race analysis. Performance and pace averages reflect estimated historical performance; trainer and jockey grades score in-the-money percentages. Grading scale: A = elite • B = above average • C = average • D = below average • F = poor • — = no data |
||
| Pick Pony AI Rating | F | F |
| Pace Trip Longshot | — | — |
| Connections Longshot | — | — |
| Situational Longshot | — | — |
| Speed | F | B |
| Early Pace | B | B |
| Mid Pace | B | B |
| Late Pace | C | B |
| Finish Pos | A | B |
| Dirt Speed | F | B |
| Turf Speed | F | D |
| Distance Speed | F | C |
| Trainer Effectiveness | C | C |
| Jockey Effectiveness | C | B |
| 3rd Party Ratings | B | A |
| Recent
Performance analysis from the horse's recent races, weighted to reflect current form. Sprint and Route FPS (Foot Per Second) measure pace efficiency over the horse's recent sprints and routes respectively. Grading scale: A = elite • B = above average • C = average • D = below average • F = poor • — = no data |
||
| Speed | B | A |
| Early Pace | A | B |
| Mid Pace | A | A |
| Late Pace | B | B |
| Sprint FPS | C | B |
| Route FPS | B | B |
| Trainer Effectiveness | C | C |
| Jockey Effectiveness | C | B |
| 3rd Party Ratings | B | A |
| Predictions
AI-generated projections for the upcoming race, derived from prior AI analysis for speed and pace trends, surface and distance suitability, and current conditions. Grading scale: A = elite • B = above average • C = average • D = below average • F = poor • — = no data |
||
| Speed | F | B |
| Early Pace | B | B |
| Mid Pace | B | B |
| Late Pace | C | C |
Chart Guide (2.0.35)
- Bubbles
- Color = surface: green (turf), brown (dirt), blue (synthetic)
- Top number = finishing position; bottom number in parentheses = starting post position
- Height above line = beaten lengths — closer means a smaller margin
- Border = track conditions: green (FST/GD/FM), yellow (WF/SL/YLD), red (SY/MY/FRZ/SFT/HVY)
- Connecting Line
- Solid = good conditions; dashed = bad conditions
- Line Symbol
- ▲ Triangle = sprint (7f or less); ● Circle = route (more than 7f)
- Days Between Races
- Small number above each bubble (e.g. 19d) = days since the previous race — helps spot freshness, layoffs, and tight scheduling.
- Shaded Band (Bollinger)
- Highlights volatility — a wider band means more variation in recent performance
- Performance Trend
- Straight line showing the overall performance direction — angled up = improving, angled down = declining
- Dashed Reference Line
- AI Opponent = AI analysis class-level par for the race
✓ Positives:(1) Dropping in class today ($30,000 → $16,000). (2) Hot trainer - high ITM rate (46%). (3) Hot jockey — high ITM rate (52%). (4) Late pace significantly above field median (LP: 92 vs field 80). (5) Closer/presser in a race with pace pressure — ideal race setup for late runners. (6) Fourth race back from a 77-day layoff — often the peak fitness race. (7) Has won at today's distance (1760 yds) within the last 10 starts — proven ability at this trip. (8) Had documented trouble last race (codes: ['F', 'L', 'O', 'S']) yet still finished 3rd — a clean trip today sets up a form reversal. (9) Pick Pony Daily Edge Radar pick — value score 7/10 — angles: Closer in Pace Duel, Hot Jockey, Troubled Trip Comeback, Class Drop, Late Kick Advantage, Won at This Distance, Classic Fourth Race Pattern.
⚠ Concerns:(1) Consider there will be likely pace pressure in this race - multiple E types entered. (2) Trip note from last race: Off slow;5-6p;8p3/16. (3) Outside post (8) in a large field of 10 horses. (4) Post 8 in a 10-horse dirt sprint — wide draw forces extra ground and a difficult first-turn path.
Mod1(W): 14 (7/9) Mod2(W): 37 (7/9) Mod3(W): 28 (7/9) Mod1-LS: 90 (3/9) Mod2-LS: 19 (7/9) Mod3-LS: 64 (3/9) Mod4(Form): 31 (7/9) Win Prob: 22.5% Value Score: 3.18 ★ ML: 10.00 (9/1) Overlay %: 1.72 Fair Odds: 10.35 (9/1) O/U: Overlay
Score Definitions
- Mod1(W)
- Winner Model 1 score (0–100) — AI composite rating among field contenders (higher = stronger). The number in parentheses (e.g. 1/9) shows this horse’s rank out of the field size.
- Mod2(W)
- Winner Model 2 score (0–100) — AI rating among field contenders (higher = stronger). The number in parentheses shows rank within the field.
- Mod3(W)
- Winner Model 3 score (0–100) — AI rating among field contenders (higher = stronger). The number in parentheses shows rank within the field.
- Mod1-LS
- Longshot Model 1 score (0–100) — AI model trained to surface high-value longshots. Higher = stronger longshot profile. Rank in parentheses shows position within the field.
- Mod2-LS
- Longshot Model 2 score (0–100) — AI longshot model. Higher = stronger longshot profile.
- Mod3-LS
- Longshot Model 3 score (0–100) — AI longshot model. Higher = stronger longshot profile.
- Mod4(Form)
- Form Model score (0–100) — AI sequence model trained on recent form patterns to capture momentum and trajectory. Higher = stronger recent form profile. Rank in parentheses shows position within the field.
- Win Prob
- LightGBM estimated win probability expressed as a percentage. This is a raw model output, not normalized to sum to 100% across the field — use it for comparison rather than as an absolute probability.
- Value Score
- Win Prob divided by the market-implied probability (derived from morning line). Values above 1.0 mean the model sees more win chance than the odds imply — a ★ star appears when Value Score ≥ 1.3, indicating a 30%+ model edge over the market.
- ML
- Morning line odds set by the track handicapper before wagering opens
- Overlay %
- How much the fair odds exceed the morning line, expressed as a percentage — positive values indicate value
- Fair Odds
- Model-derived fair-value odds based on estimated win probability
- O/U
- Overlay or Underlay — whether the horse offers value (O) or is overbet (U) relative to fair odds
Lane Bias Guide
- Bar Direction
- Bars above the line = more favorable lane • Bars below = less favorable, relative to the average at this track.
- Color
- Green = above-average advantage • Yellow = near-average • Red = below-average • Blue = this horse’s lane.
- Bias Score
- Derived from weighted average finishing positions across historical races at this track. Shown in the tooltip on hover. To use the bias score, calculate your handicap for the horse (e.g. finish position), then add (detrimental bias) or subtract (favorable bias) the bias score.
- Races
- Number of historical races used to compute each lane’s bias score.
Race Pace Bias Guide
- Bar Height & Direction
- Positive (green) = pace favors this horse • Negative (red) = pace works against this horse • Near-zero (amber) = neutral.
- Race Shape
- Projected race shape based on running styles of all horses (e.g. EE = two early horses, EP = one early presser).
- Pace Category
- FAST = contested early pace • LONE EARLY = one speed horse controlling pace • HONEST = moderate early pressure • SLOW = closers’ race.
- Flag (★)
- A star above the bar means this horse’s pace bias figure is ≥ 1.5 — a meaningful pace advantage or disadvantage.
Total Pace Guide
- Bar Segments
- Green = Early Pace (E1) • Amber = Mid Pace (E2) • Red = Late Pace (LP)
- Bar Height
- Total height = sum of E1 + E2 + LP average pace figures. Taller bars indicate a faster-paced horse overall.
- Grades & Rankings
- Hover to see each horse’s letter grade and ranking vs. other horses in this race (e.g. 2/9 = 2nd best of 9).
- Border
- Thicker border = this horse’s post position.
Performance vs. Peers Guide
- Bars (per post)
- Blue = avg career performance • Amber = avg last 3 races • Green = last race (improved vs. avg) • Red = last race (declined vs. avg)
- Trend Line
- Angled line above the bars: rising = improving form • falling = declining form.
- Horizontal Line
- Field average — the mean career performance of all horses in this race.
- Color Circles
- Standard post-position colors below each lane — same as the Total Pace chart.
- Border
- Thicker border = this horse’s post position.
Figure Comparison
- Rating
- The three Pick Pony algorithm ratings (Algo 1, Algo 2, Algo 3) that make up the overall PP AI Rating — higher is a stronger contender rating.
- Speed
- Career average speed, recent 3-race average, and last-race speed figure — spot horses in improving or declining form.
- Pace
- Average Early (E1), Mid (E2), and Stretch (LP) pace figures — reveals pace-setters vs. closers vs. all-the-way types.
- This horse
- The horse whose stats card is open is highlighted with a darker column background.
Winning Profiles
- Axes
- X: Win % from last 10 starts — Y: In-the-money % (top-3 finishes) from last 10 starts.
- Quadrants
- Consistent Winners (top-right): high win & ITM — reliable performers.
Place Threats (top-left): boards often but doesn’t win often — good exacta/trifecta angles.
Streaky (bottom-right): wins occasionally, misses the board often — all-or-nothing.
Developing (bottom-left): still finding form — longshot territory. - Reference Lines
- Dashed lines mark field averages. Dots to the right win more; dots higher board more.
- This horse
- Highlighted with a gold border and larger dot.
AI Model Comparison
- Winner Models (green)
- Mod1(W), Mod2(W), and Mod3(W) trained to predict race winners. Higher score = stronger contender.
- Longshot Models (red)
- Mod1-LS, Mod2-LS, and Mod3-LS trained to find high-value longshots. Higher score = stronger longshot candidate.
- Form Model (blue)
- Mod4 sequence model trained on recent form patterns. Higher score = stronger recent form profile.
- This horse
- Highlighted with a darker column background.
Race Pace Simulation Guide
- Slider
- Drag left→right to advance from gate to finish. Drag all the way back to reset the race.
- Predicted Finish Order
- Factors in contested pace burn, each horse’s effort curve (peaked-early vs. peaked-late), and wide trip cost from outside posts. Updated live when Track Bias changes.
- Pace Scenario
- Lone Speed: single E horse likely rates and holds. Contested: two E horses burn each other — closers benefit. Hot Pace: speed meltdown, deep closers thrive. Soft: no early speed, moderate fractions throughout.
- Track Bias
- Slider below canvas. −2 = strong closer/wet bias; +2 = strong speed/rail bias. Recomputes the predicted finish order.
- Boxed Indicator
- Dashed orange ring = horse is surrounded (rival ahead, rival behind, wall outside). In a real race this horse must find a clear path to run.
- Running Styles
- E/EE = early speed (rushes to rail). P = presser (stalks the pace). S = stalker. SS = slow starter / closer.
| Stat | vs. Current Card | vs. All Horses |
|---|---|---|
| Averages
Career-average metrics across all AI race analysis. Performance and pace averages reflect estimated historical performance; trainer and jockey grades score in-the-money percentages. Grading scale: A = elite • B = above average • C = average • D = below average • F = poor • — = no data |
||
| Pick Pony AI Rating | C | C |
| Pace Trip Longshot | — | — |
| Connections Longshot | — | — |
| Situational Longshot | — | — |
| Speed | A | A |
| Early Pace | F | D |
| Mid Pace | F | D |
| Late Pace | A | A |
| Finish Pos | B | B |
| Dirt Speed | D | A |
| Turf Speed | B | A |
| Distance Speed | C | A |
| Trainer Effectiveness | C | B |
| Jockey Effectiveness | A | A |
| 3rd Party Ratings | D | B |
| Recent
Performance analysis from the horse's recent races, weighted to reflect current form. Sprint and Route FPS (Foot Per Second) measure pace efficiency over the horse's recent sprints and routes respectively. Grading scale: A = elite • B = above average • C = average • D = below average • F = poor • — = no data |
||
| Speed | C | B |
| Early Pace | F | D |
| Mid Pace | F | D |
| Late Pace | A | A |
| Sprint FPS | D | D |
| Route FPS | D | C |
| Trainer Effectiveness | C | B |
| Jockey Effectiveness | A | A |
| 3rd Party Ratings | D | B |
| Predictions
AI-generated projections for the upcoming race, derived from prior AI analysis for speed and pace trends, surface and distance suitability, and current conditions. Grading scale: A = elite • B = above average • C = average • D = below average • F = poor • — = no data |
||
| Speed | B | A |
| Early Pace | F | D |
| Mid Pace | F | D |
| Late Pace | C | C |
Chart Guide (2.0.35)
- Bubbles
- Color = surface: green (turf), brown (dirt), blue (synthetic)
- Top number = finishing position; bottom number in parentheses = starting post position
- Height above line = beaten lengths — closer means a smaller margin
- Border = track conditions: green (FST/GD/FM), yellow (WF/SL/YLD), red (SY/MY/FRZ/SFT/HVY)
- Connecting Line
- Solid = good conditions; dashed = bad conditions
- Line Symbol
- ▲ Triangle = sprint (7f or less); ● Circle = route (more than 7f)
- Days Between Races
- Small number above each bubble (e.g. 19d) = days since the previous race — helps spot freshness, layoffs, and tight scheduling.
- Shaded Band (Bollinger)
- Highlights volatility — a wider band means more variation in recent performance
- Performance Trend
- Straight line showing the overall performance direction — angled up = improving, angled down = declining
- Dashed Reference Line
- AI Opponent = AI analysis class-level par for the race
✓ Positives:(1) Hot trainer - high ITM rate (47%). (2) Hot jockey — high ITM rate (39%). (3) Has won at today's distance (1760 yds) within the last 10 starts — proven ability at this trip. (4) Has won at AQU on dirt in the last 10 starts — proven at today's exact track/surface combo. (5) Career-best figure (90) buried in races 4–10 back — 11 pts above race median and 5 pts above recent form — market has forgotten the peak effort. (6) Pick Pony Daily Edge Radar pick — value score 5/10 — angles: Won Here Before, Hidden Figure, Won at This Distance.
⚠ Concerns:(1) Consider there will be likely pace pressure in this race - multiple E types entered. (2) Tends to fade in the stretch at similar distances (8 of 10 starts). (3) Trip note from last race: Outside;3p turn;faded. (4) Outside post (9) in a large field of 10 horses. (5) Post 9 in a 10-horse dirt sprint — wide draw forces extra ground and a difficult first-turn path.
Mod1(W): 31 (6/9) Mod2(W): 44 (6/9) Mod3(W): 37 (6/9) Mod1-LS: 100 (1/9) Mod2-LS: 43 (6/9) Mod3-LS: 27 (7/9) Mod4(Form): 31 (6/9) Win Prob: 37.7% Value Score: 5.32 ★ ML: 10.00 (9/1) Overlay %: 2.59 Fair Odds: 9.34 (8/1) O/U: Overlay
Score Definitions
- Mod1(W)
- Winner Model 1 score (0–100) — AI composite rating among field contenders (higher = stronger). The number in parentheses (e.g. 1/9) shows this horse’s rank out of the field size.
- Mod2(W)
- Winner Model 2 score (0–100) — AI rating among field contenders (higher = stronger). The number in parentheses shows rank within the field.
- Mod3(W)
- Winner Model 3 score (0–100) — AI rating among field contenders (higher = stronger). The number in parentheses shows rank within the field.
- Mod1-LS
- Longshot Model 1 score (0–100) — AI model trained to surface high-value longshots. Higher = stronger longshot profile. Rank in parentheses shows position within the field.
- Mod2-LS
- Longshot Model 2 score (0–100) — AI longshot model. Higher = stronger longshot profile.
- Mod3-LS
- Longshot Model 3 score (0–100) — AI longshot model. Higher = stronger longshot profile.
- Mod4(Form)
- Form Model score (0–100) — AI sequence model trained on recent form patterns to capture momentum and trajectory. Higher = stronger recent form profile. Rank in parentheses shows position within the field.
- Win Prob
- LightGBM estimated win probability expressed as a percentage. This is a raw model output, not normalized to sum to 100% across the field — use it for comparison rather than as an absolute probability.
- Value Score
- Win Prob divided by the market-implied probability (derived from morning line). Values above 1.0 mean the model sees more win chance than the odds imply — a ★ star appears when Value Score ≥ 1.3, indicating a 30%+ model edge over the market.
- ML
- Morning line odds set by the track handicapper before wagering opens
- Overlay %
- How much the fair odds exceed the morning line, expressed as a percentage — positive values indicate value
- Fair Odds
- Model-derived fair-value odds based on estimated win probability
- O/U
- Overlay or Underlay — whether the horse offers value (O) or is overbet (U) relative to fair odds
Lane Bias Guide
- Bar Direction
- Bars above the line = more favorable lane • Bars below = less favorable, relative to the average at this track.
- Color
- Green = above-average advantage • Yellow = near-average • Red = below-average • Blue = this horse’s lane.
- Bias Score
- Derived from weighted average finishing positions across historical races at this track. Shown in the tooltip on hover. To use the bias score, calculate your handicap for the horse (e.g. finish position), then add (detrimental bias) or subtract (favorable bias) the bias score.
- Races
- Number of historical races used to compute each lane’s bias score.
Race Pace Bias Guide
- Bar Height & Direction
- Positive (green) = pace favors this horse • Negative (red) = pace works against this horse • Near-zero (amber) = neutral.
- Race Shape
- Projected race shape based on running styles of all horses (e.g. EE = two early horses, EP = one early presser).
- Pace Category
- FAST = contested early pace • LONE EARLY = one speed horse controlling pace • HONEST = moderate early pressure • SLOW = closers’ race.
- Flag (★)
- A star above the bar means this horse’s pace bias figure is ≥ 1.5 — a meaningful pace advantage or disadvantage.
Total Pace Guide
- Bar Segments
- Green = Early Pace (E1) • Amber = Mid Pace (E2) • Red = Late Pace (LP)
- Bar Height
- Total height = sum of E1 + E2 + LP average pace figures. Taller bars indicate a faster-paced horse overall.
- Grades & Rankings
- Hover to see each horse’s letter grade and ranking vs. other horses in this race (e.g. 2/9 = 2nd best of 9).
- Border
- Thicker border = this horse’s post position.
Performance vs. Peers Guide
- Bars (per post)
- Blue = avg career performance • Amber = avg last 3 races • Green = last race (improved vs. avg) • Red = last race (declined vs. avg)
- Trend Line
- Angled line above the bars: rising = improving form • falling = declining form.
- Horizontal Line
- Field average — the mean career performance of all horses in this race.
- Color Circles
- Standard post-position colors below each lane — same as the Total Pace chart.
- Border
- Thicker border = this horse’s post position.
Figure Comparison
- Rating
- The three Pick Pony algorithm ratings (Algo 1, Algo 2, Algo 3) that make up the overall PP AI Rating — higher is a stronger contender rating.
- Speed
- Career average speed, recent 3-race average, and last-race speed figure — spot horses in improving or declining form.
- Pace
- Average Early (E1), Mid (E2), and Stretch (LP) pace figures — reveals pace-setters vs. closers vs. all-the-way types.
- This horse
- The horse whose stats card is open is highlighted with a darker column background.
Winning Profiles
- Axes
- X: Win % from last 10 starts — Y: In-the-money % (top-3 finishes) from last 10 starts.
- Quadrants
- Consistent Winners (top-right): high win & ITM — reliable performers.
Place Threats (top-left): boards often but doesn’t win often — good exacta/trifecta angles.
Streaky (bottom-right): wins occasionally, misses the board often — all-or-nothing.
Developing (bottom-left): still finding form — longshot territory. - Reference Lines
- Dashed lines mark field averages. Dots to the right win more; dots higher board more.
- This horse
- Highlighted with a gold border and larger dot.
AI Model Comparison
- Winner Models (green)
- Mod1(W), Mod2(W), and Mod3(W) trained to predict race winners. Higher score = stronger contender.
- Longshot Models (red)
- Mod1-LS, Mod2-LS, and Mod3-LS trained to find high-value longshots. Higher score = stronger longshot candidate.
- Form Model (blue)
- Mod4 sequence model trained on recent form patterns. Higher score = stronger recent form profile.
- This horse
- Highlighted with a darker column background.
Race Pace Simulation Guide
- Slider
- Drag left→right to advance from gate to finish. Drag all the way back to reset the race.
- Predicted Finish Order
- Factors in contested pace burn, each horse’s effort curve (peaked-early vs. peaked-late), and wide trip cost from outside posts. Updated live when Track Bias changes.
- Pace Scenario
- Lone Speed: single E horse likely rates and holds. Contested: two E horses burn each other — closers benefit. Hot Pace: speed meltdown, deep closers thrive. Soft: no early speed, moderate fractions throughout.
- Track Bias
- Slider below canvas. −2 = strong closer/wet bias; +2 = strong speed/rail bias. Recomputes the predicted finish order.
- Boxed Indicator
- Dashed orange ring = horse is surrounded (rival ahead, rival behind, wall outside). In a real race this horse must find a clear path to run.
- Running Styles
- E/EE = early speed (rushes to rail). P = presser (stalks the pace). S = stalker. SS = slow starter / closer.
| Stat | vs. Current Card | vs. All Horses |
|---|---|---|
| Averages
Career-average metrics across all AI race analysis. Performance and pace averages reflect estimated historical performance; trainer and jockey grades score in-the-money percentages. Grading scale: A = elite • B = above average • C = average • D = below average • F = poor • — = no data |
||
| Pick Pony AI Rating | C | B |
| Pace Trip Longshot | — | — |
| Connections Longshot | — | — |
| Situational Longshot | — | — |
| Speed | C | B |
| Early Pace | A | B |
| Mid Pace | A | A |
| Late Pace | F | C |
| Finish Pos | F | D |
| Dirt Speed | A | A |
| Turf Speed | A | A |
| Distance Speed | A | A |
| Trainer Effectiveness | B | B |
| Jockey Effectiveness | D | C |
| 3rd Party Ratings | C | A |
| Recent
Performance analysis from the horse's recent races, weighted to reflect current form. Sprint and Route FPS (Foot Per Second) measure pace efficiency over the horse's recent sprints and routes respectively. Grading scale: A = elite • B = above average • C = average • D = below average • F = poor • — = no data |
||
| Speed | D | B |
| Early Pace | A | B |
| Mid Pace | A | A |
| Late Pace | D | C |
| Sprint FPS | A | A |
| Route FPS | A | A |
| Trainer Effectiveness | B | B |
| Jockey Effectiveness | D | C |
| 3rd Party Ratings | C | A |
| Predictions
AI-generated projections for the upcoming race, derived from prior AI analysis for speed and pace trends, surface and distance suitability, and current conditions. Grading scale: A = elite • B = above average • C = average • D = below average • F = poor • — = no data |
||
| Speed | A | A |
| Early Pace | A | B |
| Mid Pace | A | A |
| Late Pace | C | C |
Chart Guide (2.0.35)
- Bubbles
- Color = surface: green (turf), brown (dirt), blue (synthetic)
- Top number = finishing position; bottom number in parentheses = starting post position
- Height above line = beaten lengths — closer means a smaller margin
- Border = track conditions: green (FST/GD/FM), yellow (WF/SL/YLD), red (SY/MY/FRZ/SFT/HVY)
- Connecting Line
- Solid = good conditions; dashed = bad conditions
- Line Symbol
- ▲ Triangle = sprint (7f or less); ● Circle = route (more than 7f)
- Days Between Races
- Small number above each bubble (e.g. 19d) = days since the previous race — helps spot freshness, layoffs, and tight scheduling.
- Shaded Band (Bollinger)
- Highlights volatility — a wider band means more variation in recent performance
- Performance Trend
- Straight line showing the overall performance direction — angled up = improving, angled down = declining
- Dashed Reference Line
- AI Opponent = AI analysis class-level par for the race
✓ Positives:(1) Returning from 61-day layoff with a recent workout. (2) Hot trainer - high ITM rate (40%). (3) Hot jockey — high ITM rate (50%). (4) Has won at today's distance (1760 yds) within the last 10 starts — proven ability at this trip. (5) Has won at AQU on dirt in the last 10 starts — proven at today's exact track/surface combo. (6) Had documented trouble last race (codes: ['D', 'S', 'T', 'U']) yet still finished 3rd — a clean trip today sets up a form reversal. (7) Pick Pony Daily Edge Radar pick — value score 6/10 — angles: Troubled Trip Comeback, Won Here Before, Won at This Distance.
⚠ Concerns:(1) Has not raced in 61 days. (2) Was claimed from its most recent race - new connections. (3) Consider there will be likely pace pressure in this race - multiple E types entered. (4) Trip note from last race: Keen 1st turn; wknd. (5) Consistently breaks behind post position (3 of last 5 starts). (6) Outside post (10) in a large field of 10 horses. (7) Has not won in last 10 starts despite career wins. (8) Post 10 in a 10-horse dirt sprint — wide draw forces extra ground and a difficult first-turn path.
Mod1(W): 13 (8/9) Mod2(W): 1 (9/9) Mod3(W): 0 (9/9) Mod1-LS: 80 (5/9) Mod2-LS: 3 (9/9) Mod3-LS: 9 (9/9) Mod4(Form): 23 (8/9) Win Prob: 16% Value Score: 2.67 ★ ML: 12.00 (10/1) Overlay %: 1.61 Fair Odds: 12.14 (12/1) O/U: Overlay
Score Definitions
- Mod1(W)
- Winner Model 1 score (0–100) — AI composite rating among field contenders (higher = stronger). The number in parentheses (e.g. 1/9) shows this horse’s rank out of the field size.
- Mod2(W)
- Winner Model 2 score (0–100) — AI rating among field contenders (higher = stronger). The number in parentheses shows rank within the field.
- Mod3(W)
- Winner Model 3 score (0–100) — AI rating among field contenders (higher = stronger). The number in parentheses shows rank within the field.
- Mod1-LS
- Longshot Model 1 score (0–100) — AI model trained to surface high-value longshots. Higher = stronger longshot profile. Rank in parentheses shows position within the field.
- Mod2-LS
- Longshot Model 2 score (0–100) — AI longshot model. Higher = stronger longshot profile.
- Mod3-LS
- Longshot Model 3 score (0–100) — AI longshot model. Higher = stronger longshot profile.
- Mod4(Form)
- Form Model score (0–100) — AI sequence model trained on recent form patterns to capture momentum and trajectory. Higher = stronger recent form profile. Rank in parentheses shows position within the field.
- Win Prob
- LightGBM estimated win probability expressed as a percentage. This is a raw model output, not normalized to sum to 100% across the field — use it for comparison rather than as an absolute probability.
- Value Score
- Win Prob divided by the market-implied probability (derived from morning line). Values above 1.0 mean the model sees more win chance than the odds imply — a ★ star appears when Value Score ≥ 1.3, indicating a 30%+ model edge over the market.
- ML
- Morning line odds set by the track handicapper before wagering opens
- Overlay %
- How much the fair odds exceed the morning line, expressed as a percentage — positive values indicate value
- Fair Odds
- Model-derived fair-value odds based on estimated win probability
- O/U
- Overlay or Underlay — whether the horse offers value (O) or is overbet (U) relative to fair odds
Lane Bias Guide
- Bar Direction
- Bars above the line = more favorable lane • Bars below = less favorable, relative to the average at this track.
- Color
- Green = above-average advantage • Yellow = near-average • Red = below-average • Blue = this horse’s lane.
- Bias Score
- Derived from weighted average finishing positions across historical races at this track. Shown in the tooltip on hover. To use the bias score, calculate your handicap for the horse (e.g. finish position), then add (detrimental bias) or subtract (favorable bias) the bias score.
- Races
- Number of historical races used to compute each lane’s bias score.
Race Pace Bias Guide
- Bar Height & Direction
- Positive (green) = pace favors this horse • Negative (red) = pace works against this horse • Near-zero (amber) = neutral.
- Race Shape
- Projected race shape based on running styles of all horses (e.g. EE = two early horses, EP = one early presser).
- Pace Category
- FAST = contested early pace • LONE EARLY = one speed horse controlling pace • HONEST = moderate early pressure • SLOW = closers’ race.
- Flag (★)
- A star above the bar means this horse’s pace bias figure is ≥ 1.5 — a meaningful pace advantage or disadvantage.
Total Pace Guide
- Bar Segments
- Green = Early Pace (E1) • Amber = Mid Pace (E2) • Red = Late Pace (LP)
- Bar Height
- Total height = sum of E1 + E2 + LP average pace figures. Taller bars indicate a faster-paced horse overall.
- Grades & Rankings
- Hover to see each horse’s letter grade and ranking vs. other horses in this race (e.g. 2/9 = 2nd best of 9).
- Border
- Thicker border = this horse’s post position.
Performance vs. Peers Guide
- Bars (per post)
- Blue = avg career performance • Amber = avg last 3 races • Green = last race (improved vs. avg) • Red = last race (declined vs. avg)
- Trend Line
- Angled line above the bars: rising = improving form • falling = declining form.
- Horizontal Line
- Field average — the mean career performance of all horses in this race.
- Color Circles
- Standard post-position colors below each lane — same as the Total Pace chart.
- Border
- Thicker border = this horse’s post position.
Figure Comparison
- Rating
- The three Pick Pony algorithm ratings (Algo 1, Algo 2, Algo 3) that make up the overall PP AI Rating — higher is a stronger contender rating.
- Speed
- Career average speed, recent 3-race average, and last-race speed figure — spot horses in improving or declining form.
- Pace
- Average Early (E1), Mid (E2), and Stretch (LP) pace figures — reveals pace-setters vs. closers vs. all-the-way types.
- This horse
- The horse whose stats card is open is highlighted with a darker column background.
Winning Profiles
- Axes
- X: Win % from last 10 starts — Y: In-the-money % (top-3 finishes) from last 10 starts.
- Quadrants
- Consistent Winners (top-right): high win & ITM — reliable performers.
Place Threats (top-left): boards often but doesn’t win often — good exacta/trifecta angles.
Streaky (bottom-right): wins occasionally, misses the board often — all-or-nothing.
Developing (bottom-left): still finding form — longshot territory. - Reference Lines
- Dashed lines mark field averages. Dots to the right win more; dots higher board more.
- This horse
- Highlighted with a gold border and larger dot.
AI Model Comparison
- Winner Models (green)
- Mod1(W), Mod2(W), and Mod3(W) trained to predict race winners. Higher score = stronger contender.
- Longshot Models (red)
- Mod1-LS, Mod2-LS, and Mod3-LS trained to find high-value longshots. Higher score = stronger longshot candidate.
- Form Model (blue)
- Mod4 sequence model trained on recent form patterns. Higher score = stronger recent form profile.
- This horse
- Highlighted with a darker column background.
Race Pace Simulation Guide
- Slider
- Drag left→right to advance from gate to finish. Drag all the way back to reset the race.
- Predicted Finish Order
- Factors in contested pace burn, each horse’s effort curve (peaked-early vs. peaked-late), and wide trip cost from outside posts. Updated live when Track Bias changes.
- Pace Scenario
- Lone Speed: single E horse likely rates and holds. Contested: two E horses burn each other — closers benefit. Hot Pace: speed meltdown, deep closers thrive. Soft: no early speed, moderate fractions throughout.
- Track Bias
- Slider below canvas. −2 = strong closer/wet bias; +2 = strong speed/rail bias. Recomputes the predicted finish order.
- Boxed Indicator
- Dashed orange ring = horse is surrounded (rival ahead, rival behind, wall outside). In a real race this horse must find a clear path to run.
- Running Styles
- E/EE = early speed (rushes to rail). P = presser (stalks the pace). S = stalker. SS = slow starter / closer.
| Stat | vs. Current Card | vs. All Horses |
|---|---|---|
| Averages
Career-average metrics across all AI race analysis. Performance and pace averages reflect estimated historical performance; trainer and jockey grades score in-the-money percentages. Grading scale: A = elite • B = above average • C = average • D = below average • F = poor • — = no data |
||
| Pick Pony AI Rating | D | D |
| Pace Trip Longshot | — | — |
| Connections Longshot | — | — |
| Situational Longshot | — | — |
| Speed | D | B |
| Early Pace | D | D |
| Mid Pace | D | C |
| Late Pace | C | B |
| Finish Pos | C | C |
| Dirt Speed | C | A |
| Turf Speed | F | D |
| Distance Speed | B | A |
| Trainer Effectiveness | D | C |
| Jockey Effectiveness | B | A |
| 3rd Party Ratings | F | B |
| Recent
Performance analysis from the horse's recent races, weighted to reflect current form. Sprint and Route FPS (Foot Per Second) measure pace efficiency over the horse's recent sprints and routes respectively. Grading scale: A = elite • B = above average • C = average • D = below average • F = poor • — = no data |
||
| Speed | B | A |
| Early Pace | D | C |
| Mid Pace | C | B |
| Late Pace | C | B |
| Sprint FPS | A | B |
| Route FPS | A | A |
| Trainer Effectiveness | D | C |
| Jockey Effectiveness | B | A |
| 3rd Party Ratings | F | B |
| Predictions
AI-generated projections for the upcoming race, derived from prior AI analysis for speed and pace trends, surface and distance suitability, and current conditions. Grading scale: A = elite • B = above average • C = average • D = below average • F = poor • — = no data |
||
| Speed | D | B |
| Early Pace | D | D |
| Mid Pace | D | C |
| Late Pace | C | C |
TL;DR
Toggle
Get more in-depth analysis, expert picks, handicapper reports, AI picks, handicapping tools, in-article data tooltips, NO ADVERTISEMENTS, and other membership perks with a Pick Pony subscription!
Pick Pony takes pride in providing the most accurate expert picks available today. Pick Pony Expert Picks are carefully selected by our team of analysts based on analytics from our advanced Past Performance Sheets and Racing Forms. For potential longshot selections, check out Pick Pony's AI Picks.
Race 1 – Maiden Claiming – 8F Dirt – Purse approximate WIN + BOXED TRIFECTA
Win: Natural Hunk (4) – 40% confidence🥇
Place: Good Cop (3) – 30% confidence🥉
Show: Noguchi (2) – 20% confidence🥈
Alternative: Powered By Coal (5) – 10% confidence
Race notes: Analysts repeatedly lean to Natural Hunk (4) as a breakthrough candidate while Good Cop (3) and Noguchi (2) form a clear second tier, suggesting a fairly defined top four with modest upset risk. The clustering around these four implies tighter win probabilities than the morning line spreads, but still leaves room for Daytona Moonshine (6) and Down The Line (1) to trip into lower exotics if pace collapses.
other runners include: Down The Line (1), Daytona Moonshine (6), Moneybags Milton (7)
Race 2 – Maiden Optional Claiming – 8F Dirt – Purse approximate WIN
Win: Celestial Body (5) – 45% confidence🥇
Place: Maizey Blue (2) – 25% confidence🥉
Show: Good Graces (4) – 20% confidence
Alternative: Truda (6) – 10% confidence
Race notes: Celestial Body (5) is the preferred win choice, but a strong subset of analysts are willing to oppose with Maizey Blue (2), creating a mild two-horse split at the top. Good Graces (4) and Truda (6) project as key underneath anchors, keeping It's Carol's Way (3) in more of an exotics-spice rather than core contender role.
other runners include: It's Carol's Way (3), Lucky Lucky Me (1)
Race 3 – Claiming – 8F Dirt – Purse approximate BOXED TRIFECTA
Win: Coquito (1) – 45% confidence🥈
Place: Kyle's Mom (2) – 25% confidence🥇
Show: Yankee Doodle (5) – 20% confidence🥉
Alternative: Floge (6) – 10% confidence
Race notes: Coquito (1) enjoys firm consensus as the most likely winner, but Kyle's Mom (2) and Yankee Doodle (5) hold enough support to keep the race from being a pure single for aggressive bettors. Floge (6) shows up consistently in underneath spots, hinting at a reliable late presence, while Luna Moth (3) and Whistler's Style (4) mostly require a pace or trip surprise to upset.
other runners include: Luna Moth (3), Whistler's Style (4)
Race 4 – Maiden Special Weight – 1320Y Dirt – Purse approximate
Win: Juliet On Approach (6) – 40% confidence🥉
Place: Garden Of Grace (3) – 30% confidence🥈
Show: Kaz Farm Girl (7) – 20% confidence
Alternative: Our Preferred Pal (2) – 10% confidence
Race notes: Juliet On Approach (6) and Garden Of Grace (3) form a strong perceived class edge, with Kaz Farm Girl (7) acting as the main alternative closer to their level. Our Preferred Pal (2) draws regular support for minor awards, while Sassetti (1), Patience N Grace (4), and Miss Jane Hathaway (5) profile more as price stabs to include in deeper vertical structures.
other runners include: Sassetti (1), Our Preferred Pal (2), Patience N Grace (4), Miss Jane Hathaway (5)
Race 5 – Claiming – 8F Dirt – Purse approximate WIN + EXACTA
Win: Rogue Justice (5) – 40% confidence🥇
Place: Spirit Of Esther (2) – 30% confidence🥈
Show: Rose Lisa (3) – 15% confidence
Alternative: Cha Cha Wren (6) – 15% confidence
Race notes: Rogue Justice (5) and Spirit Of Esther (2) attract the bulk of analyst support and often appear together in horizontal tickets, implying a relatively narrow win pool. Rose Lisa (3) and Cha Cha Wren (6) show legitimate underneath appeal, while Mia Nipotina (1), Cara's Chianti (4), and That'sthefactjack (7) mostly project as price-dependent exotics fillers rather than key opinions.
other runners include: Mia Nipotina (1), Cara's Chianti (4), That'sthefactjack (7)
Race 6 – Starter Allowance – 1320Y Dirt – Purse approximate
Win: Apollo Code (6) – 35% confidence🥈
Place: New York Scrappy (1) – 25% confidence
Show: Mo For The King (7) – 25% confidence🥇
Alternative: Fric And Frac (2) – 15% confidence
Race notes: Opinion is notably fragmented here, with Apollo Code (6), New York Scrappy (1), and Mo For The King (7) all getting serious win and exacta consideration. Fric And Frac (2) and Capt Jax Parrow (8) frequently show up as price threats, making this one of the more volatile races on the card for vertical structures.
other runners include: Camm' Duke (3), Joe West (4), Pandemic Hero (5), Capt Jax Parrow (8)
Race 7 – Claiming – 8F Dirt – Purse approximate BOXED TRIFECTA
Win: Stolen Base (3) – 30% confidence
Place: Lotsa Trouble (6) – 25% confidence🥉
Show: Secured Landing (5) – 20% confidence🥈
Alternative: Sharp Spark (8) – 25% confidence🥇
Race notes: Analysts approach this race with clear divergence, as Stolen Base (3), Lotsa Trouble (6), Secured Landing (5), Sharp Spark (8), Suerte (9), and Sagamore Mischief (4) all garner meaningful support in various slots. That breadth of opinion points toward a chaotic late sequence anchor, with value likely arising from leaning into one or two preferred narratives rather than spreading equally.
other runners include: Laughing Boy (1), Hours In A Day (2), Sagamore Mischief (4), Last Man Standing (7), Suerte (9), Quiet Wisdom (10)
Recommended Exotic Plays by Race
Race 1 – Exotic Plays
Analysts tend to frame Race 1 around a top quartet of Natural Hunk (4), Good Cop (3), Noguchi (2), and Powered By Coal (5), which suggests keying Natural Hunk (4) on top of that group in exactas and trifectas. A common structure is an exacta with Natural Hunk (4) over Good Cop (3), Noguchi (2), and Powered By Coal (5), and a trifecta pressing Natural Hunk (4) over Good Cop (3) and Noguchi (2) over that same trio plus Powered By Coal (5). Including Down The Line (1) and Daytona Moonshine (6) only in the third slot can create inexpensive superfecta coverage that still leans into the consensus core.
Race 2 – Exotic Plays
With Celestial Body (5) a strong but not unanimous choice and Maizey Blue (2) drawing serious support, analysts often recommend two-prong exacta and trifecta approaches. One approach uses Celestial Body (5) over Maizey Blue (2), Good Graces (4), and Truda (6), while the complementary ticket reverses Maizey Blue (2) over Celestial Body (5) and Good Graces (4) for a hedge against an upset. Including It's Carol's Way (3) only in the second and third spots captures her “underneath only” profile while controlling cost.
Race 3 – Exotic Plays
Race 3 profiles as a logical race to lean into a Coquito (1) and Kyle's Mom (2) axis, with Yankee Doodle (5) and Floge (6) as primary supporting actors. Analysts frequently suggest exactas with Coquito (1) over Kyle's Mom (2), Yankee Doodle (5), and Floge (6), along with saver tickets reversing Kyle's Mom (2) on top. Trifectas that anchor Coquito (1) and Kyle's Mom (2) in the first two positions, with Yankee Doodle (5), Floge (6), Whistler's Style (4), and Luna Moth (3) in the show slot, provide a realistic way to leverage their perceived class edge.
Race 4 – Exotic Plays
In Race 4, Juliet On Approach (6) and Garden Of Grace (3) appear as the most reliable win candidates, with Kaz Farm Girl (7) and Our Preferred Pal (2) occupying strong underneath roles. Analysts often favor an exacta box of Juliet On Approach (6) and Garden Of Grace (3), supplemented by trifectas using those two in the top two positions and Kaz Farm Girl (7), Our Preferred Pal (2), and Sassetti (1) underneath. A modest superfecta that keys Juliet On Approach (6) on top while spreading with Garden Of Grace (3), Kaz Farm Girl (7), Our Preferred Pal (2), and Sassetti (1) in the lower slots can capitalize on the perceived separation from the rest of the field.
Race 5 – Exotic Plays
Race 5 is treated as a focal vertical opportunity built around Rogue Justice (5) and Spirit Of Esther (2), with Rose Lisa (3) and Cha Cha Wren (6) the main supporting pieces. Analysts tend to play exactas Rogue Justice (5) over Spirit Of Esther (2), Rose Lisa (3), and Cha Cha Wren (6), with backup tickets that flip Spirit Of Esther (2) to the win slot. Trifectas that key Rogue Justice (5) and Spirit Of Esther (2) up top, while using Rose Lisa (3), Cha Cha Wren (6), Mia Nipotina (1), and That'sthefactjack (7) underneath, align well with the consensus shape of the race.
Race 6 – Exotic Plays
Given the divided opinions in Race 6, many analysts shape exotics around a spreading strategy instead of a narrow key. A common construct is a trifecta using Apollo Code (6), New York Scrappy (1), Mo For The King (7), and Fric And Frac (2) in the win and place slots, with Capt Jax Parrow (8) added especially in the show position for price impact. For bettors targeting superfectas, anchoring Apollo Code (6) or New York Scrappy (1) in one of the top two spots while using all of Mo For The King (7), Fric And Frac (2), Capt Jax Parrow (8), and even Camm' Duke (3) underneath is a reasonable attempt to monetize the race's volatility.
Race 7 – Exotic Plays
Race 7 is widely viewed as one of the most chaotic events on the card, so analysts tend to prefer wide but structured coverage rather than heavy singles. Exacta and trifecta players often include Stolen Base (3), Lotsa Trouble (6), Secured Landing (5), Sharp Spark (8), Sagamore Mischief (4), and Suerte (9) in various combinations, with a modest tilt toward Stolen Base (3) and Lotsa Trouble (6) in the win slot. Superfecta plays that spread even further to include Hours In A Day (2), Last Man Standing (7), Laughing Boy (1), and Quiet Wisdom (10) can produce outsized returns if a couple of these prices join the logical contenders in the frame.
Value Play Observations
Analysts consider Natural Hunk (4) somewhat underappreciated relative to his frequency as a top-three selection in Race 1, suggesting that any price drift above his morning line may create a playable overlay. In Race 2, Maizey Blue (2) appears to be a classic value candidate, as multiple analysts prefer or tie her to Celestial Body (5) despite a likely shorter price on the latter. Coquito (1) in Race 3 is broadly respected and may end up slightly underlaid, while Kyle's Mom (2) and especially Floge (6) could offer better value if the public over-concentrates on the favorite.
In Race 4, Kaz Farm Girl (7) projects as a price with meaningful upside because she is a primary pick for some analysts but will probably sit behind Juliet On Approach (6) and Garden Of Grace (3) in the wagering. Race 5's Spirit Of Esther (2) is repeatedly promoted as a serious threat to Rogue Justice (5), so any gap between their prices wider than the analysts' implied probabilities would grade Spirit Of Esther (2) as an overlay. The wide opinion in Race 6 means that horses like Fric And Frac (2) and Capt Jax Parrow (8) can become particularly attractive if they drift above their morning lines, as their pick frequency suggests more win chance than casual bettors might assign.
Race 7 offers the richest menu of potential overlays, with Sharp Spark (8), Lotsa Trouble (6), and Suerte (9) all receiving robust analyst backing relative to their likely odds. Stolen Base (3) and Secured Landing (5) may be correctly priced or even slightly underlaid due to their obvious form, so leaning into the less obvious but well-supported alternatives may yield the best value-adjusted returns in vertical and horizontal wagers.
Overall Wagering Strategy
Across the Aqueduct card, the strongest consensus races cluster in the middle, particularly Races 3, 4, and 5, where analysts repeatedly circle around a compact group of logical contenders. In Race 3, Coquito (1) and Kyle's Mom (2) combine to account for a large share of top-three opinions, and Race 4 sees similar concentration on Juliet On Approach (6) and Garden Of Grace (3), while Race 5 is dominated by Rogue Justice (5) and Spirit Of Esther (2). These races lend themselves to a more aggressive stance in horizontal bets, allowing bettors to trim combinations and press their opinions where the analyst community broadly agrees.
By contrast, Race 6 and Race 7 are clear examples of split-opinion contests, where multiple horses attract serious backing and no single runner emerges as a dominant choice. Race 6 features Apollo Code (6), New York Scrappy (1), Mo For The King (7), Fric And Frac (2), and Capt Jax Parrow (8) all appearing in meaningful positions, while Race 7 shows similar spread with Stolen Base (3), Lotsa Trouble (6), Secured Landing (5), Sharp Spark (8), Sagamore Mischief (4), and Suerte (9) all in the mix. These races argue for either deliberate spreading in horizontals or, alternatively, a contrarian approach that leans heavily into one or two prices in an attempt to separate from the crowd.
Multi-race sequences are most efficiently anchored by treating Race 2 through Race 5 as the core of early and middle-card strategies. Race 2 offers a two-deep approach with Celestial Body (5) and Maizey Blue (2), Race 3 and Race 4 can be built around two to three horses each, and Race 5 again narrows nicely to Rogue Justice (5) and Spirit Of Esther (2). Integrating the more chaotic Race 6 and Race 7 at the back end of a Pick 4 or Pick 5 allows bettors to accept some necessary spread while still keeping overall ticket cost in check by leaning heavily on the consensus legs earlier. The pre- and post-time weather information suggests a cool 43°F dirt card without pronounced bias indicated by analyst commentary, so bettors should initially assume a fair surface and adjust only if real-time track patterns emerge.
From a structural standpoint, exotic value opportunities lie in races where analysts agree on a small group of logical runners but still acknowledge potential prices underneath. Race 1 and Race 5 are particularly well-suited to trifecta and superfecta constructions that key one or two logical horses on top while spreading modestly in the third and fourth slots, as the consensus still leaves room for a few outsiders to sneak into minor awards. Race 7, however, is better approached with broader wheels that use several horses in all positions, given the deep spread of expert opinion and the high likelihood of at least one double-digit runner outperforming the public's expectations. Overall, bettors should prioritize pressing opinions in the consensus-heavy middle of the card, remain flexible and price-sensitive in the contentious late races, and be willing to let the tote board guide final decisions where analyst probabilities and market odds visibly diverge.

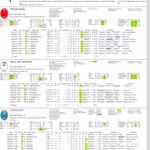
✓ Positives:(1) Hot trainer - high ITM rate (34%). (2) Hot jockey — high ITM rate (31%). (3) Early pace significantly above field median (E1: 77 vs field 70). (4) Carries 7 lbs less than field median (119 lbs vs median 126 lbs). (5) Had documented trouble last race (codes: ['B', 'F', 'T']) yet still finished 4th — a clean trip today sets up a form reversal. (6) Pick Pony Daily Edge Radar pick — value score 3/10 — angles: Troubled Trip Comeback, Weight Advantage.